Quick Start Guide

# Preface
This document is the quick start guide for Apusic In-Memory Data Cache (AMDC) V2.0.4 product, providing product introduction and basic steps for installation, deployment, and verification.
# Target Audience
This document is intended for AMDC product operations engineers, IT system operations engineers, development engineers, software architects, and R&D managers.
# Related Documentation
For more information about AMDC V2.0.4, please refer to the following AMDC V2.0.4 product manual documentation set:
| No. | Document | Description |
|---|---|---|
| 1 | Apusic In-Memory Data Cache V2.0.4 Quick Start Guide | A brief introduction on how to quickly get started with AMDC. |
| 2 | Apusic In-Memory Data Cache V2.0.4 Installation Guide | Detailed introduction on how to install AMDC on various operating systems, AMDC service start/stop operations, and product registration process. |
| 3 | Apusic In-Memory Data Cache V2.0.4 Core User Manual | Detailed introduction on how to use, configure, and manage AMDC features and supporting tools. |
| 4 | Apusic In-Memory Data Cache V2.0.4 Console User Manual | Detailed instructions on using and operating AMDC console features. |
| 5 | Apusic In-Memory Data Cache V2.0.4 Development Guide | Detailed instructions for developing AMDC client applications using various programming languages. |
| 6 | Apusic In-Memory Data Cache V2.0.4 Migration Guide | Detailed instructions for migrating AMDC from historical versions to V2.0.4, as well as migrating from Redis to AMDC. |
| 7 | Apusic In-Memory Data Cache V2.0.4 Operations Guide | Detailed instructions for AMDC monitoring, operations, security hardening, and other operational procedures. |
| 8 | Apusic In-Memory Data Cache V2.0.4 Performance Tuning Guide | Detailed instructions for AMDC performance tuning. |
# Technical Support
AMDC products provide comprehensive technical support services. You can obtain technical support through the following channels:
Website: www.apusic.com
Phone: 400-855-5800
Email: support@apusic.com
Kingdee Cloud Community: https://vip.kingdee.com/?productId=73&productLineId=14&lang=zh-CN
When requesting technical support, please provide the following information:
Your name
Company information and contact details
Operating system and version
Product version number
Detailed information including logs, screenshots, etc. of any exceptions or errors
# Cache Core Quick Start
This quick start guide will help you in a few minutes:
- Successfully deploy and start AMDC service;
- Connect to AMDC instance using default configuration;
- Execute basic read/write operations to verify functionality;
- Connect to AMDC service using Java client.
After completing this guide, you will have a running AMDC instance and be able to perform basic interactions via command line or client.
# Prerequisites
Please ensure your system meets the following requirements:
- Operating System: Linux (WSL recommended)
- CPU Architecture: x86_64, ARM64
- Java 17+ (if AMDC client is written in Java) or corresponding runtime environment (adjust according to actual tech stack)
- Network port 6359 (AMDC default port) is not occupied
# Quick Start Steps
# Get AMDC Product Package
- x86_64 CPU architecture:
AMDC-V2.0.4-20260122-amd64.tar.gz - ARM64 CPU architecture:
AMDC-V2.0.4-20260122-arm64.tar.gz
Please select the corresponding product package according to the target server CPU architecture.
Note: The date [20260122] in the product package name may be different, please refer to the actual date.
# Upload to Target Server and Extract
Below uses product package: AMDC-V2.0.4-20260122-amd64.tar.gz as an example
- Upload
AMDC-V2.0.4-20260122-amd64.tar.gzto the target server's/optdirectory - Enter /opt directory:
cd /opt - Extract:
tar -zxvf AMDC-V2.0.4-20260122-amd64.tar.gz - Enter AMDC directory:
cd amdc
# Import License File
AMDC product requires a license file to start successfully. Please contact the corresponding AMDC sales personnel/service support personnel to obtain the latest test license file.
Below uses test license file package: 金蝶Apusic分布式缓存软件2.0.zip as an example
- Get license file package:
金蝶Apusic分布式缓存软件2.0.zip - Upload to the target server's amdc directory
/opt/amdc - Extract license file:
unzip 金蝶Apusic分布式缓存软件2.0.zip - Rename the license file starting with KBC to
license.lic:mv KBCLIC-251216-000155.lic license.lic
# Start AMDC Service
- Start AMDC service:
./amdc-server
root@root:/opt/amdc$ ./amdc-server
456668:C 06 Feb 2026 14:39:27.006 # Warning: no config file specified, using the ./amdc.yaml
456668:C 06 Feb 2026 14:39:27.007 # oO0OoO0OoO0Oo AMDC is starting oO0OoO0OoO0Oo
456668:C 06 Feb 2026 14:39:27.007 * AMDC KBC authorization code: 'SZTY-1486655719' for mac: 00-00-00-00-00-00 (Example MAC address)
456668:C 06 Feb 2026 14:39:27.008 # KBC auth: license used to test users
456668:C 06 Feb 2026 14:39:27.008 * The license path that the system is using: ./license.lic
456668:C 06 Feb 2026 14:39:27.008 * Increased maximum number of open files to 10032 (it was originally set to 1024).
456668:C 06 Feb 2026 14:39:27.008 # AMDC is using kbc_license now!
456668:C 06 Feb 2026 14:39:27.008 # AMDC version=2.0.4, bits=64, commit=61420466, modified=0, pid=456668, just started
456668:C 06 Feb 2026 14:39:27.008 # licensee=深圳市金蝶天燕云计算股份有限公司, duration=2025-12-16 00:00:00 to 2026-03-31 23:59:59, ip=0, maxclients=0, maxmemory=6G, CPUs=0
456668:C 06 Feb 2026 14:39:27.008 # Configuration loaded
456668:M 06 Feb 2026 14:39:27.008 * monotonic clock: POSIX clock_gettime
      ___                     _        Apusic In-Memory Data Cache
     /   |  ____  __  _______(_)____
    / /| | / __ \/ / / / ___/ / ___/   License start: 2025-12-16 00:00:00
   / ___ |/ /_/ / /_/ (__  ) / /__     License end: 2026-03-31 23:59:59
  /_/  |_/ .___/\__,_/____/_/\___/     IP granted: 255.255.255.255
        /_/                            Licensee: 深圳市金蝶天燕云计算股份有限公司

  Version: v2.0.4   Port: 6359   PID: 456668

456668:M 06 Feb 2026 14:39:27.009 # Server initialized
456668:M 06 Feb 2026 14:39:27.009 # WARNING Memory overcommit must be enabled! Without it, a background save or replication may fail under low memory condition. Being disabled, it can can also cause failures without low memory condition, see https://github.com/jemalloc/jemalloc/issues/1328. To fix this issue add 'vm.overcommit_memory = 1' to /etc/sysctl.conf and then reboot or run the command 'sysctl vm.overcommit_memory=1' for this to take effect.
456668:M 06 Feb 2026 14:39:27.010 * RDB age 364034 seconds
456668:M 06 Feb 2026 14:39:27.010 * RDB memory usage when created 0.78 Mb
456668:M 06 Feb 2026 14:39:27.010 # Done loading RDB, keys loaded: 1, keys expired: 0.
456668:M 06 Feb 2026 14:39:27.010 * DB loaded from disk: 0.000 seconds
456668:M 06 Feb 2026 14:39:27.010 * Ready to accept connections
2
3
4
5
6
7
8
9
10
11
12
13
14
15
16
17
18
19
20
21
22
23
24
25
26
27
28
As shown above, AMDC listening port is 6359, AMDC service started successfully.
# Use amdc-cli Tool for Data Read/Write
- Start amdc-cli tool:
./amdc-cliroot@root:/opt/amdc$# ./amdc-cli 127.0.0.1:6359> info # Enter info command to view AMDC service information # Server amdc_version:2.0.4 amdc_git_sha1:0bda9619 amdc_git_dirty:0 amdc_build_id:6eb02ac39dad1e0f amdc_build_date:2026-01-21 amdc_mode:standalone os:Linux 5.15.167.4-microsoft-standard-WSL2 x86_64 arch_bits:64 monotonic_clock:POSIX clock_gettime # The following content is omitted1
2
3
4
5
6
7
8
9
10
11
12
13
14 - Create a key:
set test "hello world"127.0.0.1:6359> set test "hello world" OK1
2 - Get key value:
get test127.0.0.1:6359> get test "hello world"1
2
# Use Java for Data Read/Write
- AMDC is compatible with Redis SDK: Jedis
- Add dependency
<dependency>
    <groupId>redis.clients</groupId>
    <artifactId>jedis</artifactId>
    <version>4.3.1</version>
</dependency>
1
2
3
4
5 - Establish connection and write data
package com.robin.test;

import redis.clients.jedis.Jedis;

public class JedisDemo1 {


    private Jedis jedis;

    // Test connection
    void SetUp(){
        // 1. Establish connection
        jedis = new Jedis("127.0.0.1",6359);
    }

    // Test String
    void testString(){

        String res = jedis.set("name", "apusic");
        System.out.println("res"+res);

        String name = jedis.get("name");
        System.out.println("name="+name);

    }

    // Release resources
    void tearDown(){

        if(jedis!=null){
            jedis.close();
        }
    }

    public static void main(String[] args) {

        JedisDemo1 demo1 = new JedisDemo1();
        demo1.SetUp();
        demo1.testString();
        demo1.tearDown();
    }
}
1
2
3
4
5
6
7
8
9
10
11
12
13
14
15
16
17
18
19
20
21
22
23
24
25
26
27
28
29
30
31
32
33
34
35
36
37
38
39
40
41
42 - Other programming languages can refer to Redis client SDK usage instructions
# Security Hardening (Strongly recommended to configure immediately after first startup)
AMDC defaults to no password and binds all interfaces, strictly prohibit direct exposure to public networks or untrusted networks.
Set Access Password
- Edit
amdc.yaml(editrequirepass):SECURITY: # user: "<user> <acl rules...>" user: "" # ACL log maximum entries acllog-max-len: 128 # External ACL user file path, cannot be mixed with in-config user configuration aclfile: "" # Default user password (equivalent to ACL default user password) requirepass: "PASSWORD" # Modify the password on this line1
2
3
4
5
6
7
8
9 - Restart AMDC service
- Test:
./amdc-cli -a PASSWORD
- Edit
Limit Listening Address
- Edit
amdc.yaml(editbind):NETWORK: # Network address to listen on, defaults to only listening on local loopback address, comment out this line to listen on all interfaces (exposing to public network has security risks) bind: - "127.0.0.1" # Modify the IP address on this line to the current machine IP - "-::1"1
2
3
4
5 - Restart AMDC service
- Test:
./amdc-cli -h IP
- Edit
#
# Web Console Quick Start
AMDC Console is a web-based management and monitoring tool that supports cache monitoring, automatic deployment, cluster/node management, scaling, ACL management, automatic alerts, real-time configuration, webshell, permission control, and more.
# Quick Deploy AMDC Instance
Goal: Through AMDC console, quickly create and deploy AMDC instances (standalone, master-slave, sentinel, and cluster modes)
Steps:
Login to Console->Create Tenant->Upload License->Upload Installation Package->Add Machine (Server)->Automatic Deployment->Deployment Task
# Login to Console
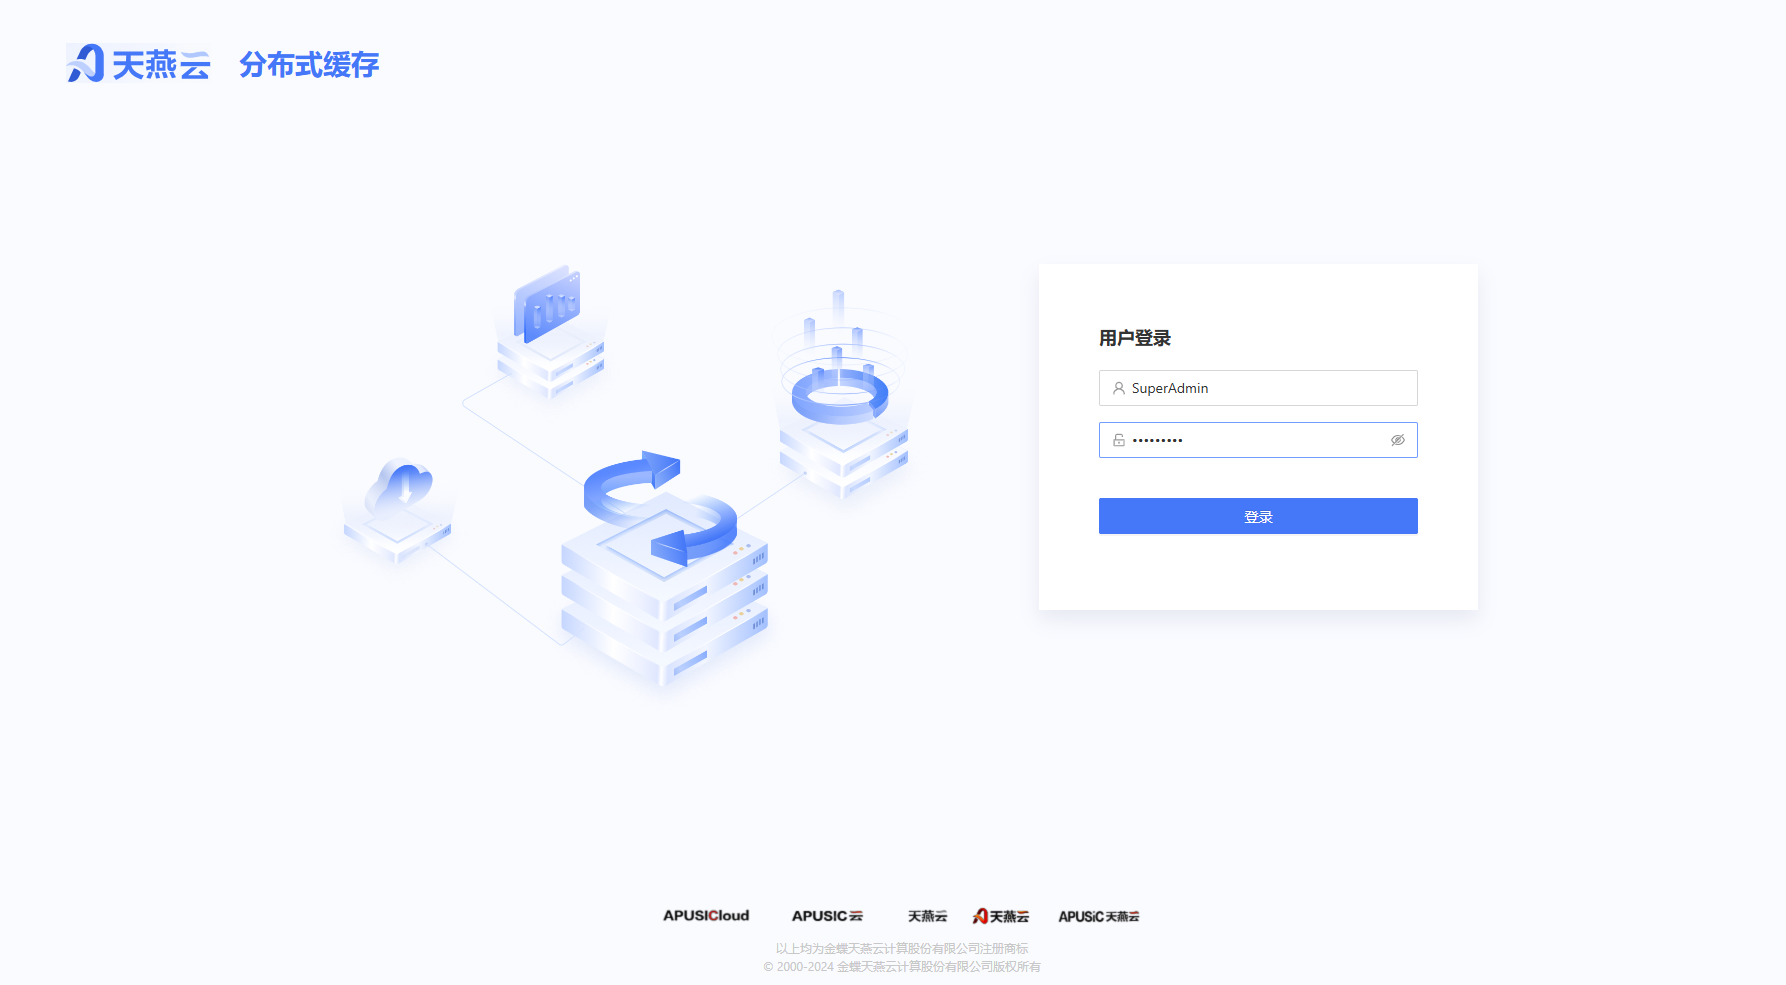
Login to console using super administrator account
- Account:
SuperAdmin - Password:
admin!123 - Login URL:
http://console-IP:9001
# Create Tenant
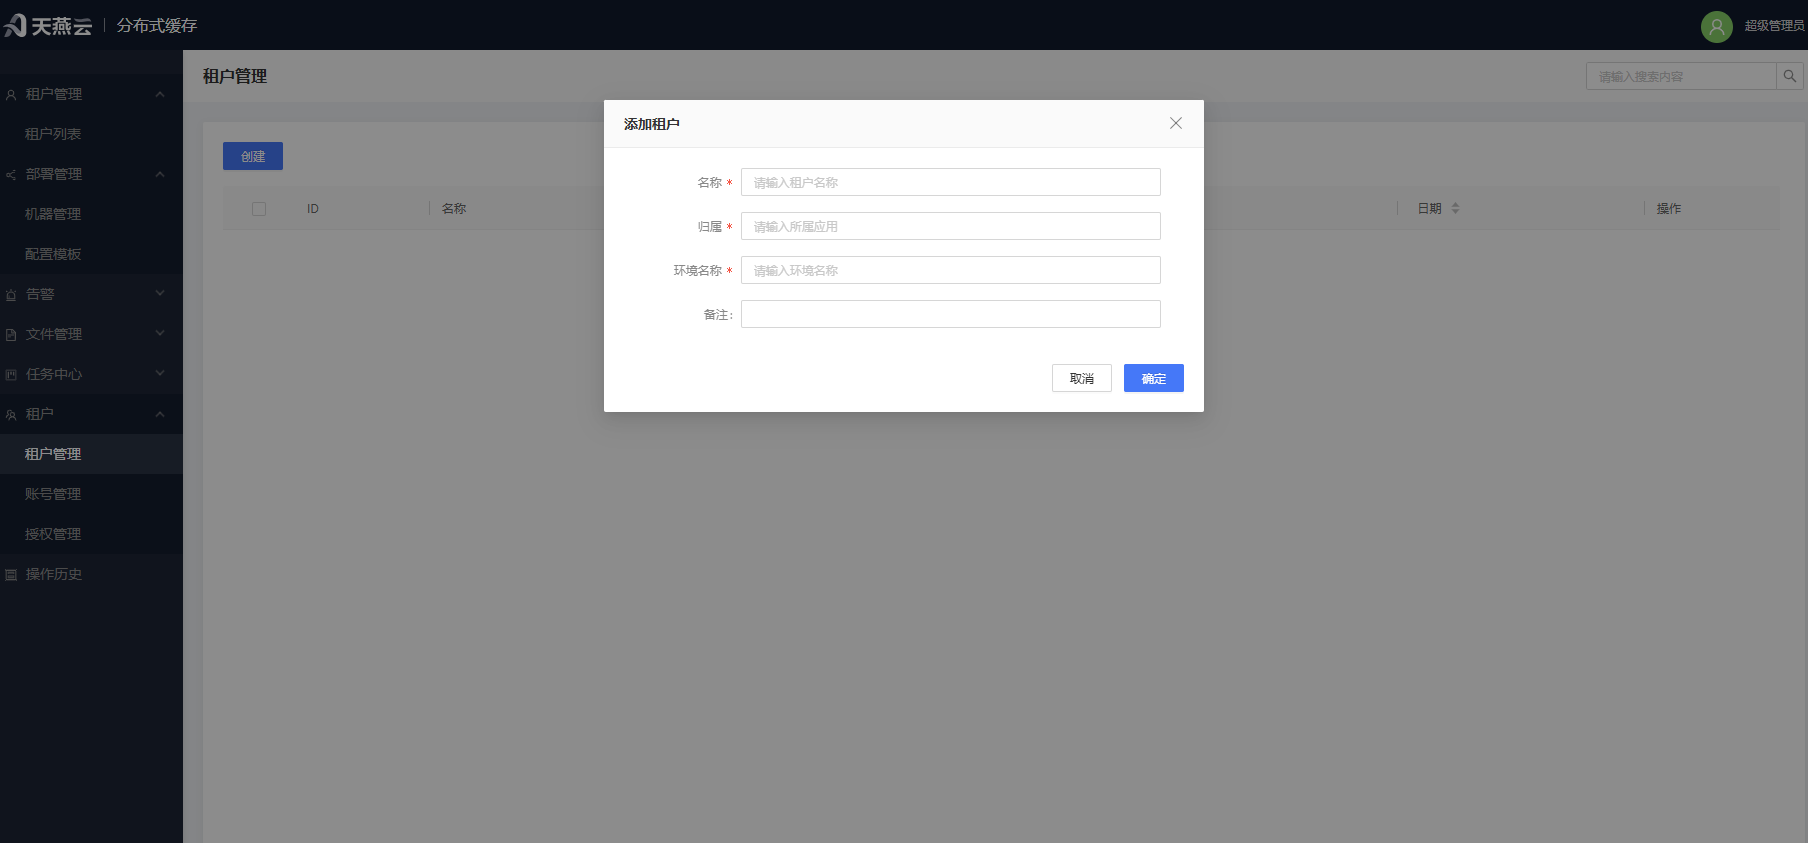
Create default tenant: Click create in the tenant management interface, and fill in the name, ownership, and environment name (content has no strict format requirements except for format).
# Upload License
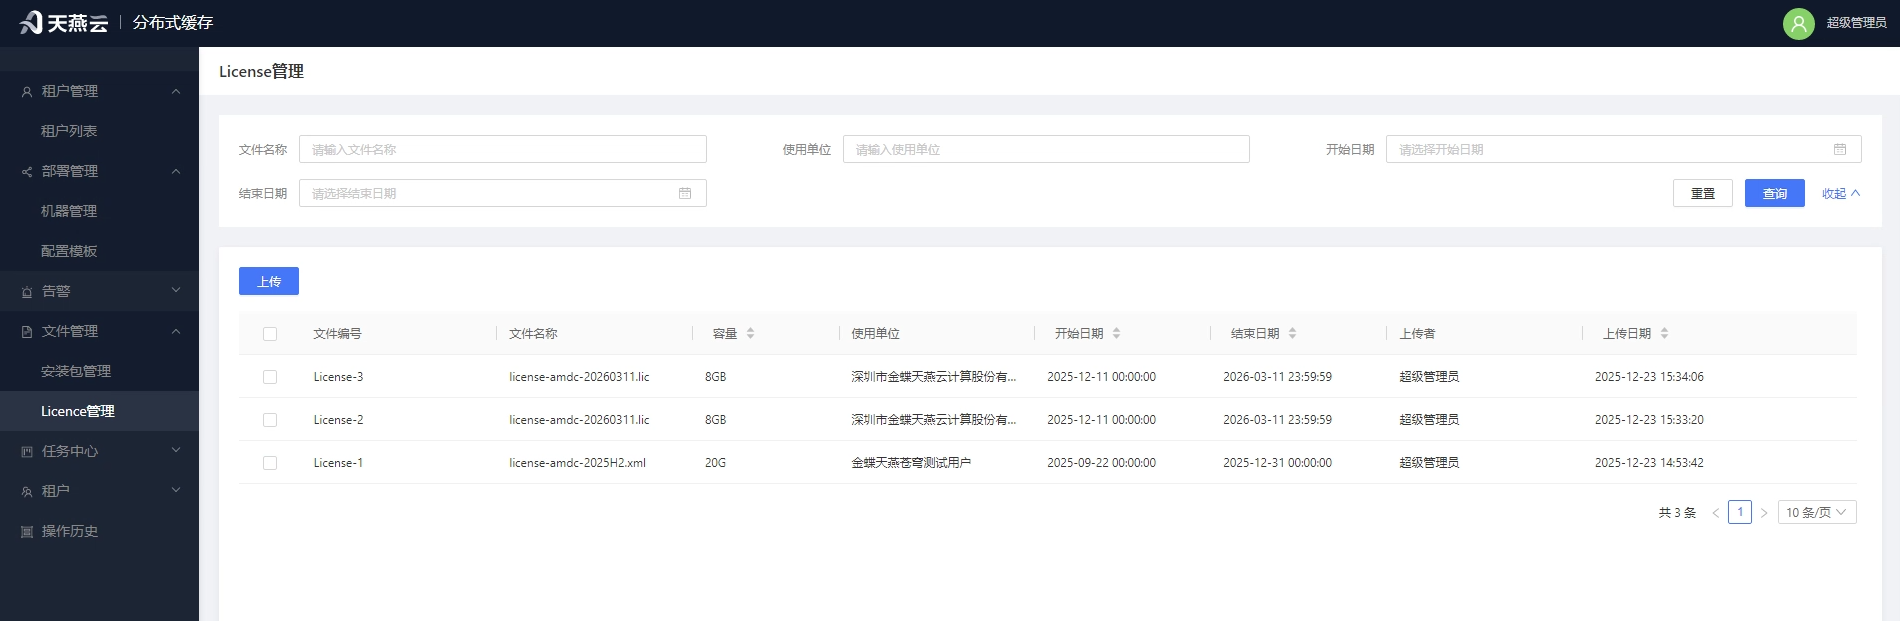
Upload AMDC instance license file. AMDC instance requires a valid license to run.
Manage licenses used for automatic deployment upload. After upload, licenses will be parsed, and invalid licenses cannot be saved in the console.
Upload License
Click the [Upload] button to open the upload license popup, click [Choose File] to select the certificate to upload.
Note: Only single license certificate upload is supported.
Delete License
Select the license to delete, click the [Delete] button in the upper left corner. Multiple licenses can be deleted simultaneously.
# Upload Installation Package
Upload AMDC instance installation package. AMDC console needs to use the uploaded package for installation and deployment.
Installation package management is used to upload packages for automatic deployment.
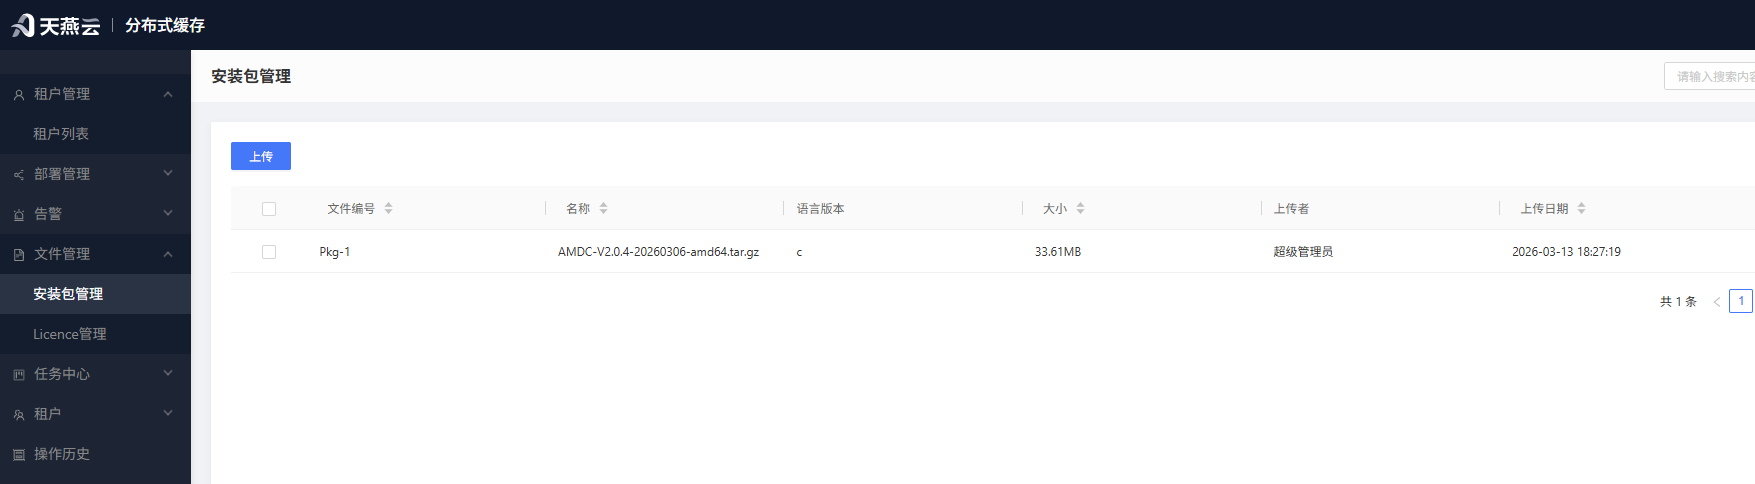
Upload Installation Package
Click the [Upload] button to open the upload installation package popup, click [Add] to select the package to upload, then click confirm.
Note: Only single installation package upload is supported.
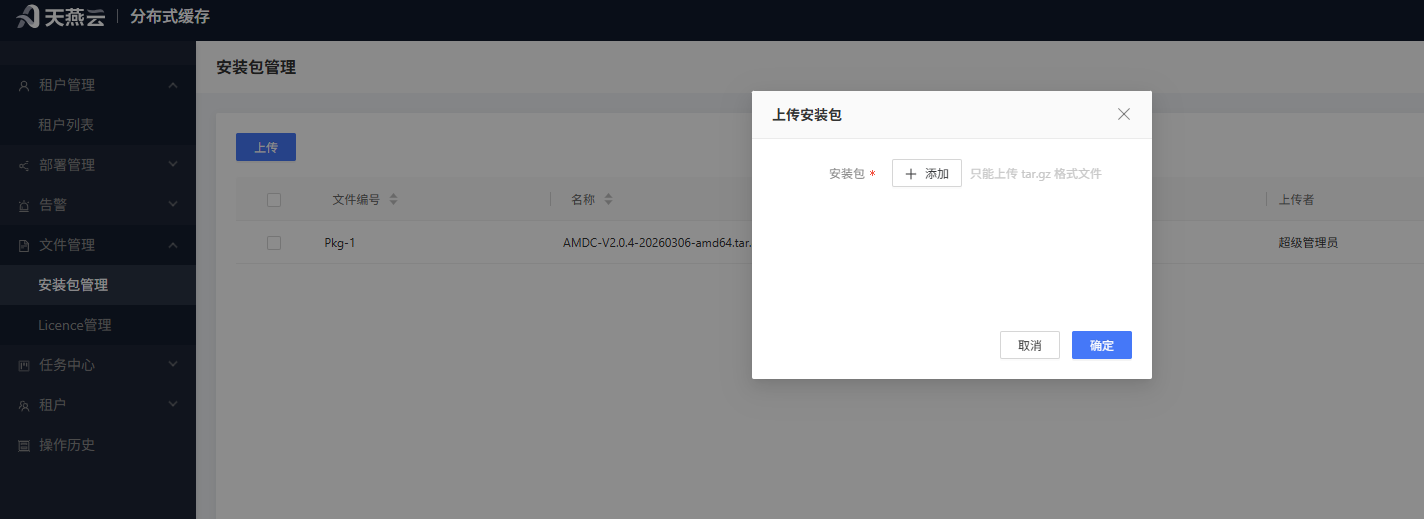
Delete Installation Package
Select the installation package to delete, click the [Delete] button in the upper left corner. Multiple packages can be deleted simultaneously.
# Machine Management
Enter [Deployment Management] > [Machine Management]. Machine information required for automatic deployment will be created here.
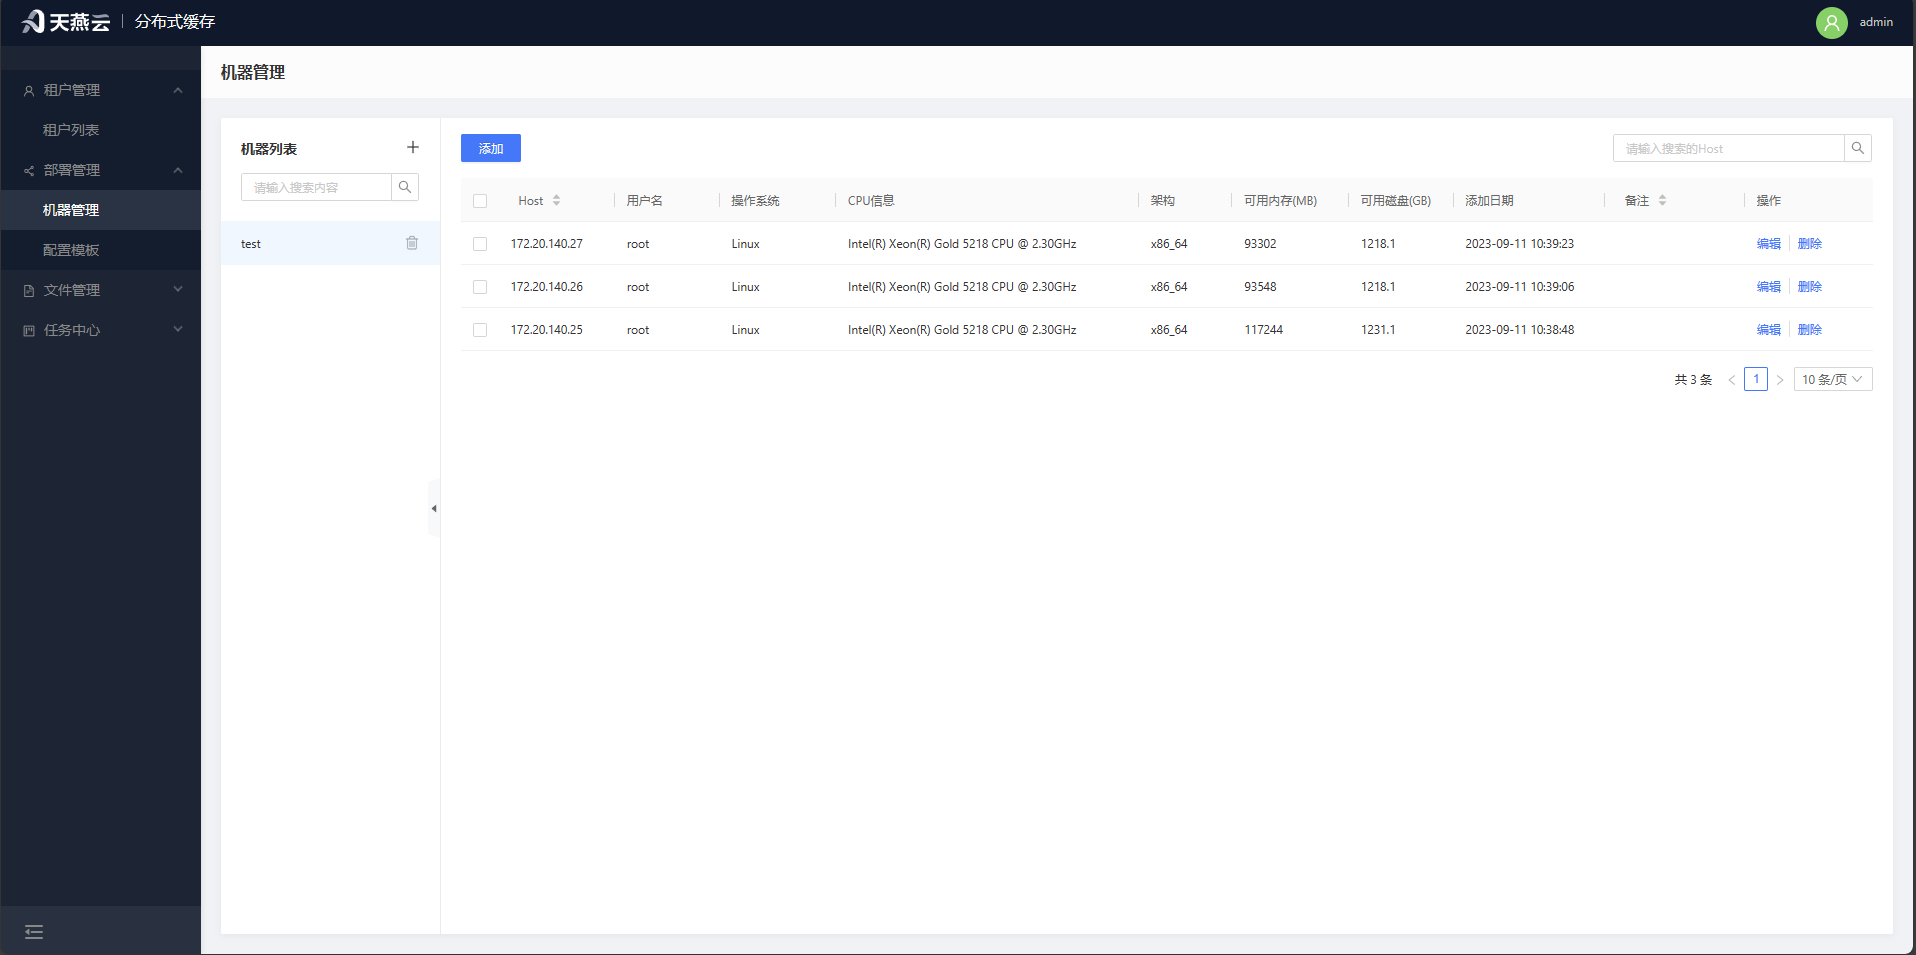
# Add Machine
Click [Deployment Management] > [Machine Management] on the homepage to enter the machine management page. A machine group must exist before adding machines. The same machine group can only add machines with the same chip architecture.
- Click the [+] button next to the machine group on the left to add a new machine group.

- Select the machine group, click the [Add] button in the upper left, and enter the corresponding information in the input box to add a machine.
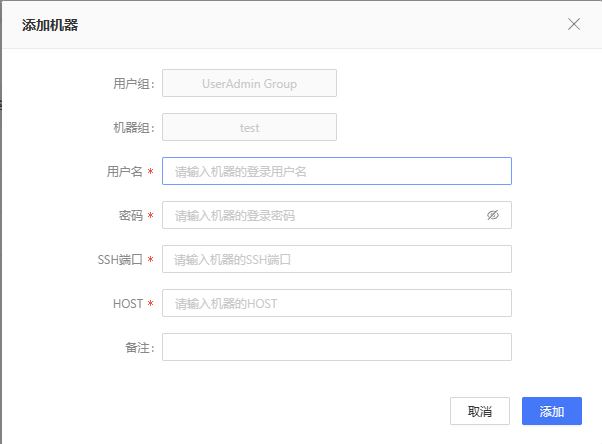
Note: Only machines with normal connection status can be added, so please confirm the target machine connection status
| Parameter | Description |
|---|---|
| Username | Username for logging into the remote machine, e.g.: root |
| Password | Password for logging into the remote machine |
| SSH Port | Port for logging into the remote machine, e.g.: 22 |
| Host | Address of the remote machine, e.g.: 192.168.0.213 |
| Remark | Can be empty |
# Automatic Deployment
Prerequisites:
- Tenant creation, machine addition, license upload, and installation package upload must be completed.
- Please ensure the target server connection is normal before console automatic deployment
- Target server has been added to the machine list (refer to Machine Management)
- Target server has tar and ss commands.
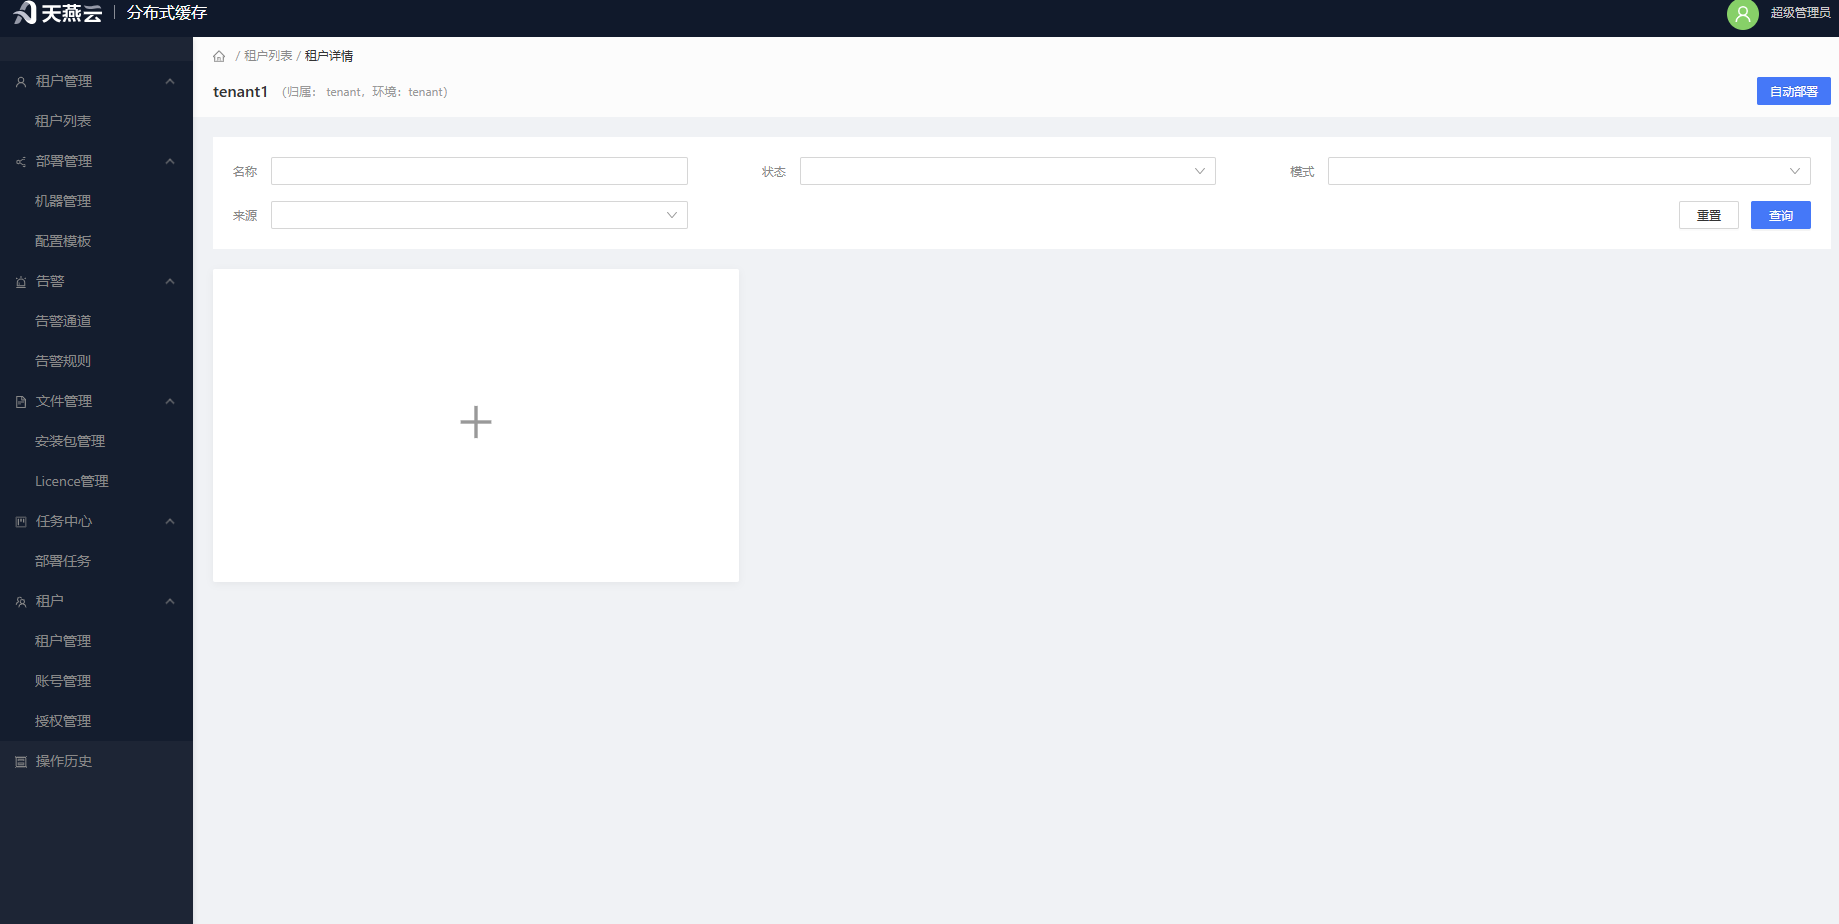 Enter [Tenant List] > [Tenant Management] > [Tenant Details], click [Automatic Deployment] to enter the [Automatic Deployment] form page.
# Fill in Deployment Information:
Service name entry -> Default license selection -> Installation package selection -> Installation directory entry -> Mode selection -> Auto-start on boot (select No if no restart needed) -> Configuration information selection
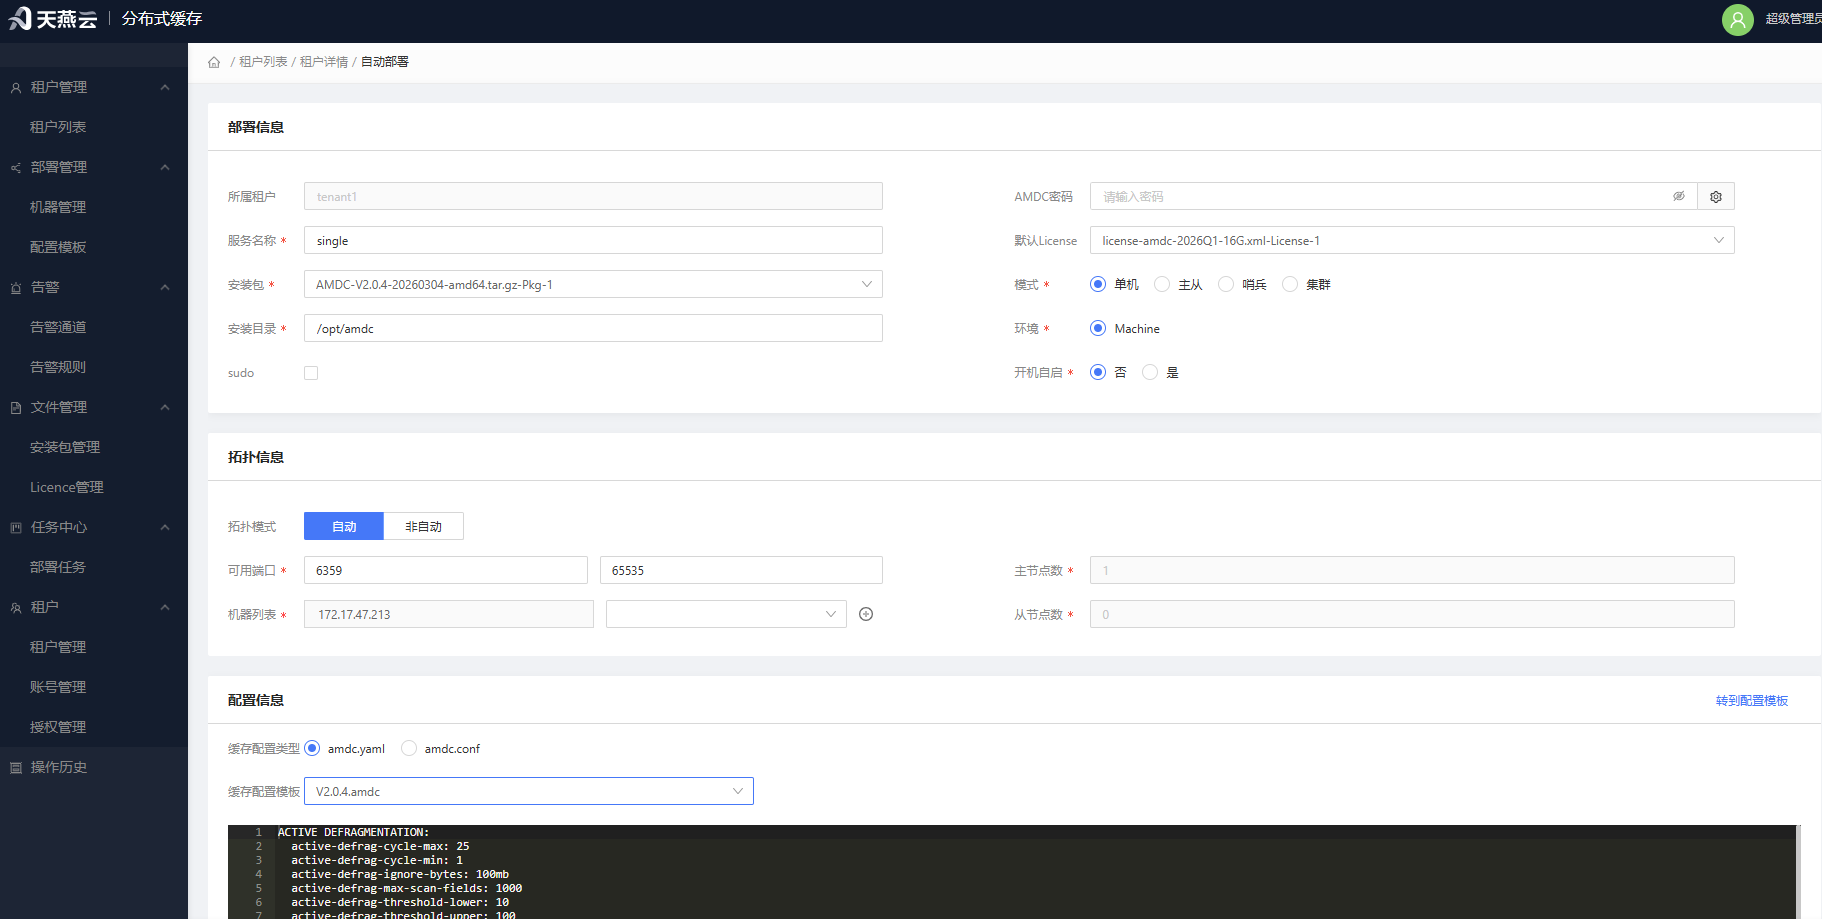 Topology Information: Standalone-Automatic: Only need to fill in machine and port.
Standalone-Non-automatic: Only need to fill in machine and port.
Topology Information: Standalone-Automatic: Only need to fill in machine and port.
Standalone-Non-automatic: Only need to fill in machine and port.
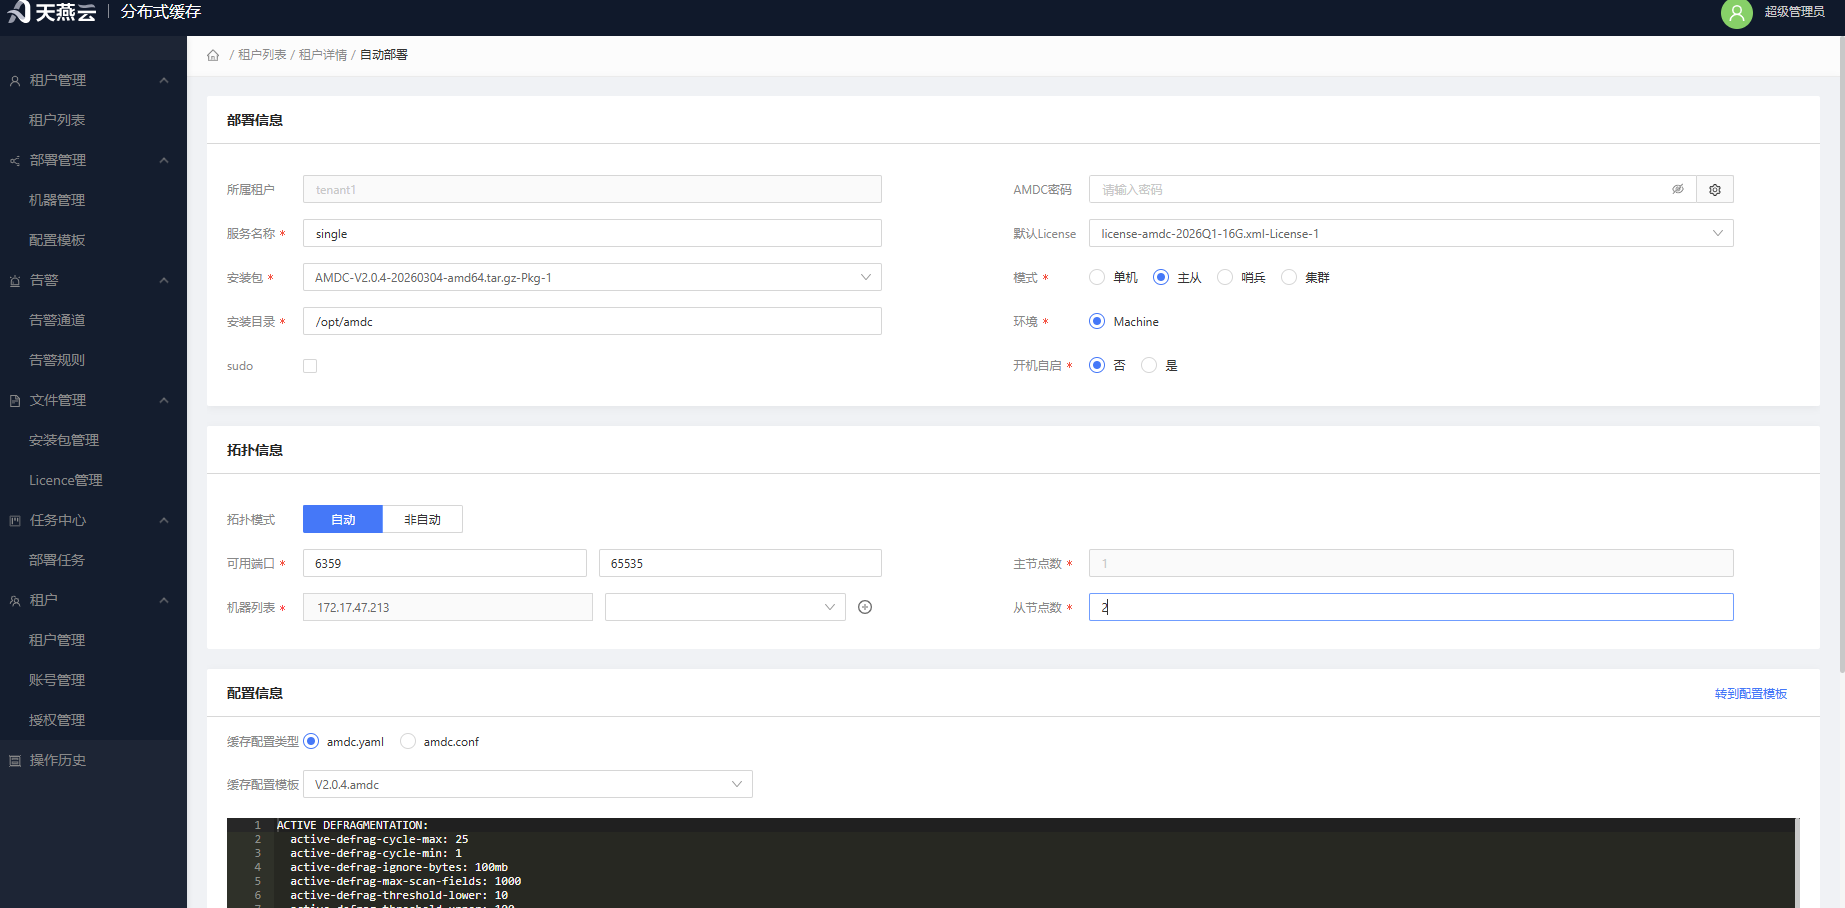 Master-Slave Mode-Automatic: Fill in slave node count, complete machine and port entry.
Master-Slave Mode-Non-automatic: Complete master-slave node configuration entry as prompted.
Master-Slave Mode-Automatic: Fill in slave node count, complete machine and port entry.
Master-Slave Mode-Non-automatic: Complete master-slave node configuration entry as prompted.
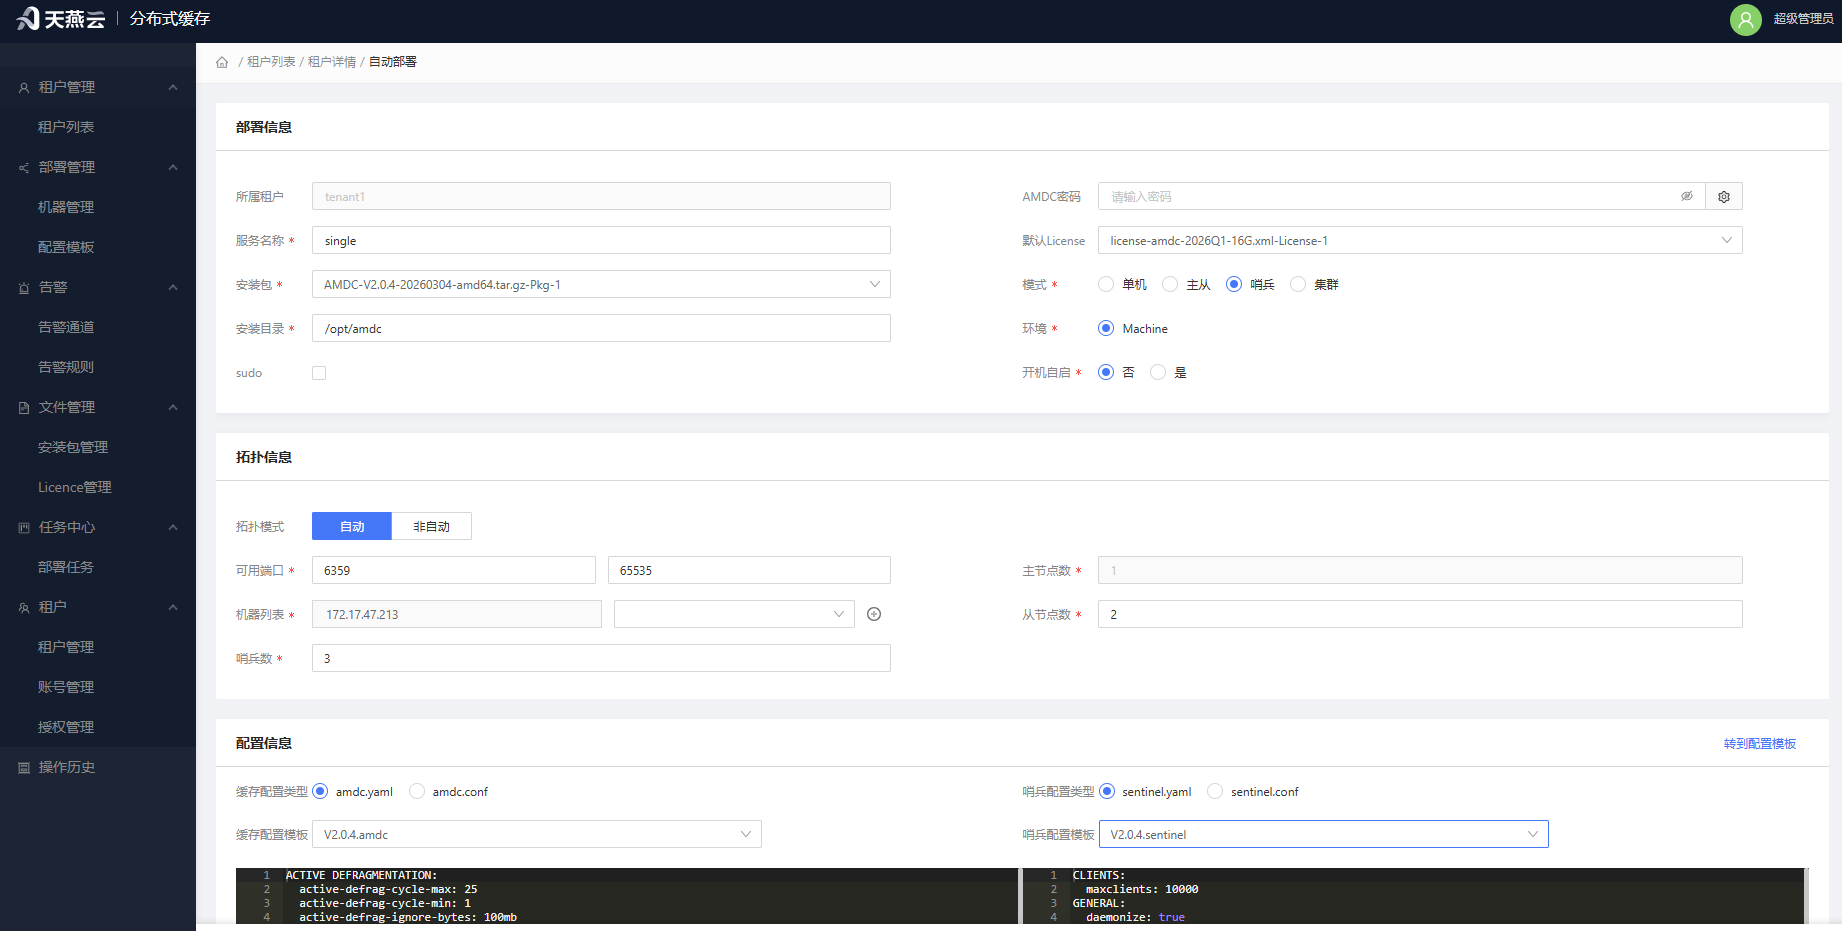 Sentinel Mode-Automatic: Fill in slave node count, sentinel count, complete machine and port entry.
Sentinel Mode-Non-automatic: Complete master-slave node and sentinel configuration entry as prompted.
Sentinel Mode-Automatic: Fill in slave node count, sentinel count, complete machine and port entry.
Sentinel Mode-Non-automatic: Complete master-slave node and sentinel configuration entry as prompted.
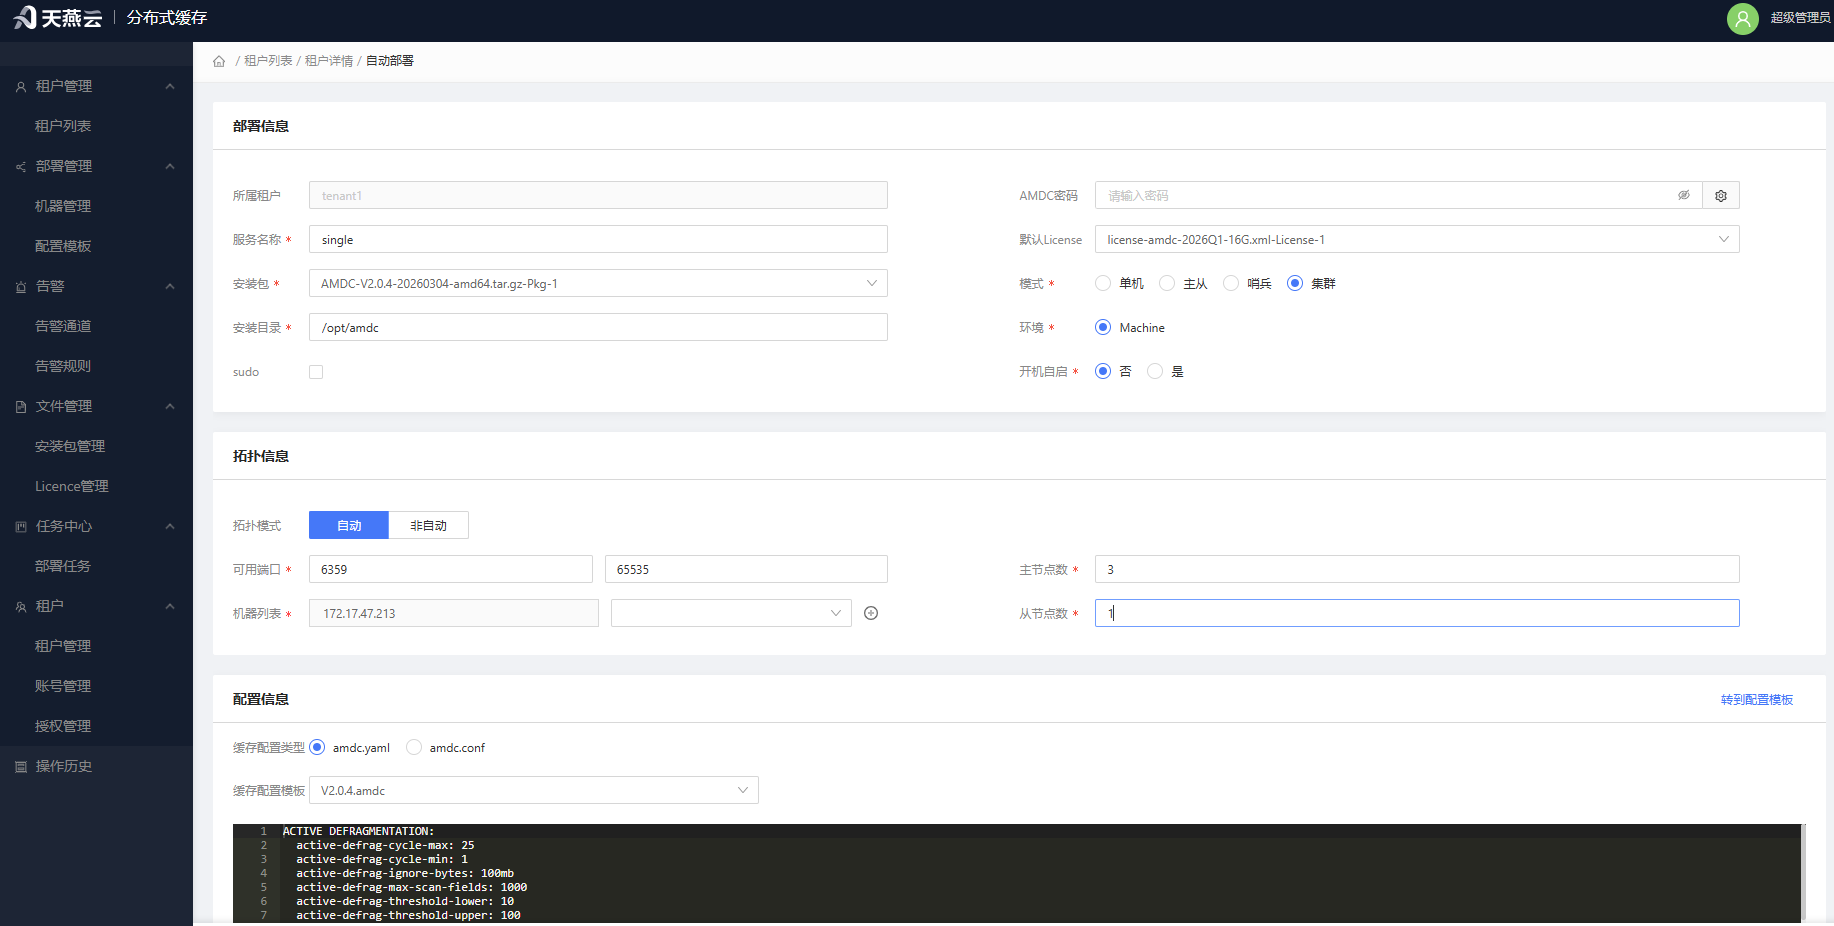 Cluster Mode-Automatic: Fill in master node count and slave nodes per master, complete machine and port entry.
Cluster Mode-Non-automatic: Complete cluster node configuration entry in the order of Master1-Slave1, Master2-Slave2, Master3-Slave3.
Cluster Mode-Automatic: Fill in master node count and slave nodes per master, complete machine and port entry.
Cluster Mode-Non-automatic: Complete cluster node configuration entry in the order of Master1-Slave1, Master2-Slave2, Master3-Slave3.
# View Deployment Tasks
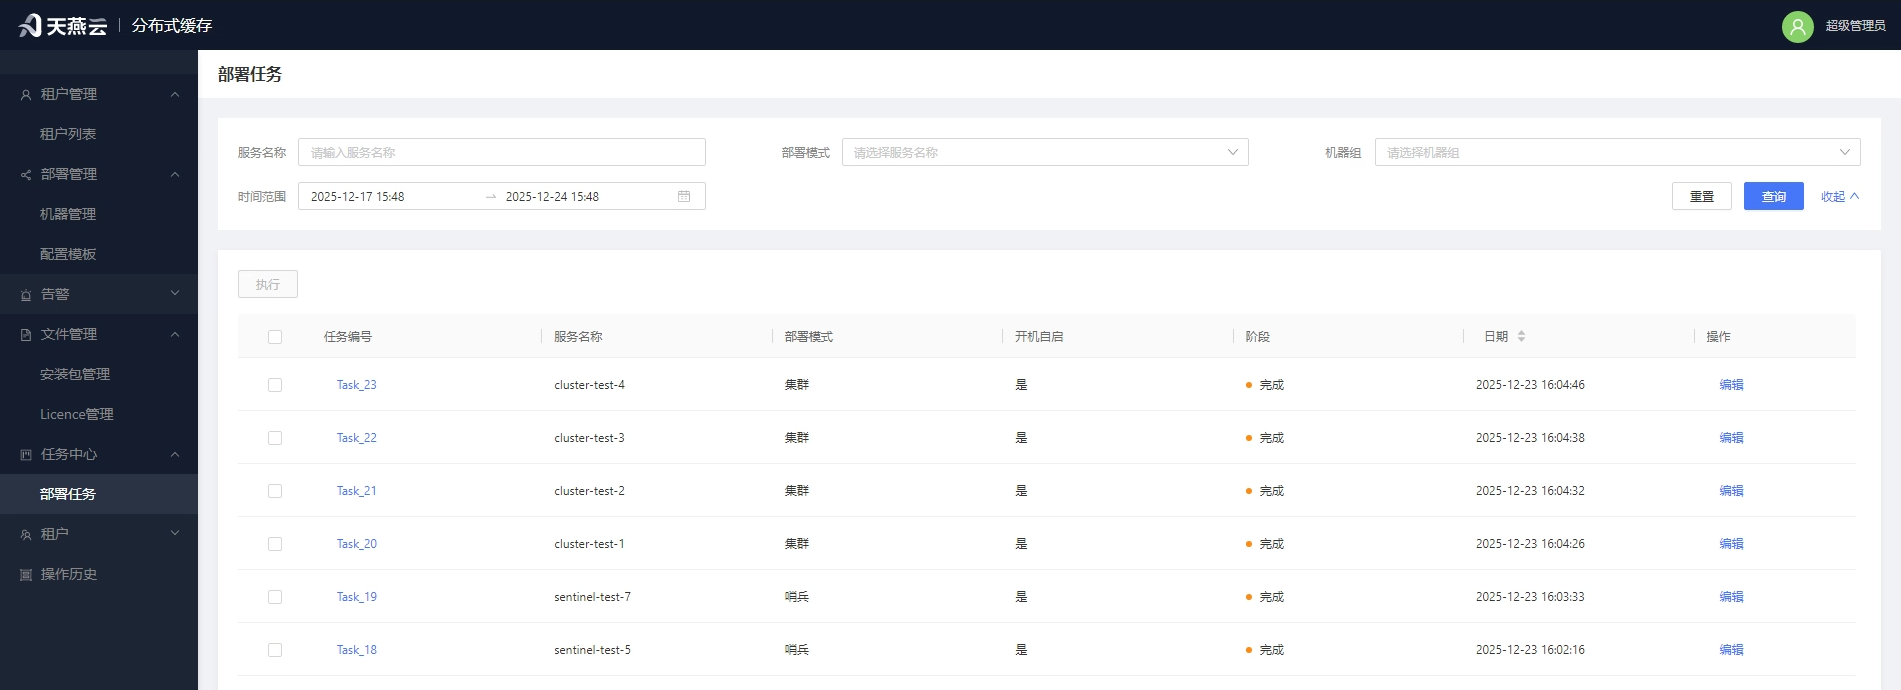
Enter [Task Center] - [Deployment Tasks]. This displays the list of all tasks. You can view deployment status through the task list fields. If the task is in Completed status, deployment is successful. If the task is in Failed status, you can click the [Task Details] button in the operation column to view the specific reason. If the task is in Not Executed/Failed status, you can modify deployment information through [Edit].
# Import Instance
- Import Instance: Tenant List->Tenant Details->Import
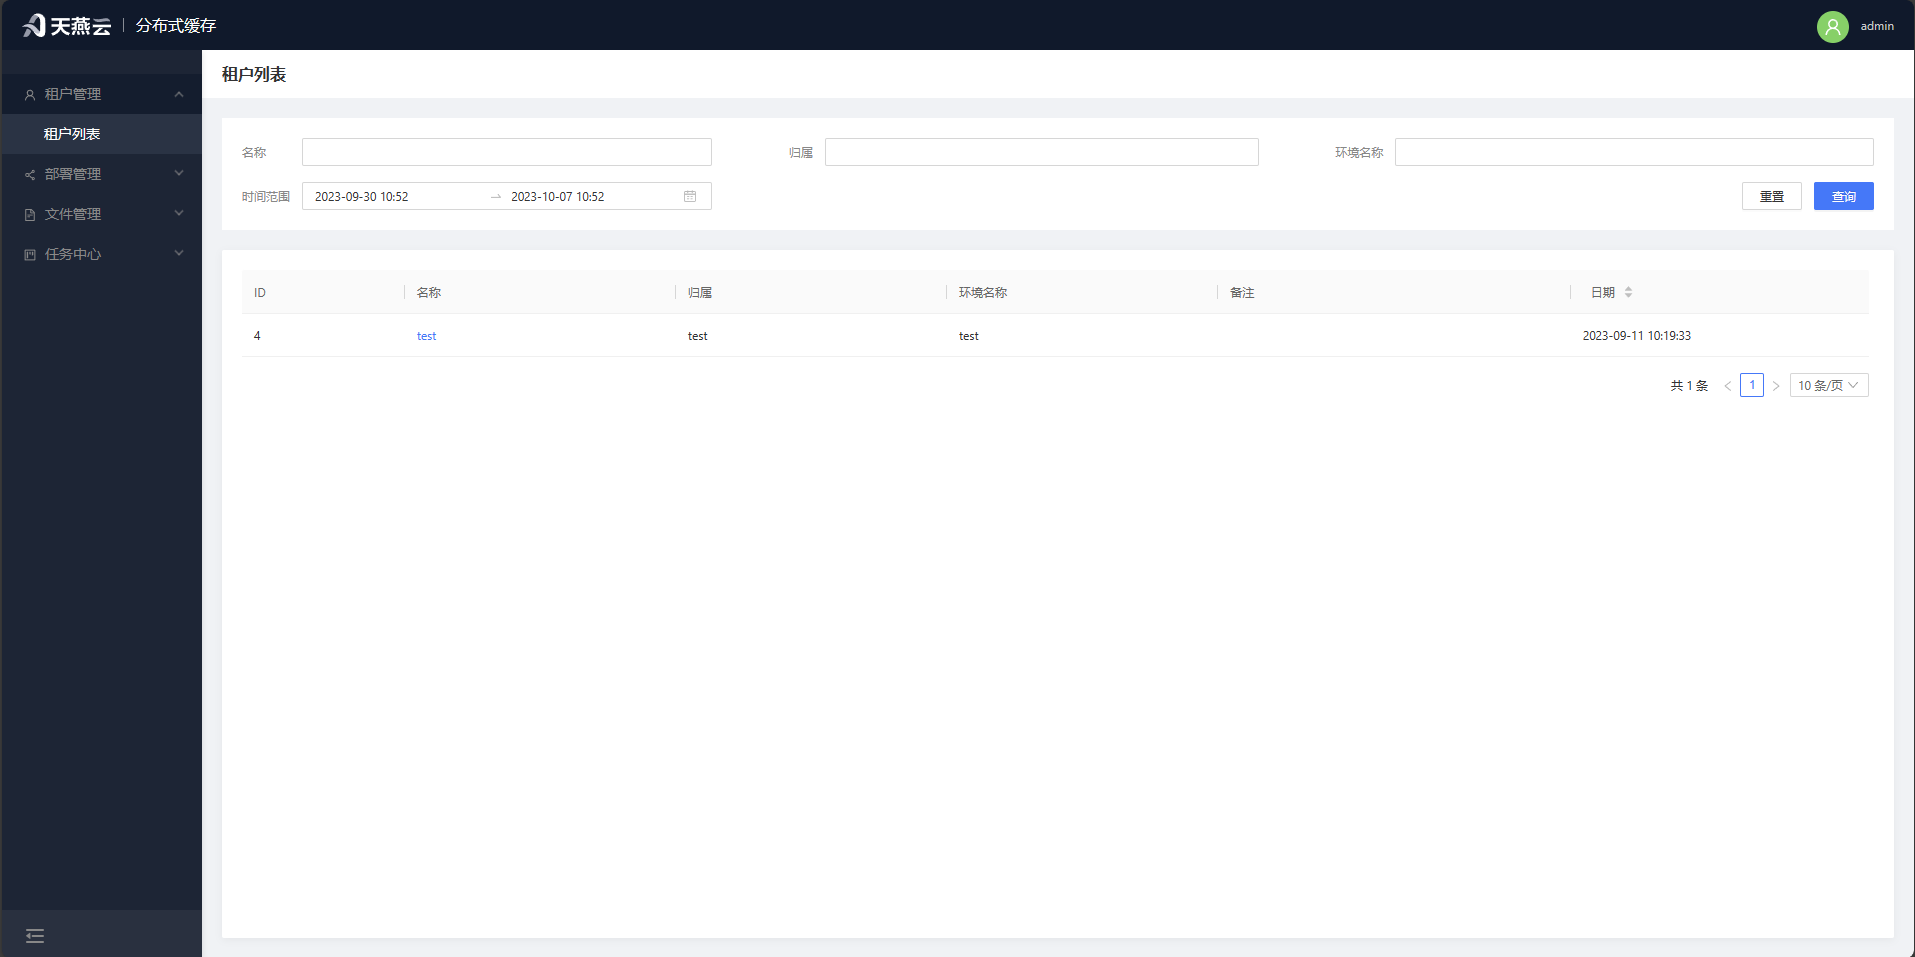
# Tenant List
Page Path: Tenant Management - Tenant List
Displays all tenant information.
# Tenant Details
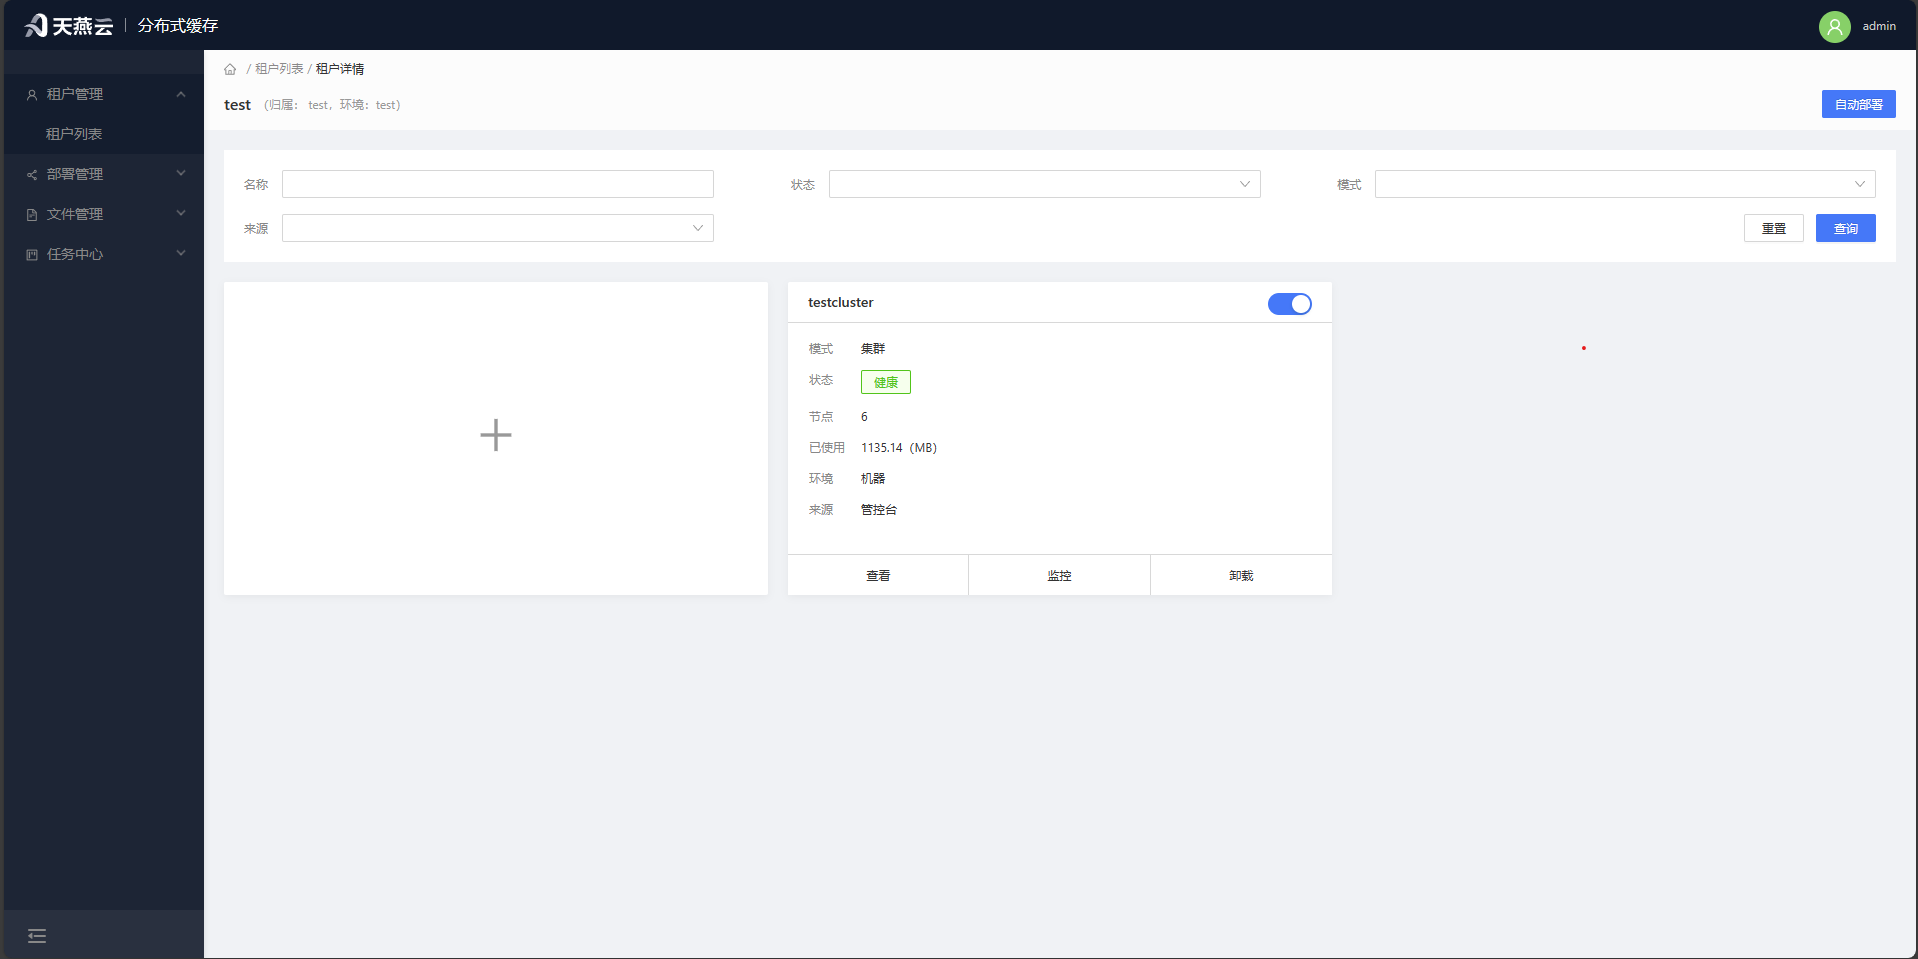
Page Path: Tenant Management - Tenant List - Tenant Details
Displays the list of cache cores owned by this tenant. Provides functions for automatic deployment, importing existing clusters, enabling/disabling cache cores, settings, monitoring, and deletion.
# Import AMDC Cluster or Standalone
For AMDC cache cores not deployed through the console, they can be imported into the console for monitoring, modification, command execution, and other operations.
Click the [+] import button on the cluster homepage, and add the monitored cluster/standalone instance information according to page prompts.
Parameter Description Cluster Name Custom cluster name AMDC Password Password for the AMDC cache core AMDC Node IP:Port of the AMDC cache core 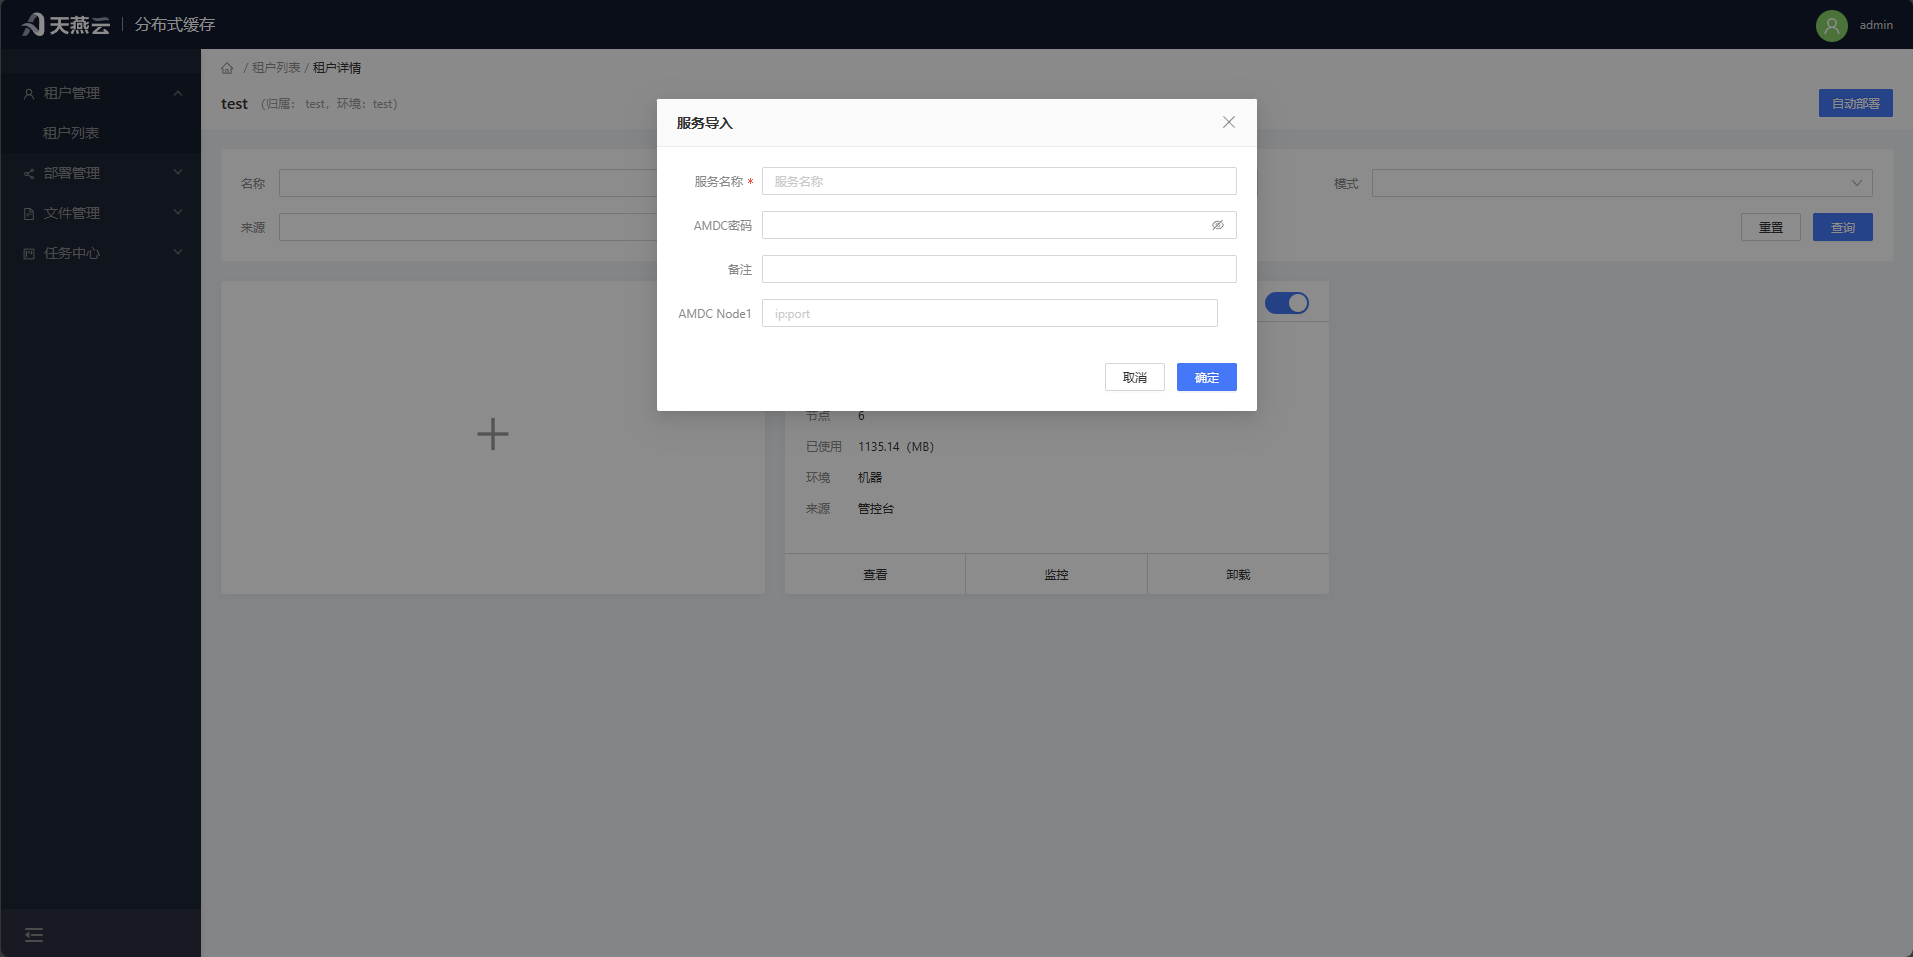
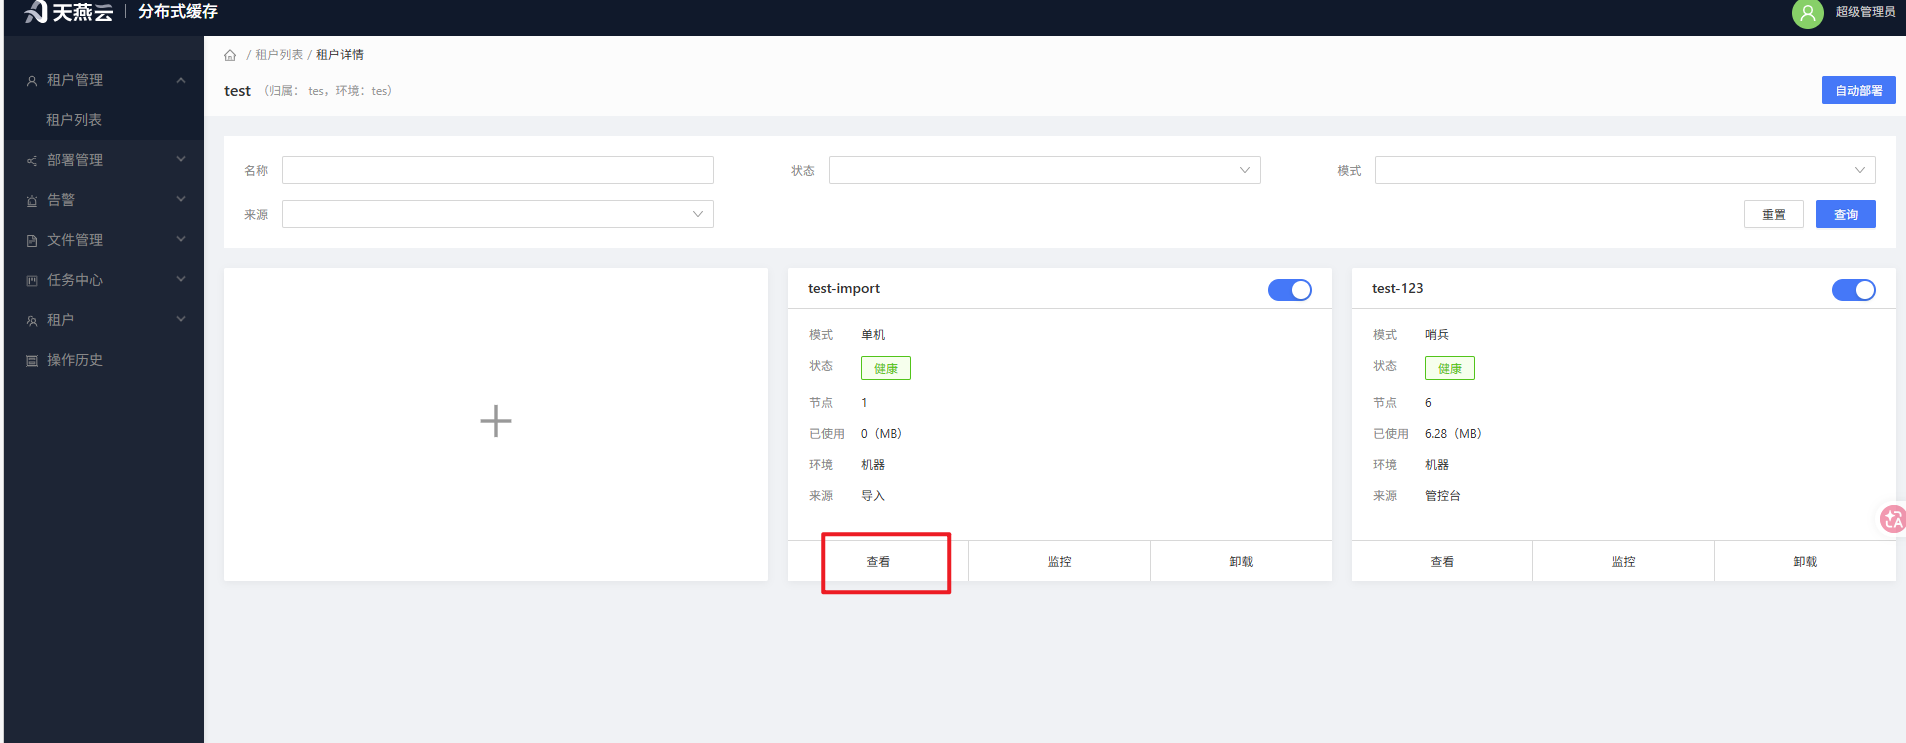
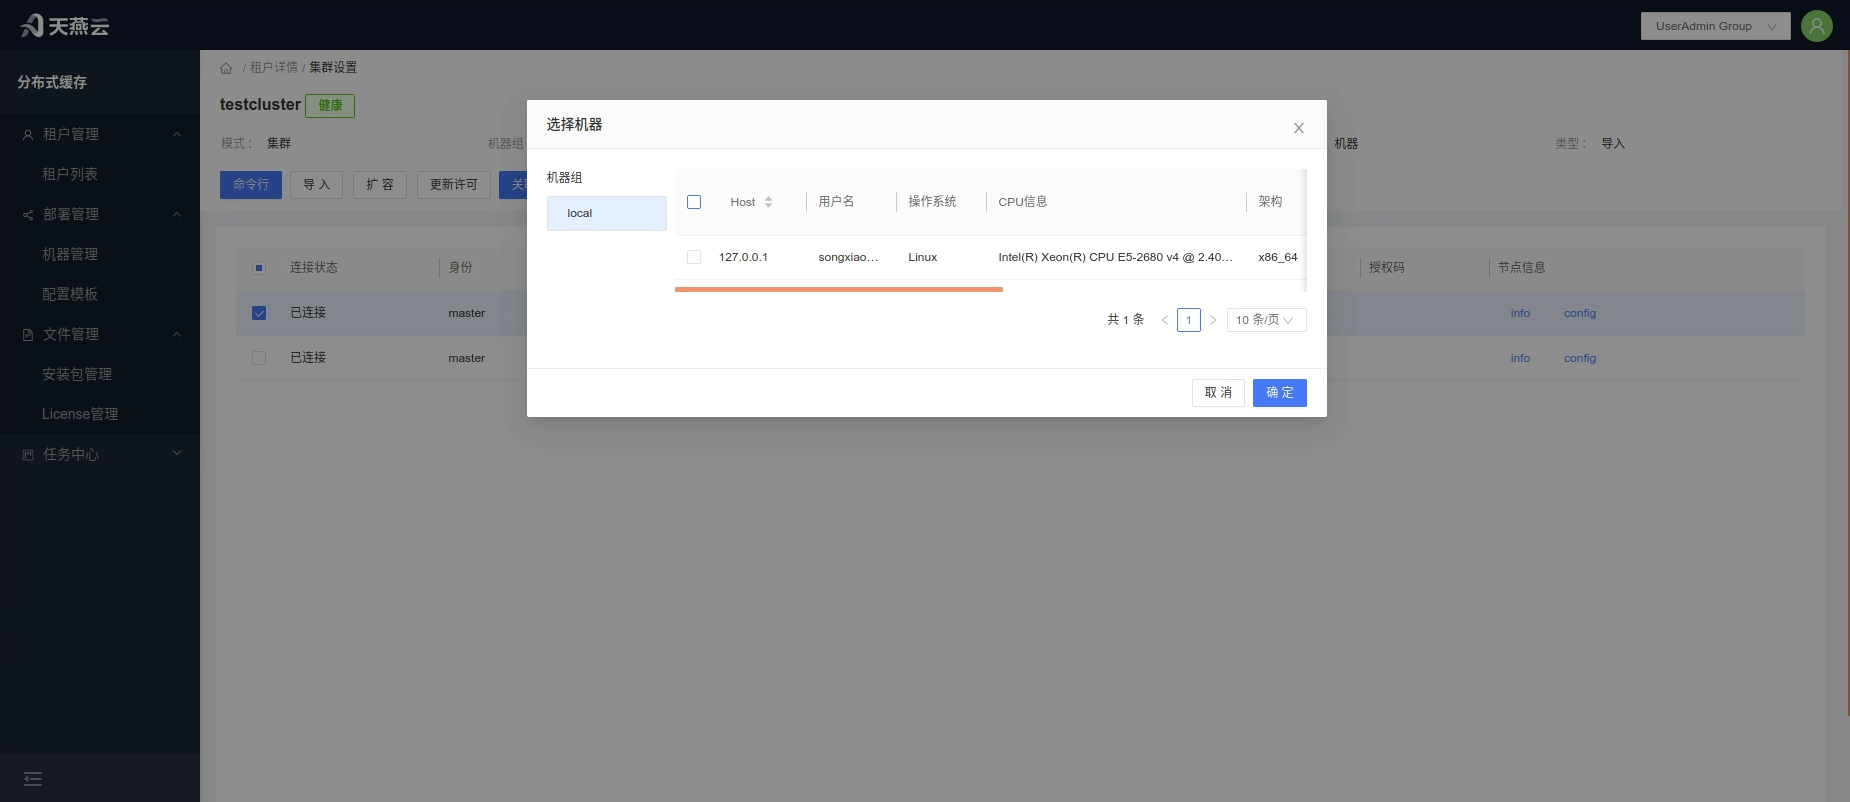
After successful cluster import, click to view, then click "Associate Machine", select the deployment node, and click confirm.
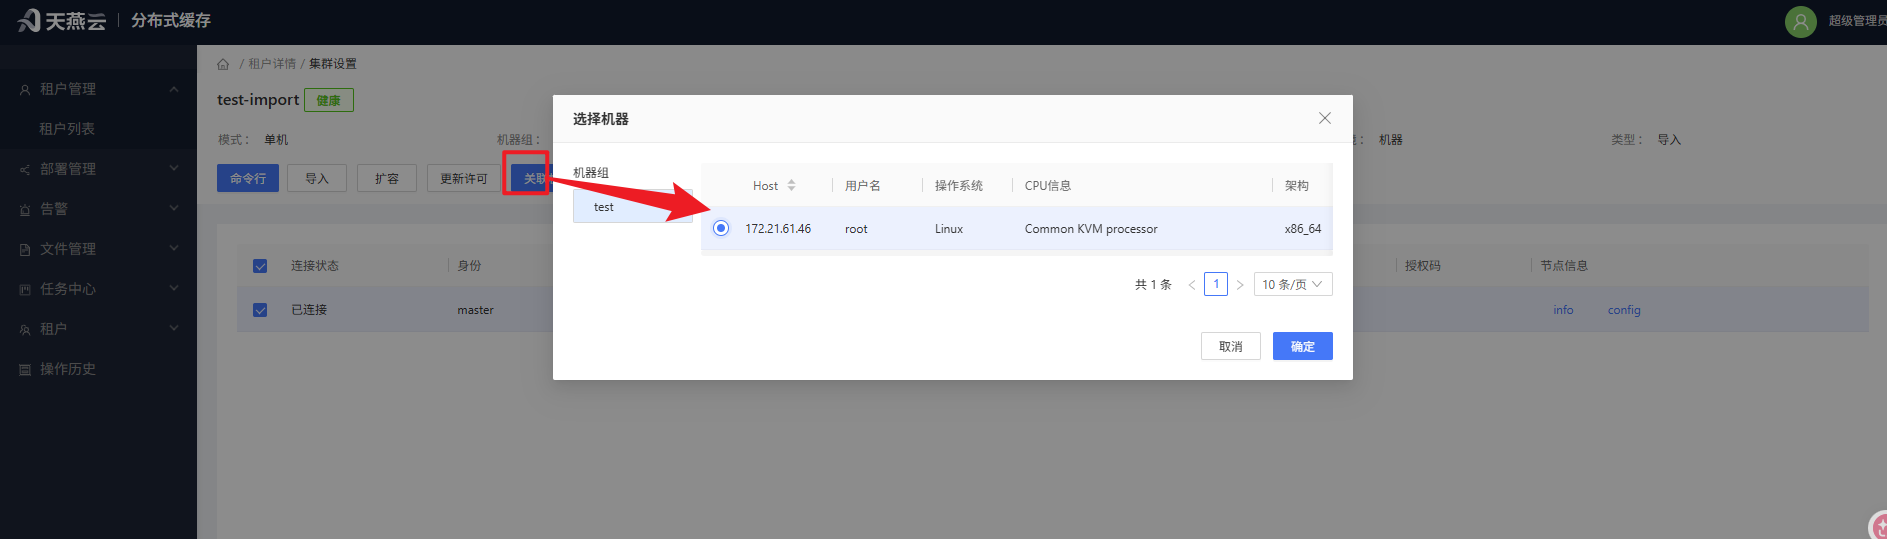
Note: Successful import and machine association is required to use the console for instance start/stop operations.
# Management Functions and Monitoring
# Add Configuration Template
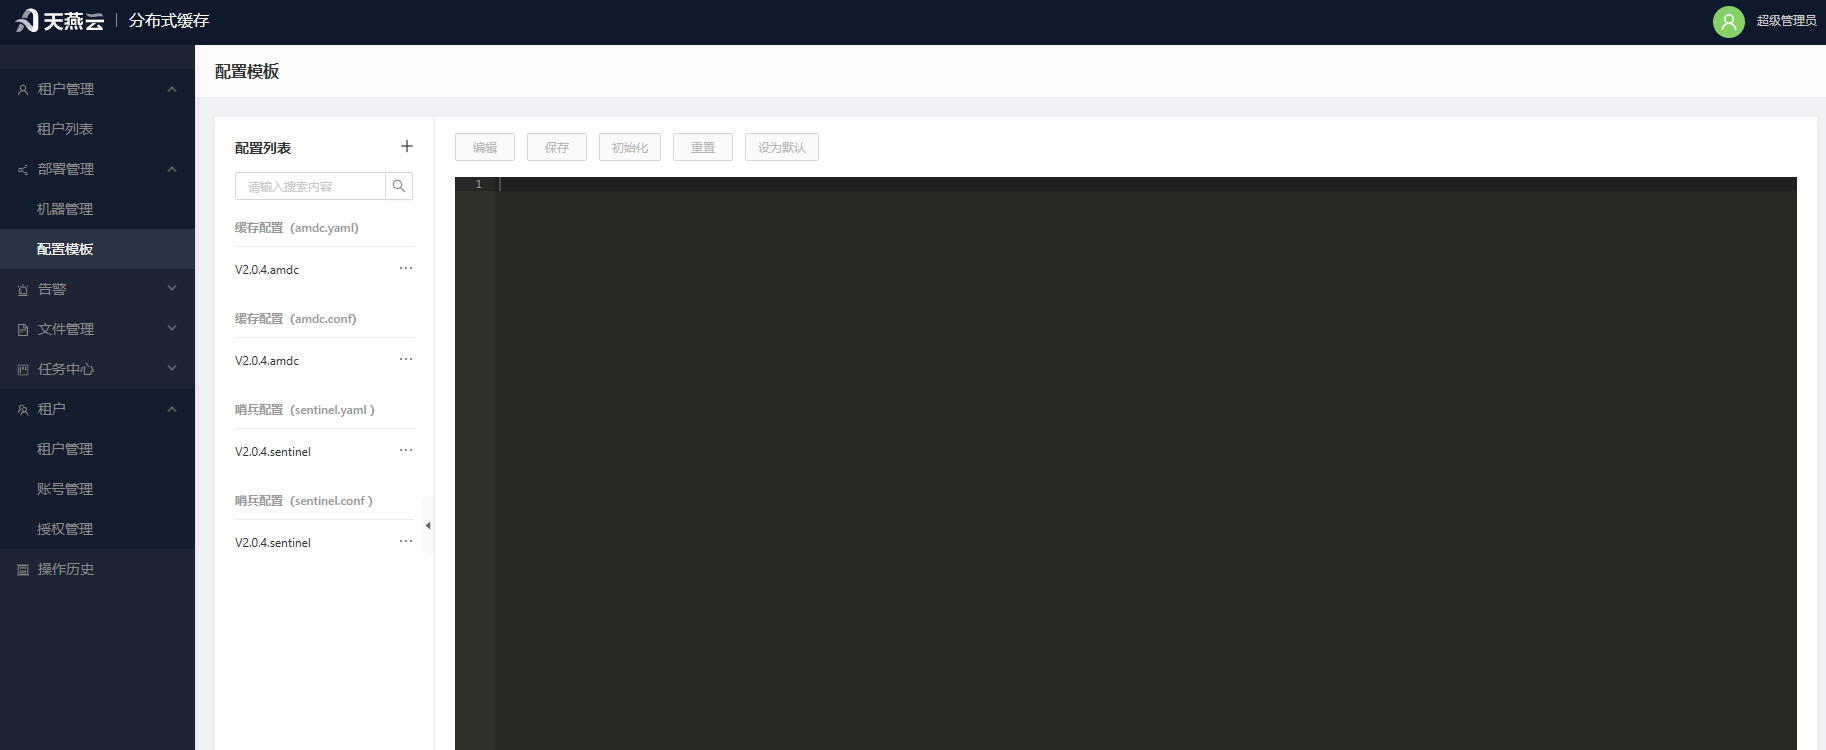
Click [Deployment Management] > [Configuration Template] to enter the configuration template page. Click the + sign on the right side of the configuration list to add a new configuration template. (Use default template if no special tuning is needed) For standalone and cluster modes, only cache template needs to be added. For sentinel mode, sentinel template needs to be added.
Recommended configuration combinations: amdc.yaml (cache) + sentinel.yaml (sentinel) -- c version amdc amdc.conf (cache) + sentinel.conf (sentinel) -- c version amdc (for Redis configuration compatibility needs)
On this page, you can define configuration templates for cache core and sentinel, and use these templates in [Automatic Deployment]. Generally, the default template configuration is sufficient and does not need modification. If you have cache usage technical background and understand tuning, you can adjust some optimization configurations.
Note: Non-public parameters like IP and port will not take effect in the configuration template to ensure automatic deployment works properly.
# Password Settings
If you want to set a password, click the settings after the password to enter the password format requirement settings interface for password complexity and length settings.
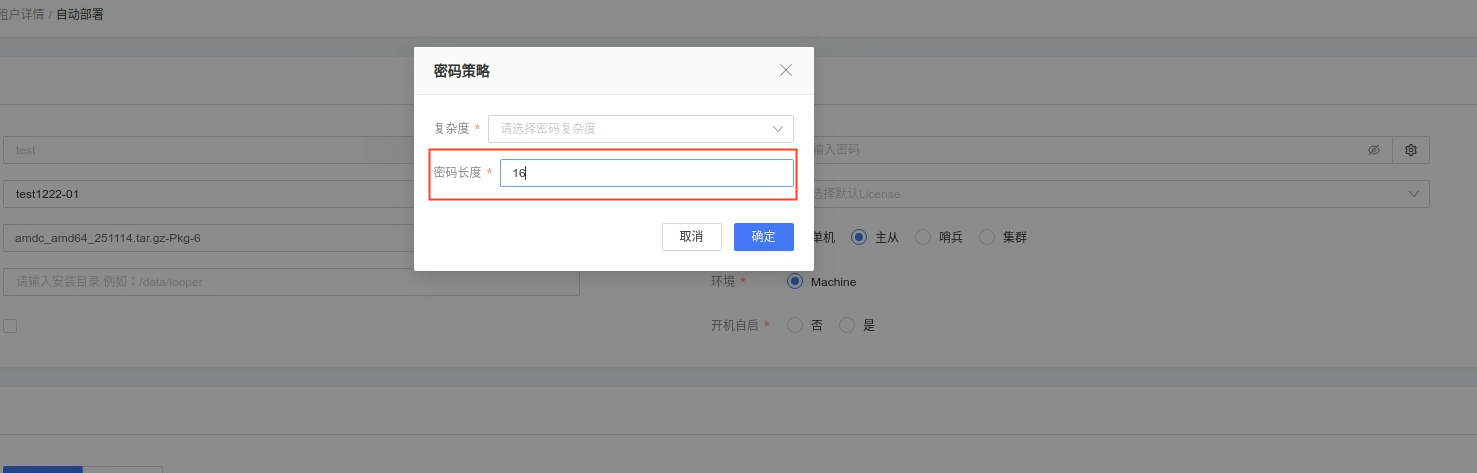
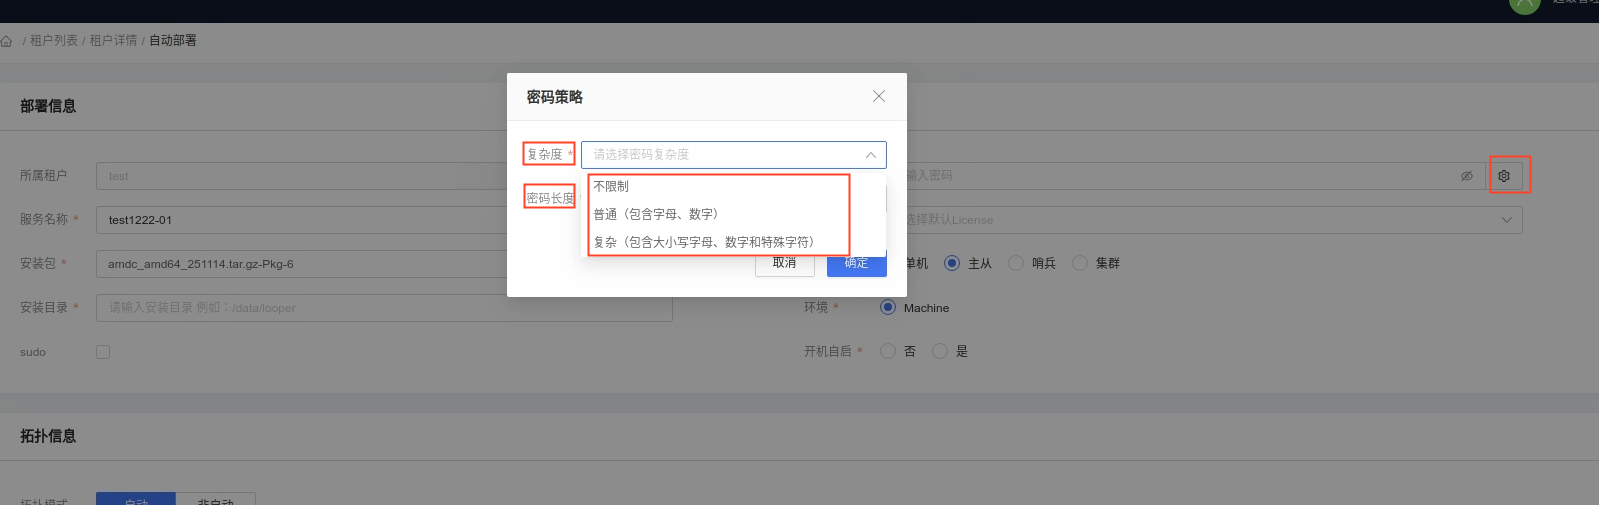
# Settings
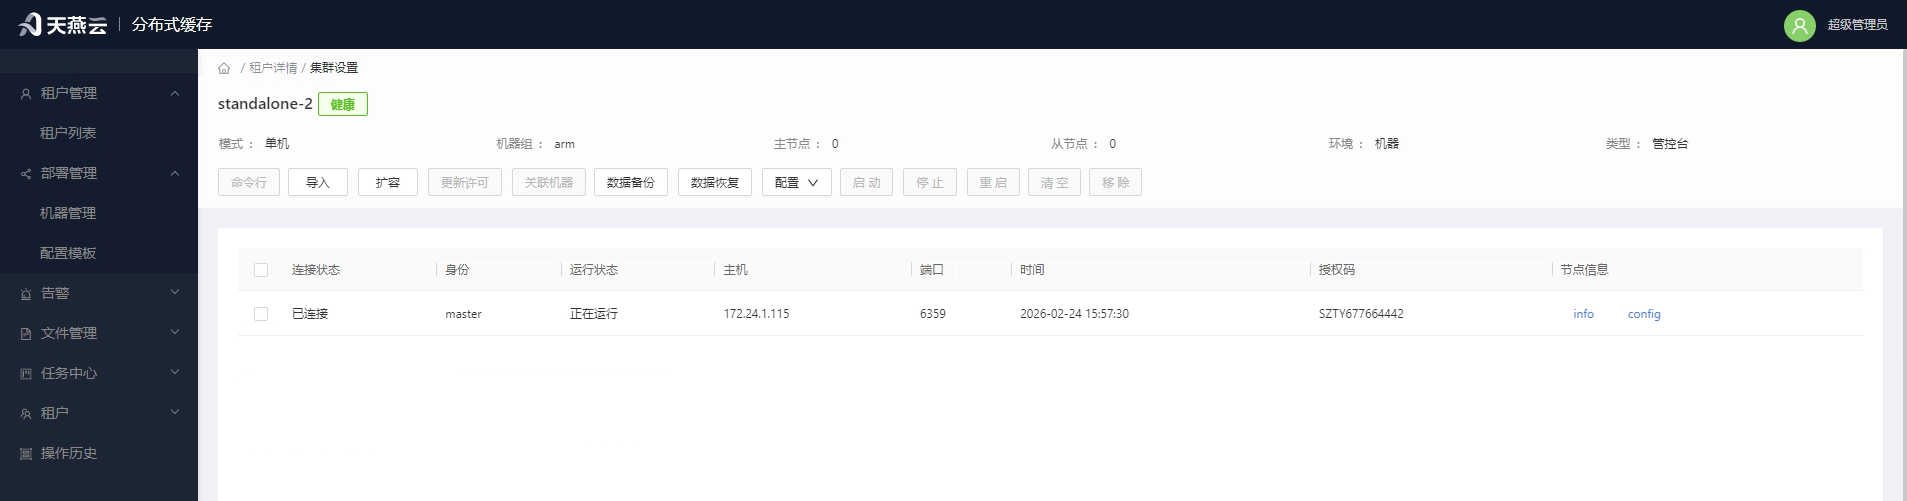
Provides AMDC service command line, configuration modification, cluster node stop/start/restart, info/config information viewing, machine association, data backup, and data recovery operations.
# Command Line
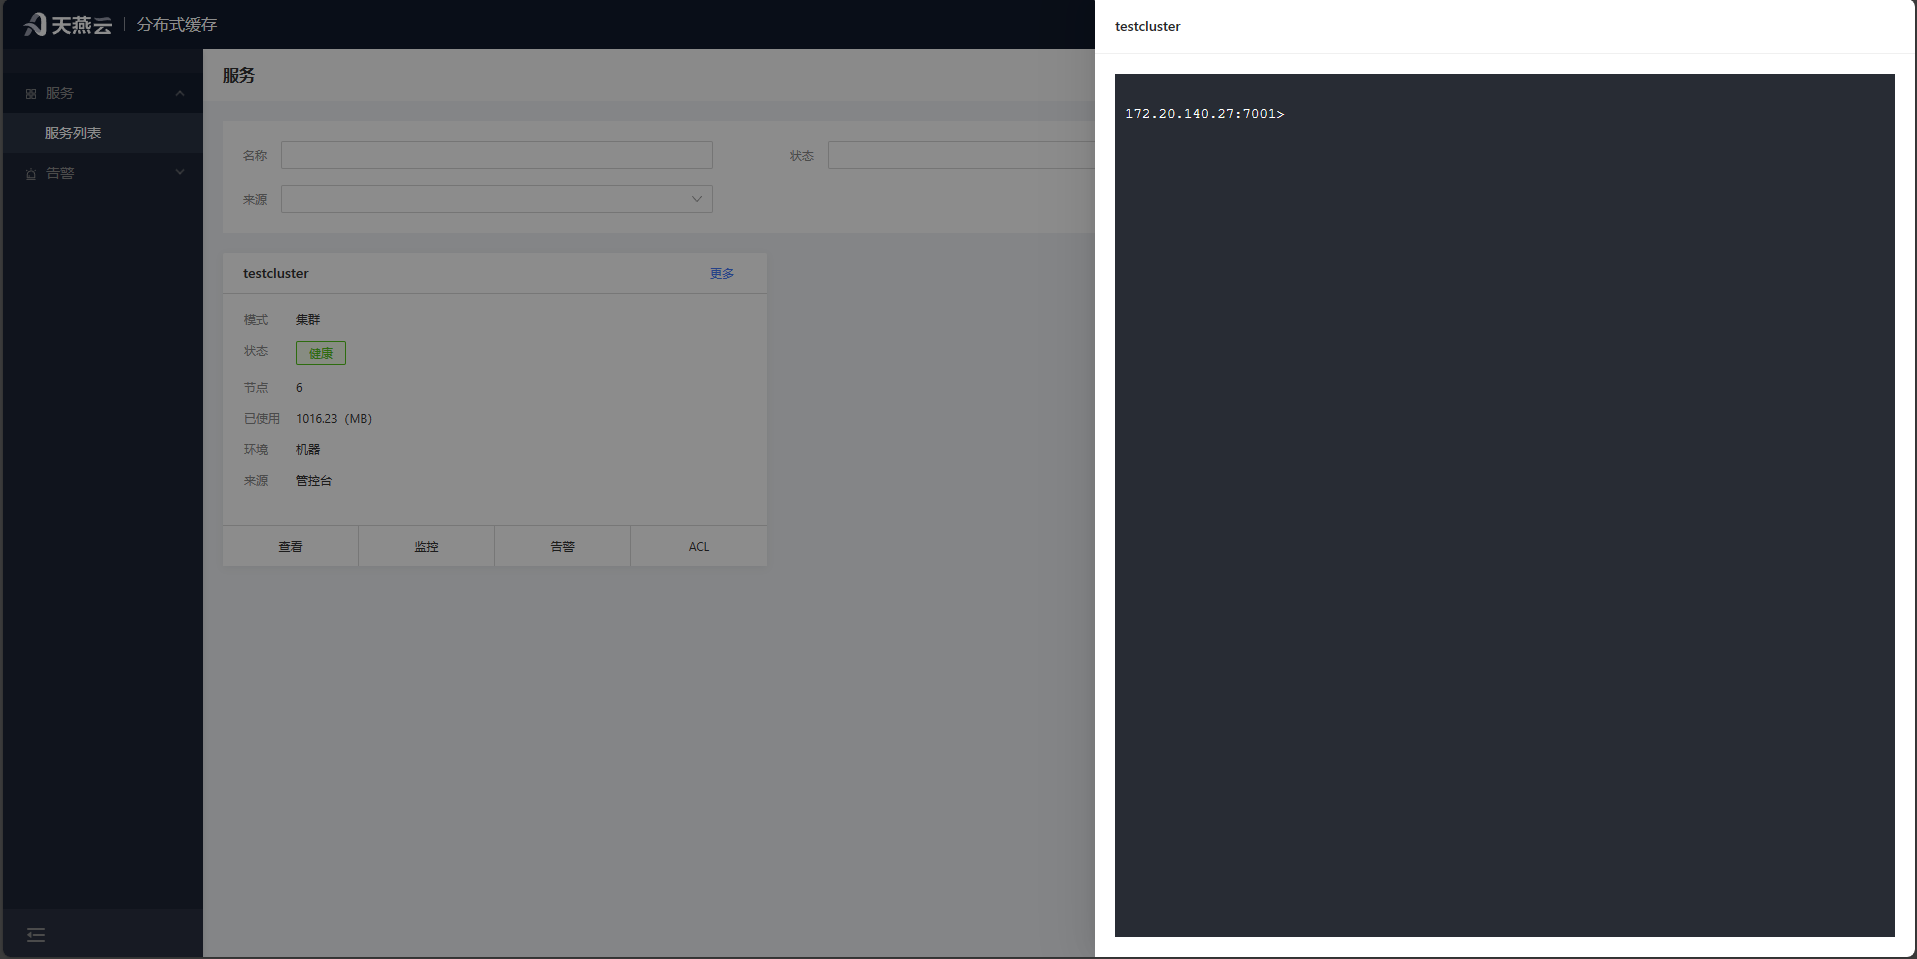
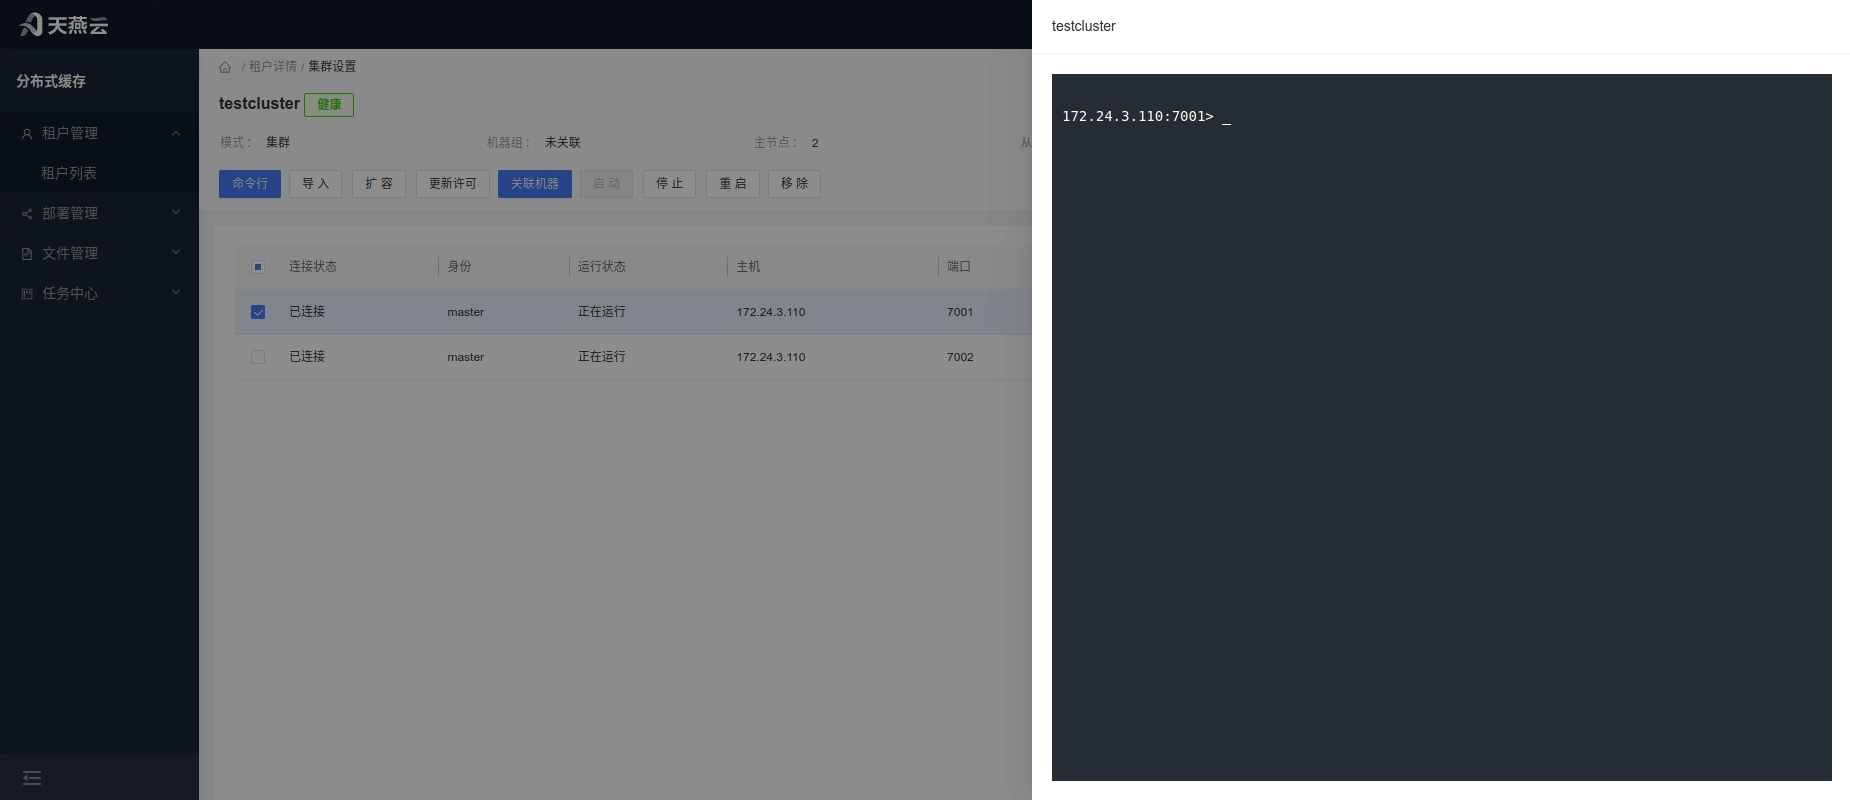
Enter [Service List] and click the [Command Line] button in the service or click [Settings] to enter the service settings interface, then click the [Command Line] button.
# Import
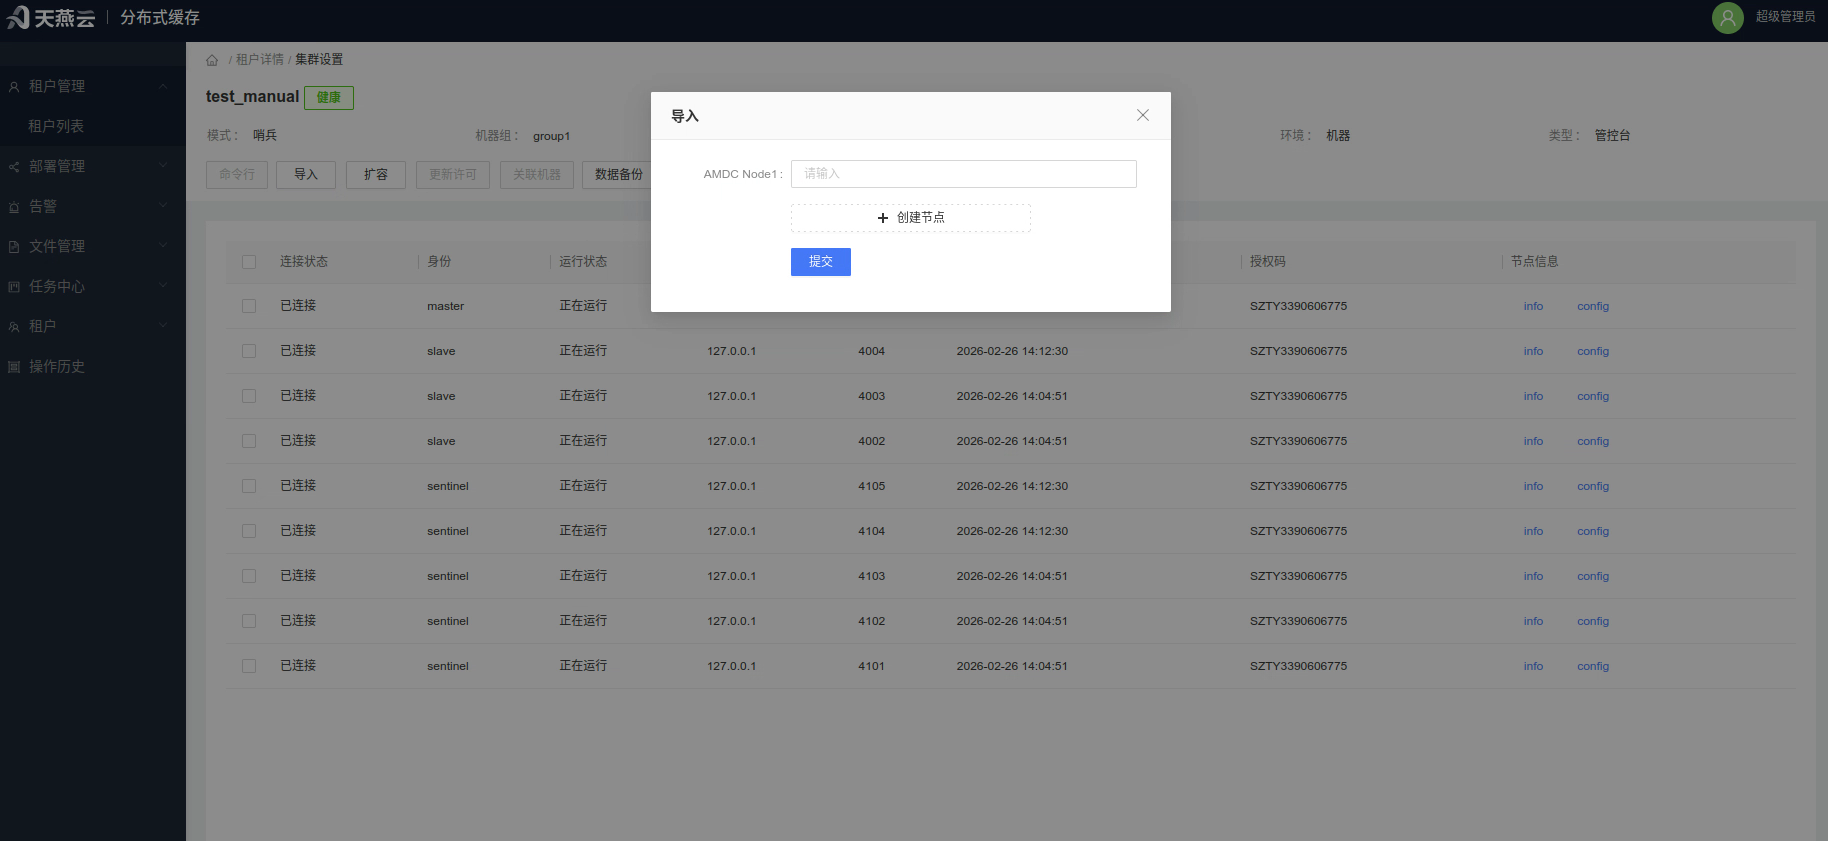
Add nodes belonging to the cluster. You can import AMDC cache cores created through other channels via the console.
Operation steps: Click the [Import] button to enter the cluster node import page and import AMDC services created outside the console.
Note: Only services that already belong to the current cluster can be imported.
# Associate Machine
Click the [Settings] button in the cluster information bar on the homepage to enter the cluster settings page. Select the corresponding node and click the [Associate Machine] button to associate the imported node with machine information, providing complete management functions for the node.
# Automatic Scaling
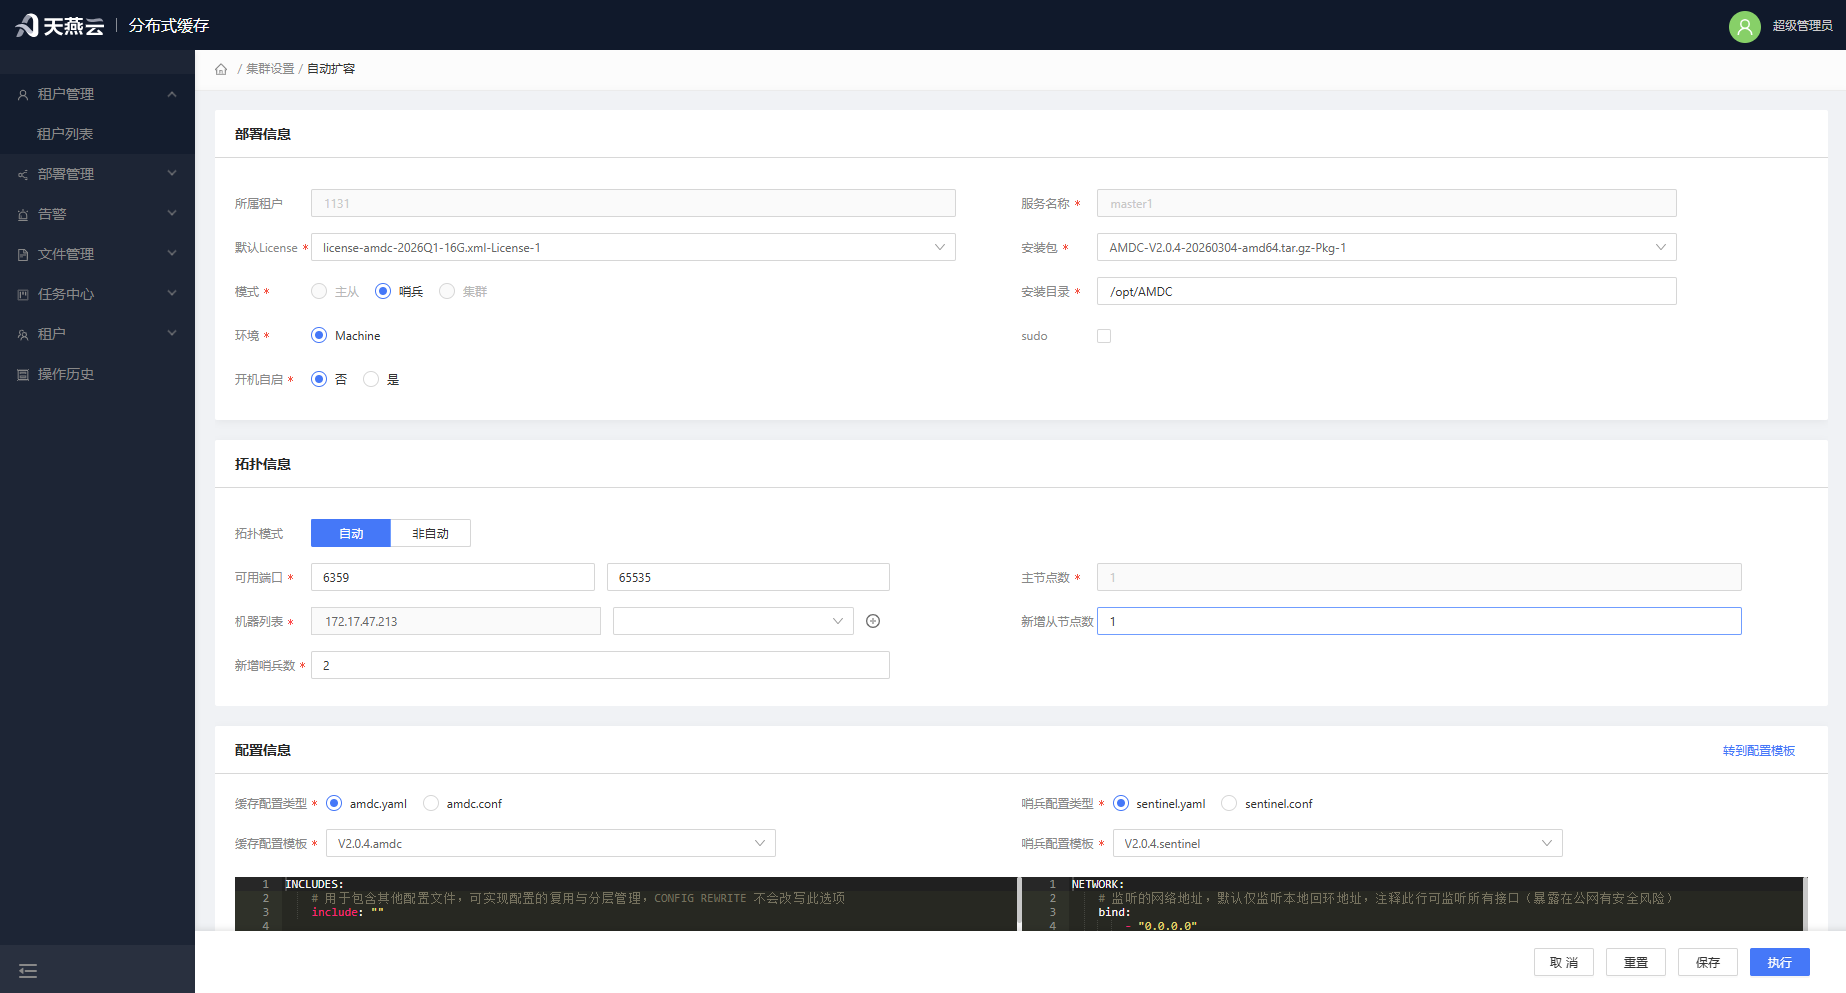
Click the [Scale] button to jump to the automatic scaling page, enabling expansion of slave nodes in master-slave mode or expansion of cluster mode nodes.
# Update License
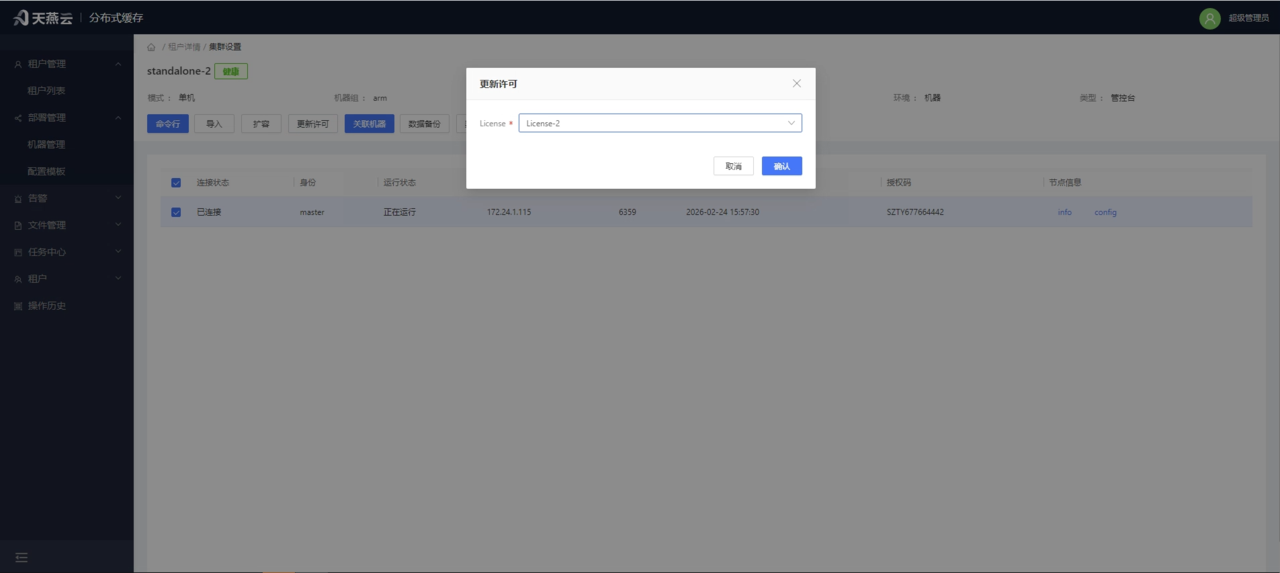
Click the [Update License] button to open the update license popup. Select the uploaded license and click [Confirm] to update. When the license is within 1 month of expiration, a reminder will appear in the [Service List].
# Start, Stop, Restart, Delete Nodes
Select the corresponding nodes and click [Stop], [Restart], [Start], [Delete] buttons to perform node stop, start, restart, and delete operations. Batch operations are supported.
# Analysis
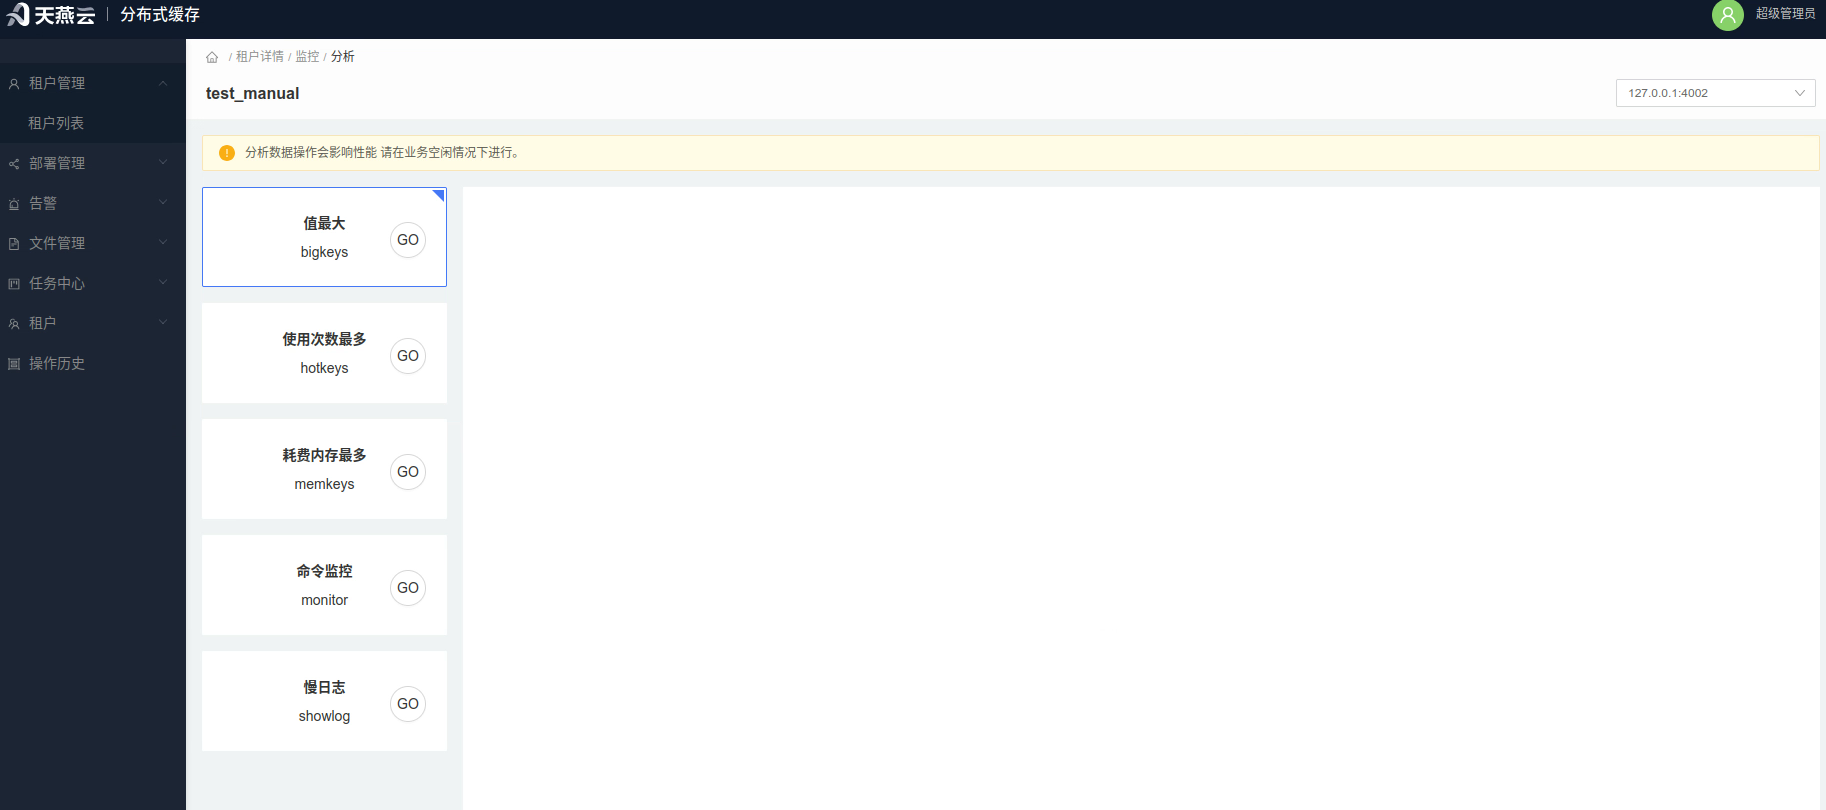
Click the [Analysis] button above [Monitoring] to enter the [Analysis] page. Here you can perform data analysis queries for cache core bigkeys, hotkeys, memkeys, monitor, and slowlog.
# Three-Administrator Management
There are three special roles: System Administrator, Security Officer, and Security Auditor. Special roles have exactly one account each, generated when the system starts, with passwords that cannot be changed (encrypted in the configuration file).
- System Administrator is responsible for creating tenants and accounts, with tenant management and user management menus;
- Security Officer is responsible for assigning tenants and roles (access permissions) to accounts, with authorization management menu;
- Security Auditor is responsible for reviewing console operation logs, with operation log menu.
Console function users are divided into two categories:
- Administrator Account: Administrators are responsible for creating services and maintaining services for tenants;
- Tenant Account: Corresponds to the service data assigned to the tenant, can use these services and some service management functions. Tenant represents an independent environment, and data between different tenants is isolated. Tenants can also manage their own services on the console (by logging in with tenant account), but only have usage rights, not ownership (cannot decide to delete or modify cache cores).
# Tenant Management
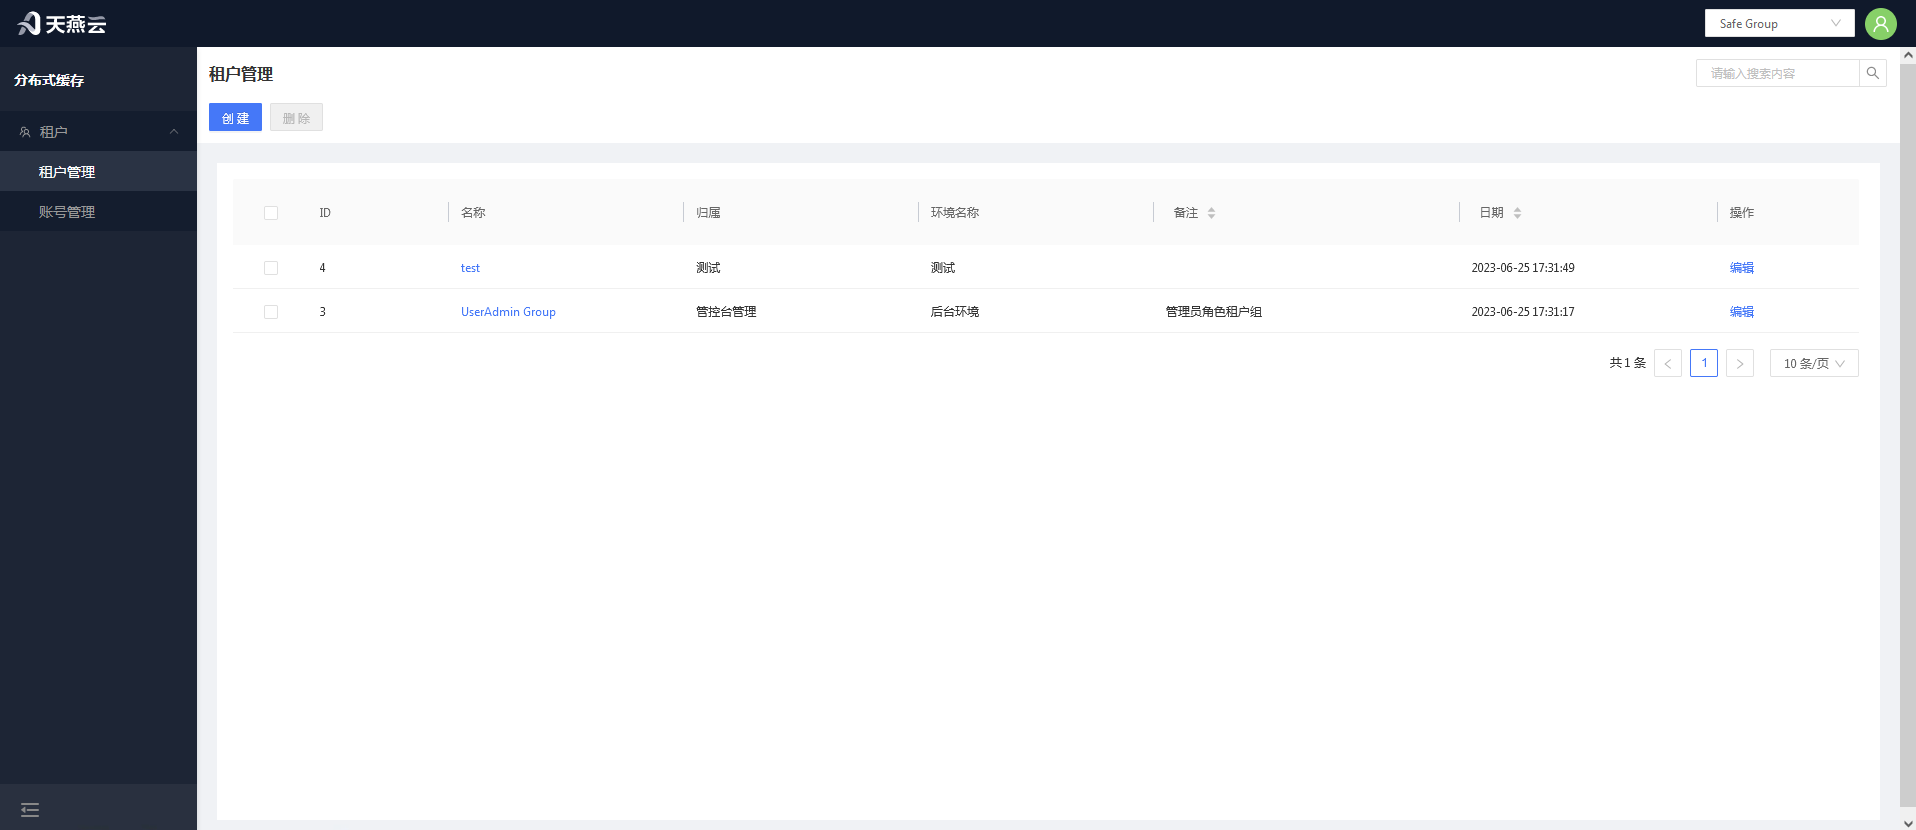
Tenant management is used to create, edit, and delete user-owned tenants. Mainly used to distinguish AMDC clusters that users can manage.
# Create Tenant
Click the [Add] button in the upper right corner to add a tenant.
# Edit Tenant
Select the tenant to edit and click the "Tenant Name" column to edit the tenant.
# Authorization Management
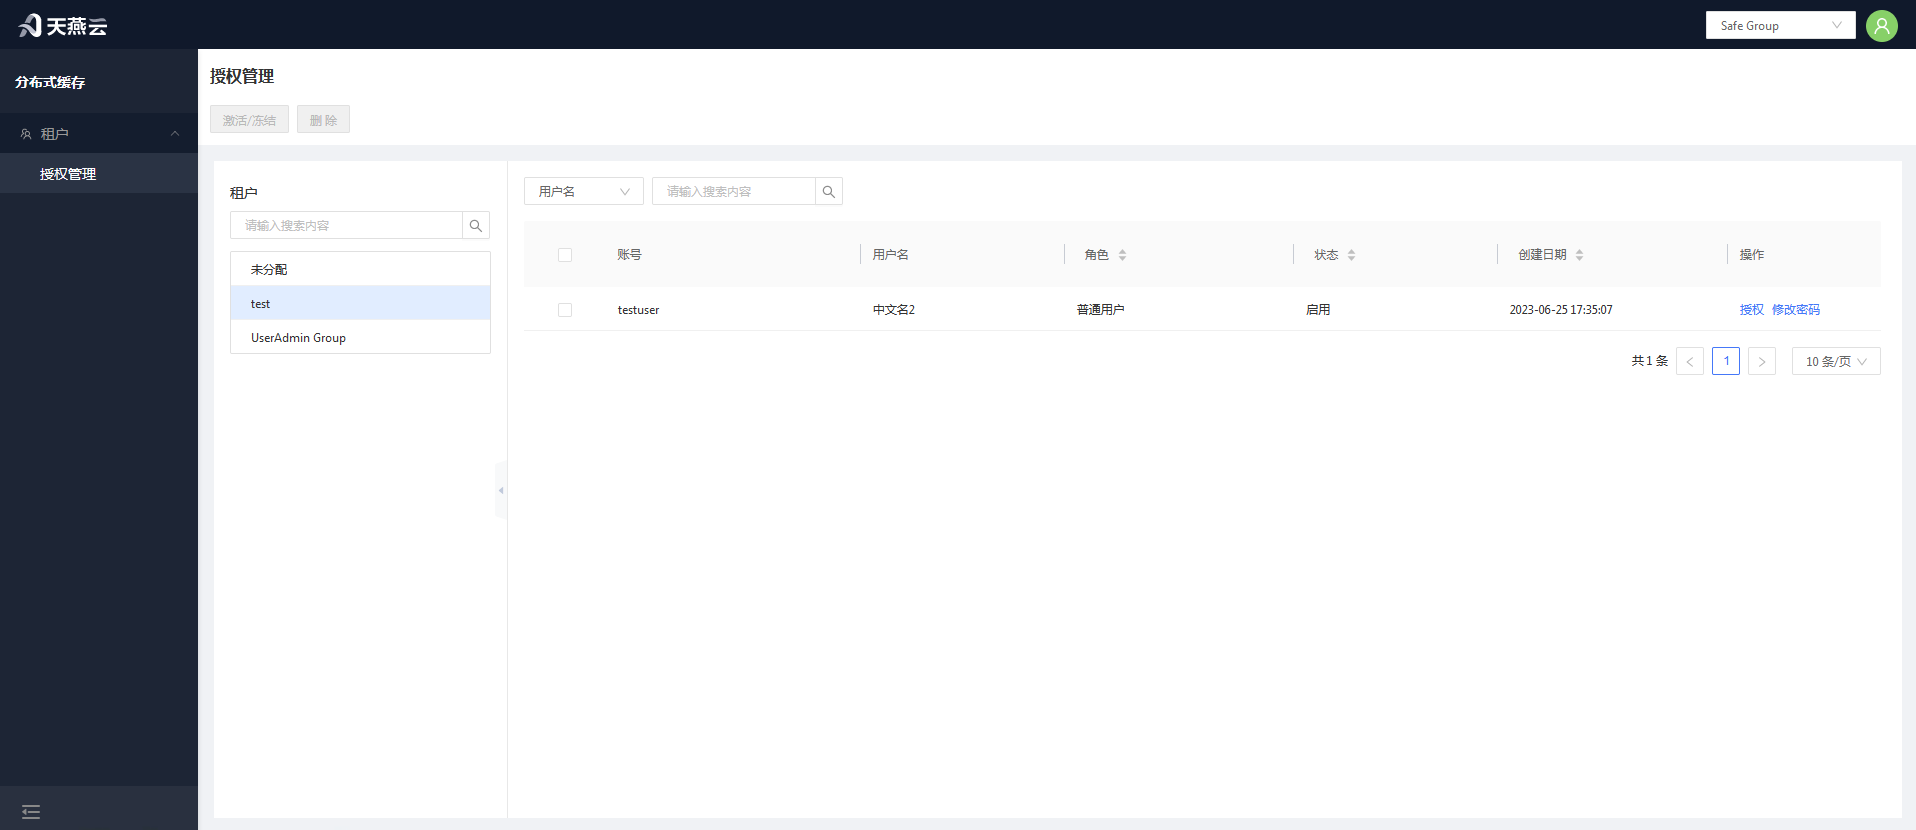
Enter [Users] > [Authorization Management] to enter the authorization management page.
# Authorize Roles
Users in the unassigned group in the tenant are users who have not been assigned to any tenant. These users need tenant authorization first.
# Modify Password
New accounts do not have initial passwords and cannot log in. Passwords must be modified once in authorization management before logging in.
# Activate and Freeze
Click [Activate/Freeze] to activate or freeze the user account. Frozen accounts cannot log in.
# Operation History
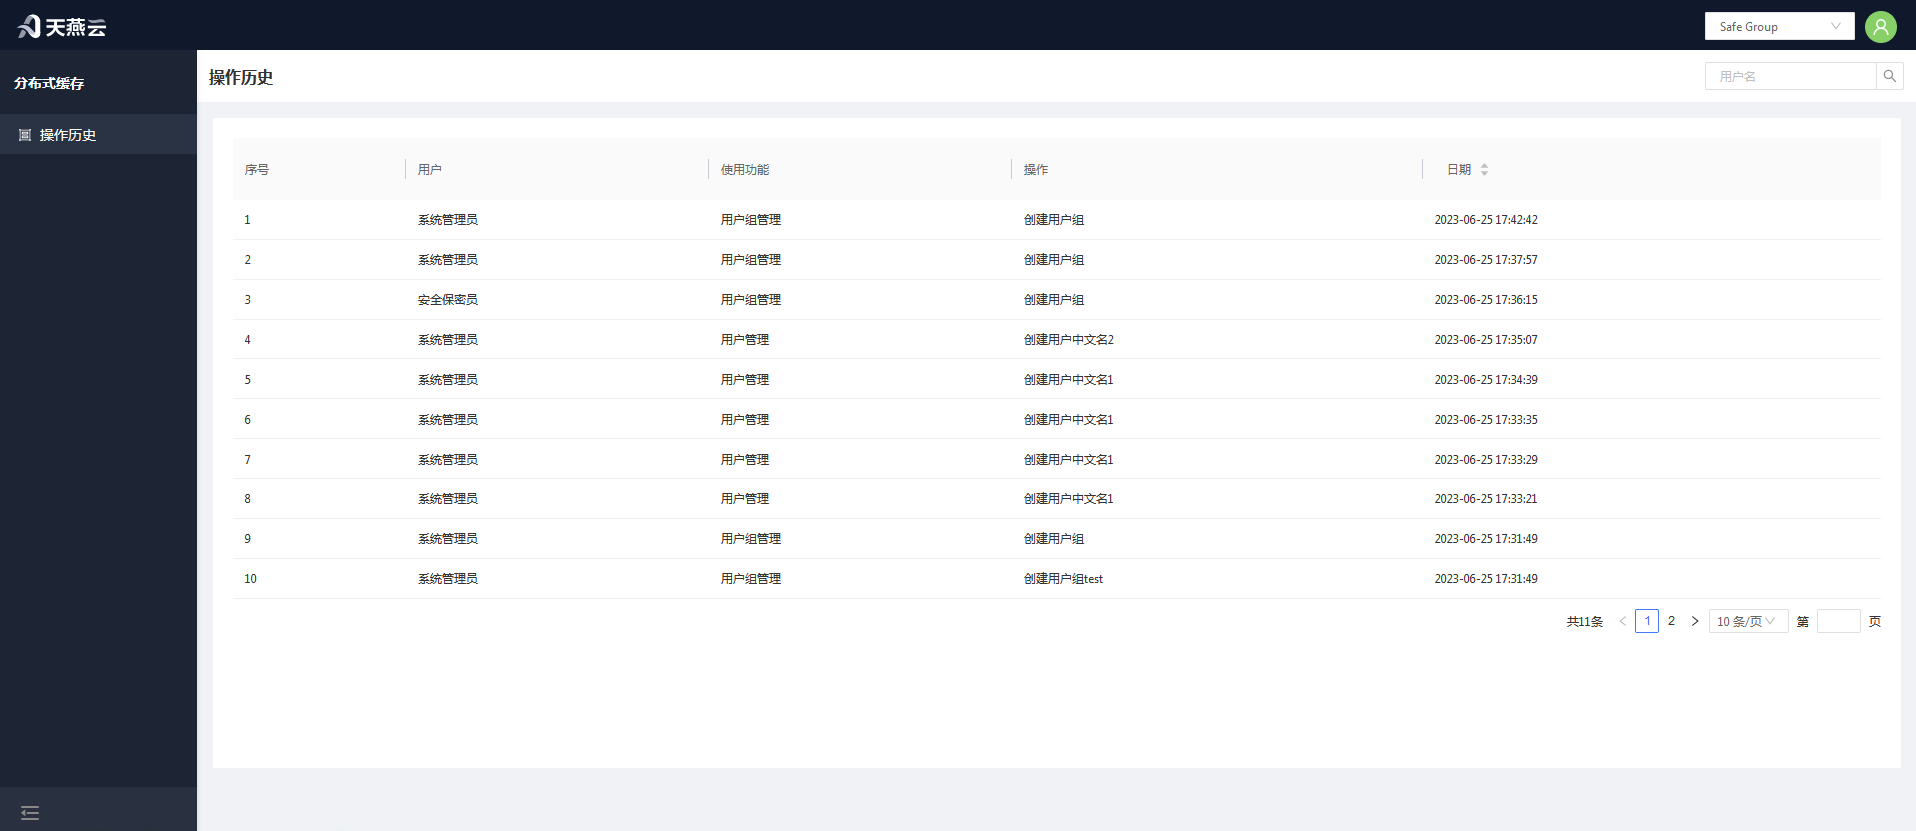
Operation history records all user operation history on the console.
# Password and Security
Password modification instructions: To ensure system security, passwords must be 6 characters or longer and contain special characters. Passwords can be modified through the management platform or through configuration files.
# Initial Passwords for Three Administrators
The three administrators refer to: System Administrator (account: SystemAdministrator), Security Officer (account: KeysKeeper), Security Auditor (account: SafetyAuditor). Initial passwords are all [admin!123]. Note that these three accounts cannot be deleted.
# Modify Current User Password
Log in to the console, click [User Information] in the upper right corner of the homepage. In the user information interface, click the [Change Password] button to modify the current user's login password in the popup.
# Security Officer Modifies User Password
System Administrator can modify "Administrator" and "Regular User" user information. Administrators can modify "Regular User" information. User login to Users > Authorization Management, click the tenant where the user is located, select the user and click the [Modify Password] button to modify that user's password.
# Tenant Functions
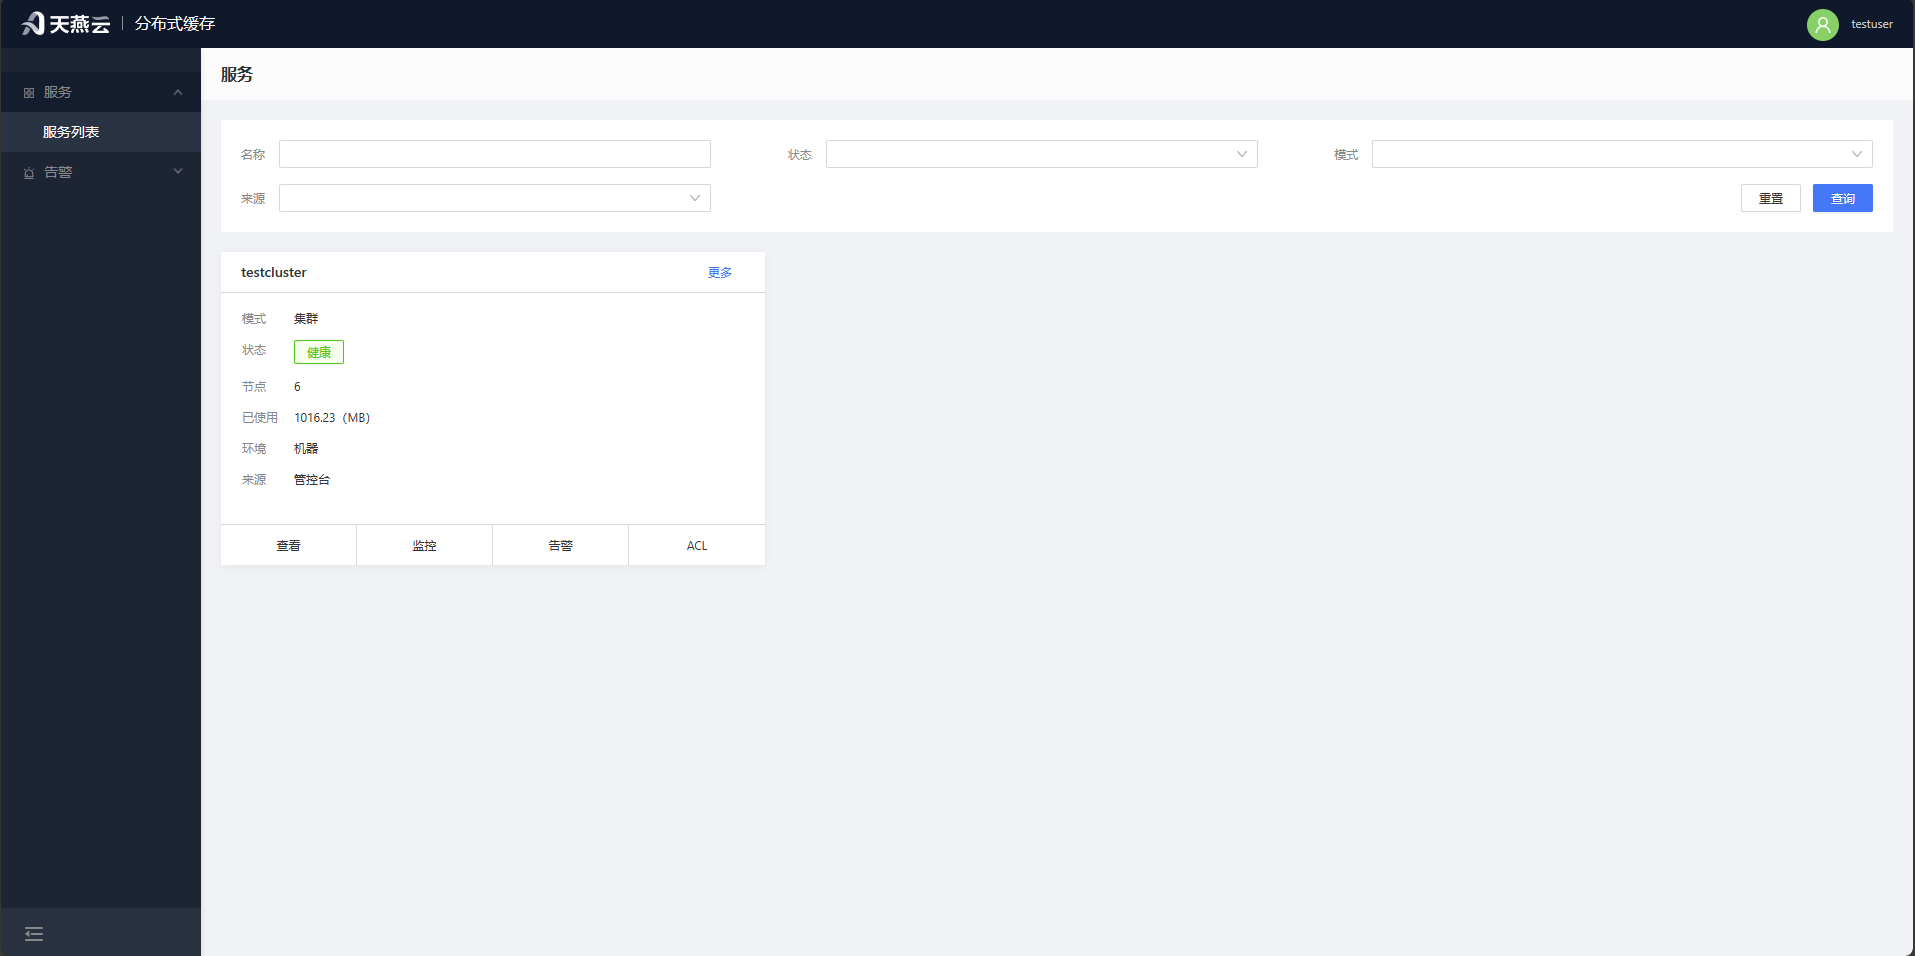
# Service Management
[Service List] provides entry points for cluster browsing, cluster monitoring, cluster alerts, cluster settings, cluster editing, and cluster deletion operations.
# Command Line
Click [Service List], select a cluster's [More-Command Line] button to enter the cluster command line interface, where you can simulate cluster client interaction.