
Installation Manual

# Preface
This document is the installation manual for Apusic In-Memory Data Cache (AMDC) V2.0.4 product, providing installation and deployment process guidance for various deployment modes (including standalone, sentinel, cluster) on various operating systems and container environments, as well as related configuration instructions.
# Target Audience
This document is intended for AMDC operations engineers, IT system operations engineers, development engineers, software architects, and other personnel.
# Related Documentation
For more information about AMDC V2.0.4, please refer to the following AMDC V2.0.4 product manual documentation set:
| No. | Document | Description |
|---|---|---|
| 1 | Apusic In-Memory Data Cache V2.0.4 Quick Start Guide | A brief introduction on how to quickly get started with AMDC. |
| 2 | Apusic In-Memory Data Cache V2.0.4 Installation Guide | Detailed introduction on how to install AMDC on various operating systems, AMDC service start/stop operations, and product registration process. |
| 3 | Apusic In-Memory Data Cache V2.0.4 Core User Manual | Detailed introduction on how to use, configure, and manage AMDC features and supporting tools. |
| 4 | Apusic In-Memory Data Cache V2.0.4 Console User Manual | Detailed instructions on using and operating AMDC console features. |
| 5 | Apusic In-Memory Data Cache V2.0.4 Development Guide | Detailed instructions for developing AMDC client applications using various programming languages. |
| 6 | Apusic In-Memory Data Cache V2.0.4 Migration Guide | Detailed instructions for migrating AMDC from historical versions to V2.0.4, as well as migrating from Redis to AMDC. |
| 7 | Apusic In-Memory Data Cache V2.0.4 Operations Guide | Detailed instructions for AMDC monitoring, operations, security hardening, and other operational procedures. |
| 8 | Apusic In-Memory Data Cache V2.0.4 Performance Tuning Guide | Detailed instructions for AMDC performance tuning. |
# Technical Support
AMDC products provide comprehensive technical support services. You can obtain technical support through the following channels:
Website: www.apusic.com
Phone: 400-855-5800
Email: support@apusic.com
Kingdee Cloud Community: https://vip.kingdee.com/?productId=73&productLineId=14&lang=zh-CN
When requesting technical support, please provide the following information:
Your name
Company information and contact details
Operating system and version
Product version number
Detailed information including logs, screenshots, etc. of any exceptions or errors
# Related Concepts
| Term | Meaning | Usage Notes |
|---|---|---|
| Standalone | Stores data, handles data read/write, handles data synchronization | AMDC's default mode, standalone mode. In standalone mode, the master node is in standalone mode |
| Master-Slave | Replicates data from master node, handles data read/write, does not participate in data synchronization | Real-time replica of master node data. It actively connects to the specified master node and receives the data stream sent by the master node, thereby maintaining data synchronization with the master node. By default, slave nodes are read-only, and all write operations must be sent to the master node. |
| Sentinel | Monitors master-slave nodes, handles master node failover, handles master-slave node synchronization | Sentinel mode, when the master node goes down, automatically switches to slave node, when slave node goes down, automatically switches to master node. |
| Cluster | Computer service system composed of multiple independent computers | In this document, master-slave/sentinel/cluster three modes can all be considered clusters. Cluster mode specifically refers to the mode where multiple master nodes store data in shards. |
# Installation Instructions
# Overview
AMDC product package is divided into two parts: cache and console, where cache is the AMDC core component, and console is the AMDC management component.
# Environment Support
| Platform Type | System Type |
|---|---|
| Chip Type | Huawei Kunpeng, HiSilicon, Phytium, Zhaoxin and other X86/ARM architecture chips |
| Operating System | Galaxy Kylin series, UOS,中标麒麟 etc. |
| Other Linux Series | RedHat series, CentOS series, Ubuntu series etc. |
# Recommended Configuration
| Deployment Mode | Operating System | Installation Content | Hardware Specifications (CPU/Memory/Disk) | Server Count |
|---|---|---|---|---|
| Standalone | Linux | AMDC service | 8 cores/16G/100G | 1 |
| Master-Slave | Linux | AMDC service | 8 cores/16G/100G | 2 |
| Sentinel | Linux | AMDC sentinel service | 8 cores/16G/100G | 3 |
| Cluster | Linux | AMDC console, AMDC service | 8 cores/16G/100G | 3 |
# AMDC Cache Installation
# Cache Core Installation Package Naming Convention
- Extract installation package:
AMDC-version-build-date-CPU-architecture.tar.gzcan be extracted to any path on the target machine for use. - Docker installation package:
AMDC-Docker-build-date-CPU-architecture-base-os.tar.gz. - RPM package:
AMDC-build-date-CPU-architecture.rpm, install usingrpm -ivh package-name, after installation, the installation path is/opt/amdc.
Note: The build date is the specific build date of the AMDC product package. The same version may have multiple build dates. Please use the latest date when obtaining the installation package.
# Standalone Mode
Installation steps:
- Upload AMDC cache core installation package (
AMDC-version-build-date-CPU-architecture.tar.gz) to the target server's installation directory (e.g., /opt directory) - Extract installation package:
tar -zxf AMDC-version-build-date-CPU-architecture.tar.gz - Enter the extracted folder:
cd amdc - Upload license file
license.licto each node's installation directory/opt/amdc. For licensing, refer to AMDC License Management Guide in this document[root@private amdc]# tree -L 2 . ├── acls.properties ├── amdc-benchmark ├── amdc-check-aof ├── amdc-check-rdb ├── amdc-cli ├── amdc-conf-conv ├── amdc-sentinel ├── amdc-server ├── amdc.yaml ├── license.lic # License file └── sentinel.yaml1
2
3
4
5
6
7
8
9
10
11
12
13 - Execute startup command to start AMDC cache core:
./amdc-server amdc.yaml
# Verify Installation
./amdc-cli
If info information is printed normally, the connection is successful.
./amdc-cli
127.0.0.1:6359> info
# Server
amdc_version:2.0.4
amdc_git_sha1:61420466
amdc_git_dirty:0
amdc_build_id:905134ad61530534
amdc_build_date:2026-02-03
amdc_mode:cluster
os:Linux 3.10.0-1160.119.1.el7.x86_64 x86_64
arch_bits:64
monotonic_clock:POSIX clock_gettime
multiplexing_api:epoll
atomicvar_api:atomic-builtin
gcc_version:4.8.5
process_id:7075
process_supervised:no
run_id:69ffa6dd5f6bfa0250f5b0ee2bd38f8b9de143a3
tcp_port:6359
server_time_usec:1770275528738835
uptime_in_seconds:5201
uptime_in_days:0
hz:10
configured_hz:10
2
3
4
5
6
7
8
9
10
11
12
13
14
15
16
17
18
19
20
21
22
23
24
# Master-Slave Mode
Master-slave deployment diagram
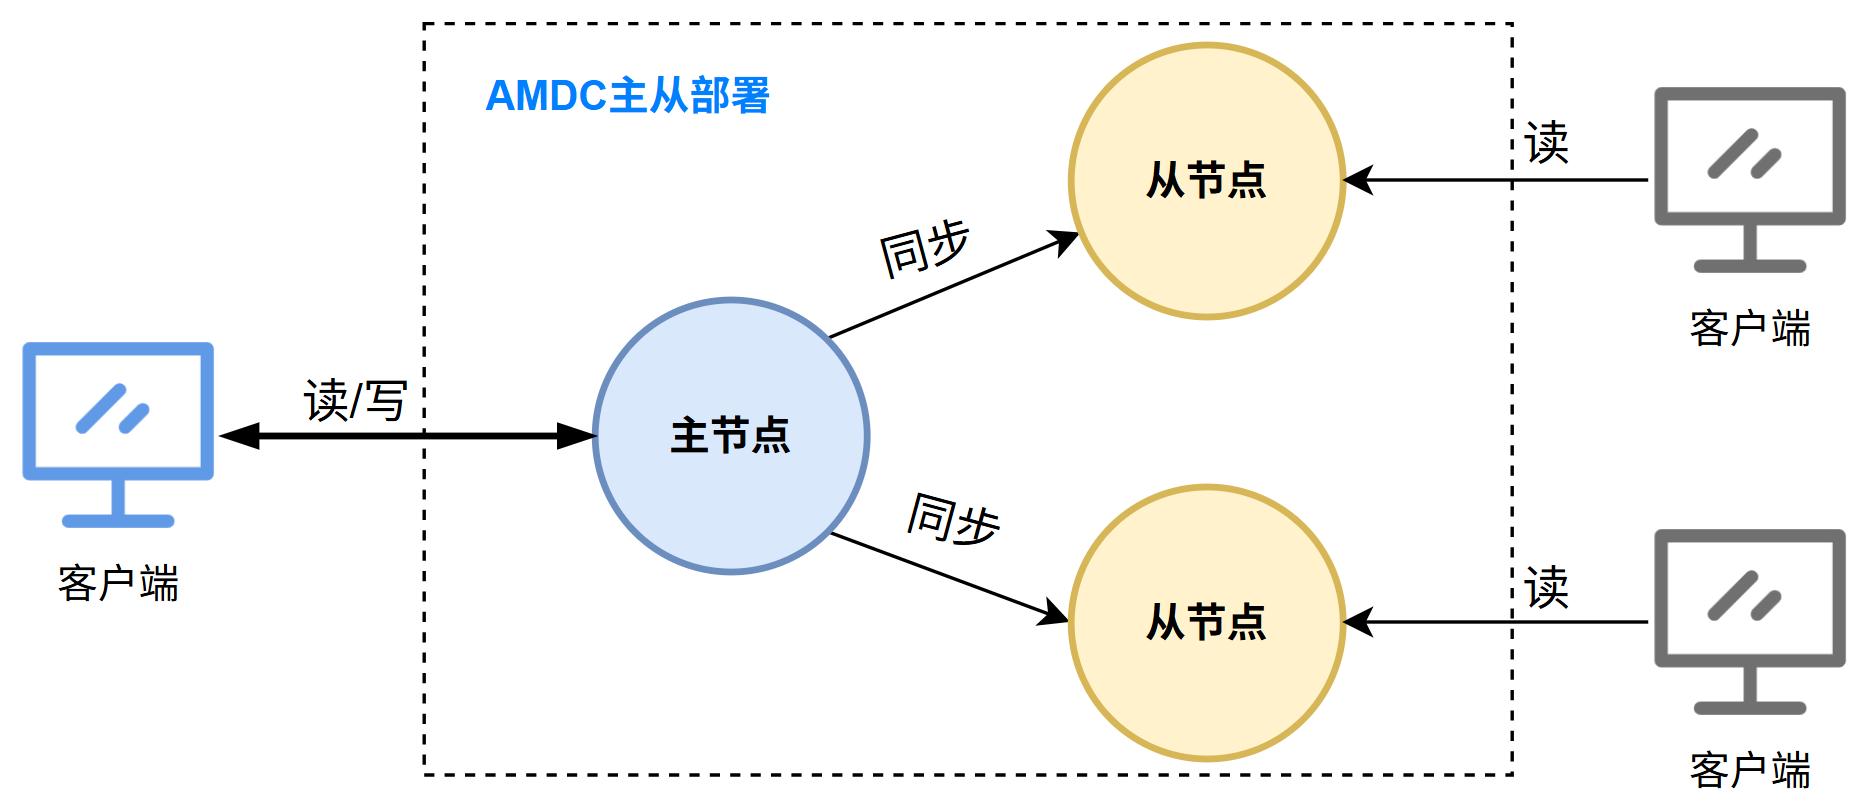
As shown above, three AMDC cache cores will be deployed, with one master node and two slave nodes. The deployment steps are:
- Prepare three server nodes (the following nodes are examples)
- Master node: 172.21.61.46
- Slave nodes: 172.21.61.66 and 172.21.61.32
- Upload AMDC cache core installation package (
AMDC-version-build-date-CPU-architecture.tar.gz) to the target server's installation directory (e.g., /opt directory)
- Upload AMDC cache core installation package (
- Extract installation package:
tar -zxf AMDC-version-build-date-CPU-architecture.tar.gz
- Extract installation package:
- Enter the extracted folder:
cd amdc
- Enter the extracted folder:
- Upload license file
license.licto each node's installation directory/opt/amdc. For licensing, refer to AMDC License Management Guide in this document
[root@private amdc]# tree -L 2
.
├── acls.properties
├── amdc-benchmark
├── amdc-check-aof
├── amdc-check-rdb
├── amdc-cli
├── amdc-conf-conv
├── amdc-sentinel
├── amdc-server
├── amdc.yaml
├── license.lic      # License file
└── sentinel.yaml
1
2
3
4
5
6
7
8
9
10
11
12
13- Upload license file
- Configure amdc.yaml file
Master node: Modify
bindinamdc.yamlto current machine IPNETWORK: # Network address to listen on, by default only listens on local loopback address, comment out this line to listen on all interfaces (exposing to public network has security risks) bind: - "172.21.61.46" # Modify to local IP address - "-::1" # Protection mode, when bind is not specified and no password, only allows local loopback address and Unix domain socket connections1
2
3
4
5
6Slave nodes:
- 172.21.61.66: Modify
bindinamdc.yamlto current machine IP andreplicaofto master node IP and portNETWORK: # Network address to listen on, by default only listens on local loopback address, comment out this line to listen on all interfaces (exposing to public network has security risks) bind: - "172.21.61.66" # Add local IP - "-::1" # Non-configuration items omitted REPLICATION: replicaof: "172.21.61.46 6359" # Add master node IP and port1
2
3
4
5
6
7
8
9 - 172.21.61.32: Modify
bindinamdc.yamlto current machine IP andreplicaofto master node IP and portNETWORK: # Network address to listen on, by default only listens on local loopback address, comment out this line to listen on all interfaces (exposing to public network has security risks) bind: - "172.21.61.32" # Add local IP - "-::1" # Non-configuration items omitted REPLICATION: replicaof: "172.21.61.46 6359" # Add master node IP and port1
2
3
4
5
6
7
8
9
- 172.21.61.66: Modify
- Start AMDC cache core on each node
- Start master node:
./amdc-server amdc.yaml - Start slave nodes:
./amdc-server amdc.yaml
- Verify installation
# Execute on master node
./amdc-cli -h 172.21.61.46 -p 6359 then enter info replication
```bash
172.21.61.46:6359> info replication
# Replication
role:master
connected_slaves:2
slave0:ip=172.21.61.66,port=6359,state=online,offset=322,lag=0
slave1:ip=172.21.61.32,port=6359,state=online,offset=322,lag=1
master_failover_state:no-failover
master_replid:c246dd7c8902e4ca62fc72df6473d9386b502c8e
master_replid2:0000000000000000000000000000000000000000
master_repl_offset:322
second_repl_offset:-1
repl_backlog_active:1
repl_backlog_size:1048576
repl_backlog_first_byte_offset:1
1
2
3
4
5
6
7
8
9
10
11
12
13
14
15
16
17- As shown above, successfully appearing two slave node information indicates successful startup of three-node master-slave mode
# Sentinel Mode
Sentinel mode deployment diagram
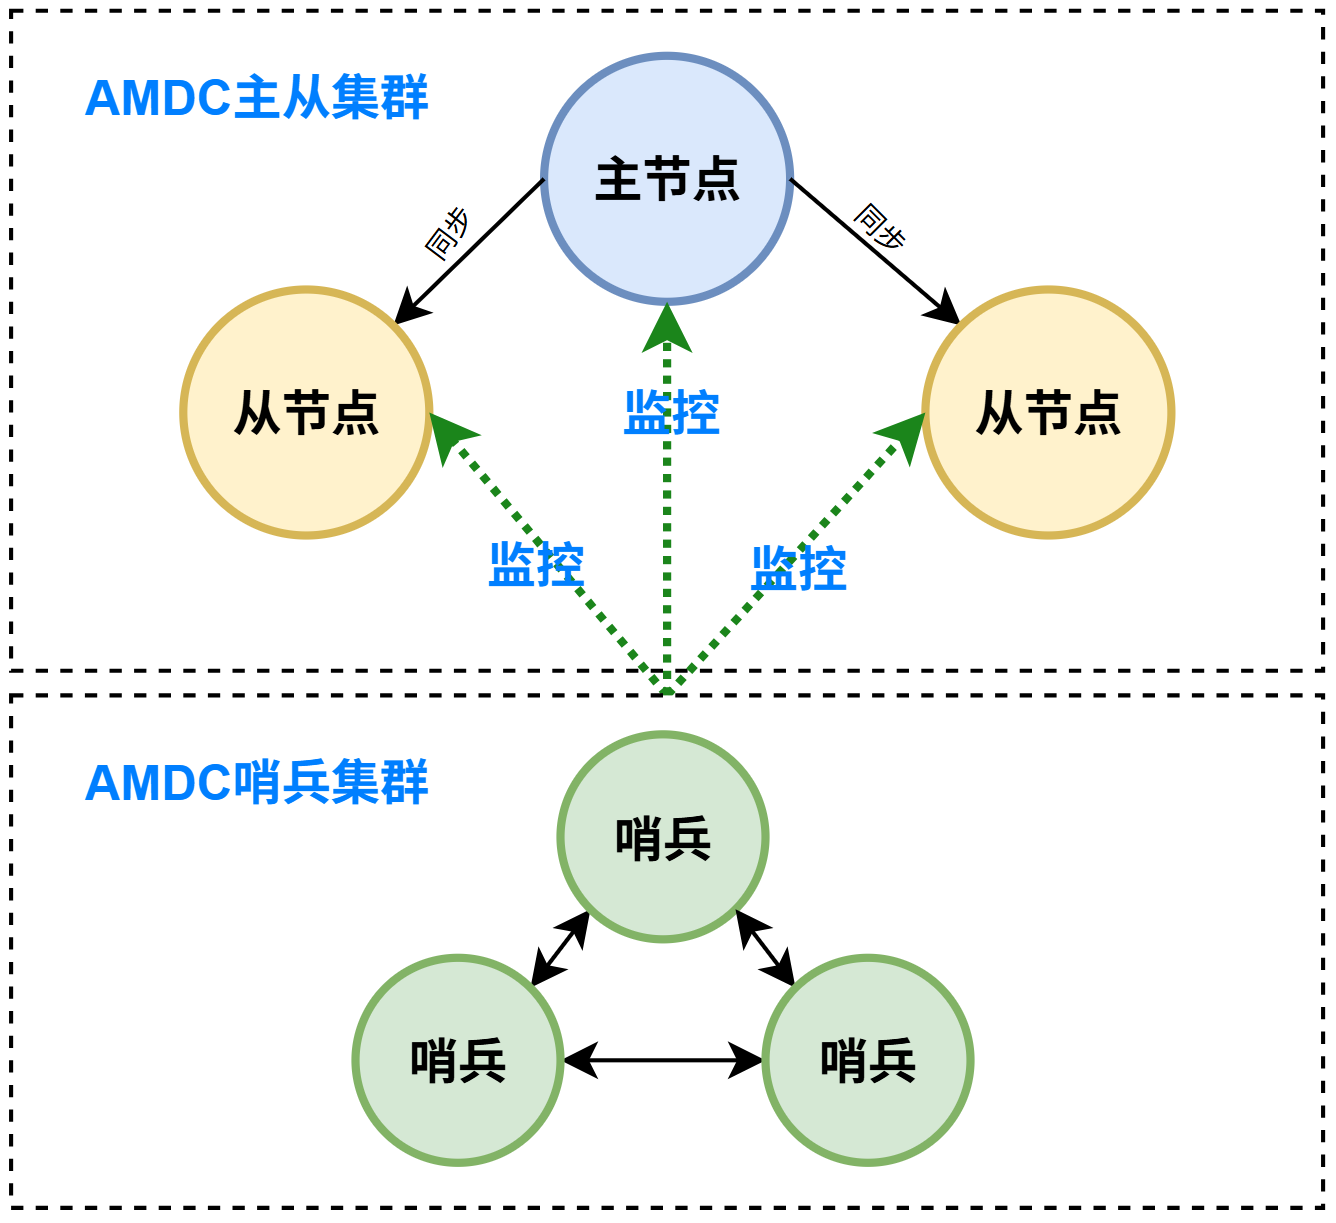
As shown above, three AMDC cache cores + three sentinels will be deployed. The deployment steps are:
- Prepare three server nodes (the following nodes are examples)
- 172.21.61.46: Master node + Sentinel
- 172.21.61.66: Slave node + Sentinel
- 172.21.61.32: Slave node + Sentinel
- Upload AMDC cache core installation package (
AMDC-version-build-date-CPU-architecture.tar.gz) to the target server's installation directory (e.g., /opt directory)
- Upload AMDC cache core installation package (
- Extract installation package:
tar -zxf AMDC-version-build-date-CPU-architecture.tar.gz
- Extract installation package:
- Enter the extracted folder:
cd amdc
- Enter the extracted folder:
- Upload license file
license.licto each node's installation directory/opt/amdc. For licensing, refer to AMDC License Management Guide in this document
- Upload license file
- Cache configuration
amdc.yamlfile
Master node: Modify
bindinamdc.yamlto current machine IPNETWORK: # Network address to listen on, by default only listens on local loopback address, comment out this line to listen on all interfaces (exposing to public network has security risks) bind: - "172.21.61.46" # Modify to local IP address - "-::1" # Protection mode, when bind is not specified and no password, only allows local loopback address and Unix domain socket connections1
2
3
4
5
6Slave nodes:
- 172.21.61.66: Modify
bindinamdc.yamlto current machine IP andreplicaofto master node IP and portNETWORK: # Network address to listen on, by default only listens on local loopback address, comment out this line to listen on all interfaces (exposing to public network has security risks) bind: - "172.21.61.66" # Add local IP - "-::1" # Non-configuration items omitted REPLICATION: replicaof: "172.21.61.46 6359" # Add master node IP and port1
2
3
4
5
6
7
8
9 - 172.21.61.32: Modify
bindinamdc.yamlto current machine IP andreplicaofto master node IP and portNETWORK: # Network address to listen on, by default only listens on local loopback address, comment out this line to listen on all interfaces (exposing to public network has security risks) bind: - "172.21.61.32" # Add local IP - "-::1" # Non-configuration items omitted REPLICATION: replicaof: "172.21.61.46 6359" # Add master node IP and port1
2
3
4
5
6
7
8
9
- 172.21.61.66: Modify
- Cache configuration
- Sentinel configuration
- 172.21.61.46 node sentinel modify bind to current IP, and master node IP
NETWORK:
  # Network address to listen on, by default only listens on local loopback address, comment out this line to listen on all interfaces (exposing to public network has security risks)
  bind:
      - "172.21.61.46"
      - "-::1"
# Non-configuration items omitted
SENTINEL:
  # Define master node to monitor, format is <master-name> <ip> <amdc-port> <quorum> (e.g., mymaster 127.0.0.1 6359 2 means at least 2 Sentinels must consider master node down to judge as objectively down)
  sentinel monitor: mymaster 172.21.61.46 6359 2
1
2
3
4
5
6
7
8
9 - 172.21.61.66 node sentinel modify bind to current IP, and master node IP
NETWORK:
  # Network address to listen on, by default only listens on local loopback address, comment out this line to listen on all interfaces (exposing to public network has security risks)
  bind:
      - "172.21.61.66"
      - "-::1"
# Non-configuration items omitted
SENTINEL:                                                                             # Define master node to monitor, format is <master-name> <ip> <amdc-port> <quorum> (e.g., mymaster 127.0.0.1 6359 2 means at least 2 Sentinels must consider master node down to judge as objectively down)
  sentinel monitor: mymaster 172.21.61.46 6359 2
1
2
3
4
5
6
7
8 - 172.21.61.32 node sentinel modify bind to current IP, and master node IP
NETWORK:
  # Network address to listen on, by default only listens on local loopback address, comment out this line to listen on all interfaces (exposing to public network has security risks)
  bind:
      - "172.21.61.32"
      - "-::1"
# Non-configuration items omitted
SENTINEL:
  # Define master node to monitor, format is <master-name> <ip> <amdc-port> <quorum> (e.g., mymaster 127.0.0.1 6359 2 means at least 2 Sentinels must consider master node down to judge as objectively down)
  sentinel monitor: mymaster 172.21.61.46 6359 2
1
2
3
4
5
6
7
8
9
- Start cache and sentinel on each node
- Start master node:
./amdc-server amdc.yaml - Start slave nodes:
./amdc-server amdc.yaml - Start sentinel:
./amdc-sentinel sentinel.yaml
- Verify sentinel mode
- Use
amdc-cliclient tool by specifying -p and -h parameters, specifying sentinel IP and port./amdc-cli -p 26359 -h 172.21.61.46 172.21.61.46:26359> info sentinel # Sentinel sentinel_masters:1 sentinel_tilt:0 sentinel_running_scripts:0 sentinel_scripts_queue_length:0 sentinel_simulate_failure_flags:0 master0:name=mymaster,status=ok,address=172.21.61.46:6359,slaves=2,sentinels=31
2
3
4
5
6
7
8
9 - As shown above, appearing master node information, slave node count and sentinel count are all correct, indicating successful deployment.
# Cluster Mode
Cluster deployment diagram
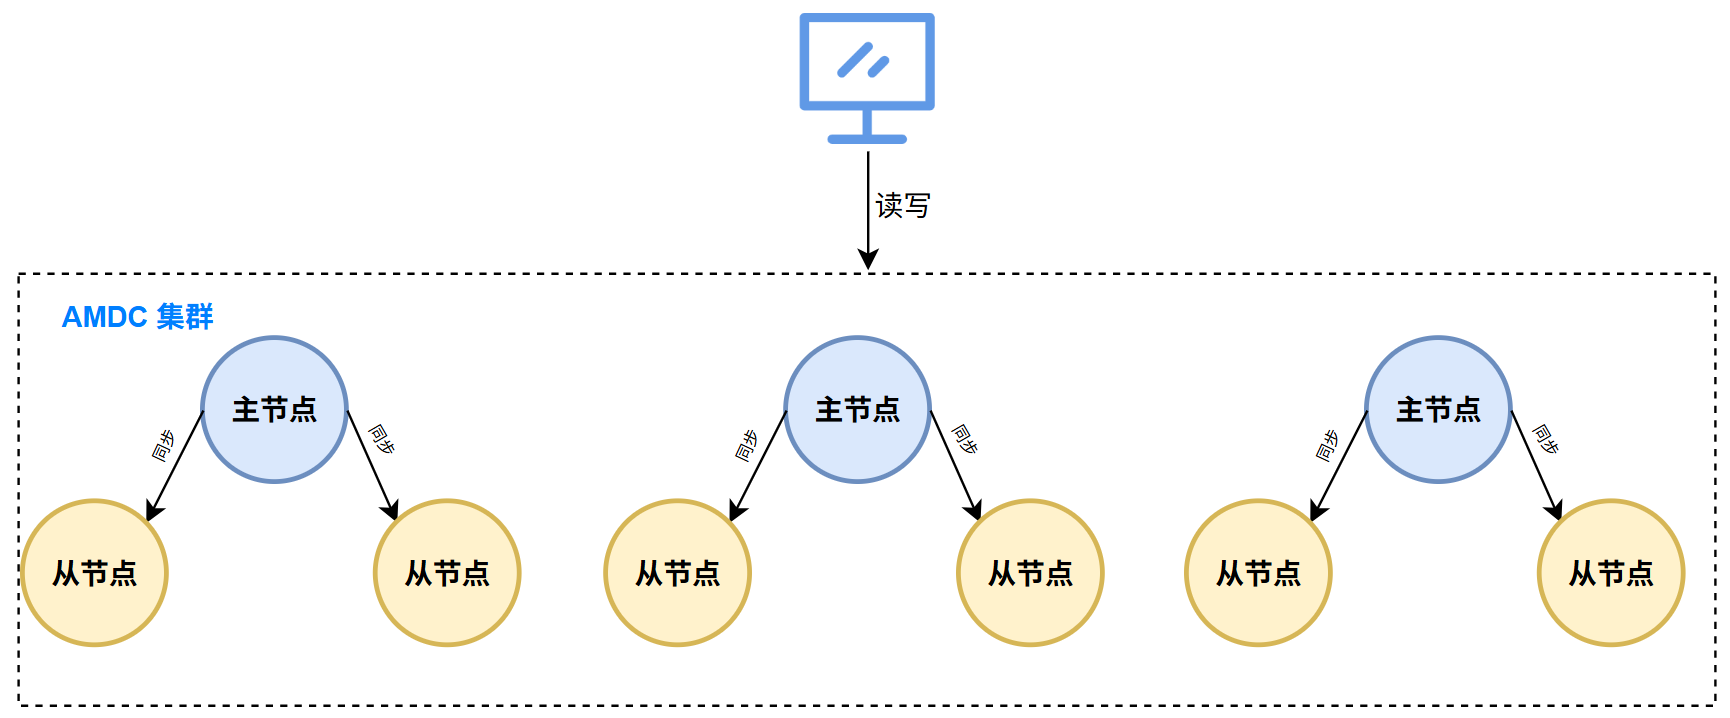
Cluster node planning
| Server IP | Role | Port |
|---|---|---|
| 172.21.61.46 | Cluster node 1 + slave node 1 | 6359, 6360 |
| 172.21.61.66 | Cluster node 2 + slave node 2 | 6359, 6360 |
| 172.21.61.32 | Cluster node 3 + slave node 3 | 6359, 6360 |
# Cluster Installation Steps
- Prepare server nodes
- Upload AMDC cache core installation package (
AMDC-version-build-date-CPU-architecture.tar.gz) to the above target server's installation directory (e.g., /opt/amdc directory)
- Upload AMDC cache core installation package (
- Extract installation package:
tar -zxf AMDC-version-build-date-CPU-architecture.tar.gz
- Extract installation package:
- Copy a copy of the installation package as
slavenode:cp -r amdc amdc-slave
- Copy a copy of the installation package as
- Upload license file
license.licto each node's installation directory/opt/amdc/(including slave). For licensing, refer to AMDC License Management Guide in this document
[root@private opt]# tree -L 3
.
├── amdc
│   ├── amdc                 # Master node directory
│   │   ├── acls.properties
│   │   ├── amdc-benchmark
│   │   ├── amdc-check-aof
│   │   ├── amdc-check-rdb
│   │   ├── amdc-cli
│   │   ├── amdc-conf-conv
│   │   ├── amdc-sentinel
│   │   ├── amdc-server
│   │   ├── amdc.yaml
│   │   ├── license.xml #License file
│   │   └── sentinel.yaml
│   └── amdc-slave          # Slave node directory
│       ├── acls.properties
│       ├── amdc-benchmark
│       ├── amdc-check-aof
│       ├── amdc-check-rdb
│       ├── amdc-cli
│       ├── amdc-conf-conv
│       ├── amdc-sentinel
│       ├── amdc-server
│       ├── amdc.yaml
│       ├── license.xml #License file
│       └── sentinel.yaml
1
2
3
4
5
6
7
8
9
10
11
12
13
14
15
16
17
18
19
20
21
22
23
24
25
26
27- Upload license file
- Cluster configuration
- Cluster node 1 (172.21.61.46): Modify
bindinamdc.yamlto current machine IP and enable cluster mode, and enable background running modeNETWORK: # Network address to listen on, by default only listens on local loopback address, comment out this line to listen on all interfaces (exposing to public network has security risks) bind: - "172.21.61.46" # Add local IP - "-::1" GENERAL: # Whether to run as daemon daemonize: yes # Non-configuration items omitted CLUSTER: # Whether to enable cluster mode cluster-enabled: yes1
2
3
4
5
6
7
8
9
10
11
12 - Cluster node 2 (172.21.61.66): Modify
bindinamdc.yamlto current machine IP and enable cluster mode, and enable background running modeNETWORK: # Network address to listen on, by default only listens on local loopback address, comment out this line to listen on all interfaces (exposing to public network has security risks) bind: - "172.21.61.66" # Add local IP - "-::1" # Non-configuration items omitted CLUSTER: # Whether to enable cluster mode cluster-enabled: yes1
2
3
4
5
6
7
8
9
10 - Cluster node 3 (172.21.61.32): Modify
bindinamdc.yamlto current machine IP and enable cluster mode, and enable background running modeNETWORK: # Network address to listen on, by default only listens on local loopback address, comment out this line to listen on all interfaces (exposing to public network has security risks) bind: - "172.21.61.32" # Add local IP - "-::1" # Non-configuration items omitted CLUSTER: # Whether to enable cluster mode cluster-enabled: yes1
2
3
4
5
6
7
8
9
10
- Slave node configuration
- Since master node and slave node are on the same machine, modify listening port to:
6360 - The following operations enter
amdc-slavedirectory - Slave node 1 (172.21.61.46): Modify
bindinamdc.yamlto current machine IP, Port and enable cluster mode, and enable background running modeNETWORK: # Network address to listen on, by default only listens on local loopback address, comment out this line to listen on all interfaces (exposing to public network has security risks) bind: - "172.21.61.46" # Add local IP - "-::1" port: 6360 GENERAL: # Whether to run as daemon daemonize: yes # pid file path pidfile: "/var/run/amdc-server-slave.pid" # Non-configuration items omitted CLUSTER: # Whether to enable cluster mode cluster-enabled: yes # Cluster configuration file path, automatically maintained by node cluster-config-file: "node-6360.conf"1
2
3
4
5
6
7
8
9
10
11
12
13
14
15
16
17 - Slave node 2 (172.21.61.66): Modify
bindinamdc.yamlto current machine IP, Port and enable cluster mode, and enable background running modeNETWORK: # Network address to listen on, by default only listens on local loopback address, comment out this line to listen on all interfaces (exposing to public network has security risks) bind: - "172.21.61.66" # Add local IP - "-::1" port: 6360 GENERAL: # Whether to run as daemon daemonize: yes # pid file path pidfile: "/var/run/amdc-server-slave.pid" # Non-configuration items omitted CLUSTER: # Whether to enable cluster mode cluster-enabled: yes # Cluster configuration file path, automatically maintained by node cluster-config-file: "node-6360.conf"1
2
3
4
5
6
7
8
9
10
11
12
13
14
15
16
17 - Slave node 3 (172.21.61.32): Modify
bindinamdc.yamlto current machine IP, Port and enable cluster mode, and enable background running modeNETWORK: # Network address to listen on, by default only listens on local loopback address, comment out this line to listen on all interfaces (exposing to public network has security risks) bind: - "172.21.61.32" # Add local IP - "-::1" port: 6360 GENERAL: # Whether to run as daemon daemonize: yes # pid file path pidfile: "/var/run/amdc-server-slave.pid" # Non-configuration items omitted CLUSTER: # Whether to enable cluster mode cluster-enabled: yes # Cluster configuration file path, automatically maintained by node cluster-config-file: "node-6360.conf"1
2
3
4
5
6
7
8
9
10
11
12
13
14
15
16
17
- Start cache and slave nodes on each node
- Start master node:
./amdc-server amdc.yaml - Start slave node (switch to amdc-slave):
./amdc-server amdc.yaml
- Use
amdc-cliclient tool to create cluster
amdc-cli:./amdc-cli --cluster create 172.21.61.46:6359 172.21.61.66:6359 172.21.61.32:6359 172.21.61.46:6360 172.21.61.66:6360 172.21.61.32:6360 --cluster-replicas 1Note:
amdc-cli --clustercommand user manual can be found in user manual.- During creation process, enter "yes" to confirm cluster node arrangement, as follows:
[root@private amdc]# ./amdc-cli --cluster create 172.21.61.46:6359 172.21.61.66:6359 172.21.61.32:6359 172.21.61.46:6360 172.21.61.66:6360 172.21.61.32:6360  --cluster-replicas 1
>>> Performing hash slots allocation on 6 nodes...
Master[0] -> Slots 0 - 5460
Master[1] -> Slots 5461 - 10922
Master[2] -> Slots 10923 - 16383
Adding replica 172.21.61.66:6360 to 172.21.61.46:6359
Adding replica 172.21.61.32:6360 to 172.21.61.66:6359
Adding replica 172.21.61.46:6360 to 172.21.61.32:6359
M: a11b0a053f596321a4e310046e2b69bca8c96d4a 172.21.61.46:6359
  slots:[0-5460] (5461 slots) master
M: ab6dcd5d434ce3ec8ad199ac1a3d610ac33f3a7f 172.21.61.66:6359
  slots:[5461-10922] (5462 slots) master
M: 70451b10ef6f7793083b47a994c900cccc218b39 172.21.61.32:6359
  slots:[10923-16383] (5461 slots) master
S: 37ffc8538d24b332d45d6732b1df7e9386114522 172.21.61.46:6360
  replicates 70451b10ef6f7793083b47a994c900cccc218b39
S: 3ffc63268838f02dd4e1d66f11b5a6ffdc83cdfe 172.21.61.66:6360
  replicates a11b0a053f596321a4e310046e2b69bca8c96d
S: 4862dfb143cf5de0bebb64370f77c8bbe5bfc917 172.21.61.32:6360
  replicates ab6dcd5d434ce3ec8ad199ac1a3d610ac33f3a7f
Can I set the above configuration? (type 'yes' to accept): yes
>>> Nodes configuration updated
>>> Assign a different config epoch to each node
>>> Sending CLUSTER MEET messages to join the cluster
Waiting for the cluster to join
.
>>> Performing Cluster Check (using node 172.21.61.46:6359)
M: a11b0a053f596321a4e310046e2b69bca8c96d4a 172.21.61.46:6359
  slots:[0-5460] (5461 slots) master
  1 additional replica(s)
S: 4862dfb143cf5de0bebb64370f77c8bbe5bfc917 172.21.61.32:6360
  slots: (0 slots) slave
  replicates ab6dcd5d434ce3ec8ad199ac1a3d610ac33f3a7f
S: 37ffc8538d24b332d45d6732b1df7e9386114522 172.21.61.46:6360
  slots: (0 slots) slave
  replicates 70451b10ef6f7793083b47a994c900cccc218b39
S: 3ffc63268838f02dd4e1d66f11b5a6ffdc83cdfe 172.21.61.66:6360
  slots: (0 slots) slave
  replicates a11b0a053f596321a4e310046e2b69bca8c96d4a
M: 70451b10ef6f7793083b47a994c900cccc218b39 172.21.61.32:6359
  slots:[10923-16383] (5461 slots) master
  1 additional replica(s)
M: ab6dcd5d434ce3ec8ad199ac1a3d610ac33f3a7f 172.21.61.66:6359
  slots:[5461-10922] (5462 slots) master
  1 additional replica(s)
[OK] All nodes agree about slots configuration.
>>> Check for open slots...
>>> Check slots coverage...
[OK] All 16384 slots covered.
1
2
3
4
5
6
7
8
9
10
11
12
13
14
15
16
17
18
19
20
21
22
23
24
25
26
27
28
29
30
31
32
33
34
35
36
37
38
39
40
41
42
43
44
45
46
47
48
49- Use
- Check cluster status
./amdc-cli --cluster info
[root@private amdc]# ./amdc-cli --cluster info
172.21.61.46:6359> cluster info
cluster_state:ok
cluster_slots_assigned:16384
cluster_slots_ok:16384
cluster_slots_pfail:0
cluster_slots_fail:0
cluster_known_nodes:6
cluster_size:3
cluster_current_epoch:7
cluster_my_epoch:1
cluster_stats_messages_ping_sent:100
cluster_stats_messages_pong_sent:131
cluster_stats_messages_auth-ack_sent:1
cluster_stats_messages_sent:232
cluster_stats_messages_ping_received:131
cluster_stats_messages_pong_received:96
cluster_stats_messages_fail_received:1
cluster_stats_messages_auth-req_received:1
cluster_stats_messages_received:229
1
2
3
4
5
6
7
8
9
10
11
12
13
14
15
16
17
18
19
20
# Docker Container Environment Installation
AMDC provides Docker installation packages for ARM and x86 architectures, allowing direct AMDC deployment through AMDC-Docker packages.
# Package Description
- AMDC-Docker compressed installation package names
- x86_64:
AMDC-Docker-20260204-amd64-kylin.tar.gz - arm64:
AMDC-Docker-20260204-arm64-kylin.tar.gz
Note: Package dates may differ, please select according to actual situation.
- Package directory structure
tree -l 1 AMDC-Docker-20260204-amd64-kylin
AMDC-Docker-20260204-amd64-kylin             # Docker package extraction directory
|-- AMDC-Docker-20260204-amd64-kylin.tar.gz  # Docker image file
|-- amdc
|   |-- amdc.conf                                     # AMDC configuration file
|   |-- license.xml                                   # License file
|-- amdc-dockercompose.yaml                   # Docker compose configuration file
2
3
4
5
6
7
# Installation Steps
The following uses AMDC-Docker-20260204-amd64-kylin.tar.gz as an example.
- Extract and import image
- Extract:
tar -zxvf AMDC-Docker-20260204-amd64-kylin.tar.gz - Enter extracted folder:
cd AMDC-Docker-20260204-amd64-kylin - Load image:
docker load < AMDC-Docker-20260204-amd64-kylin.tar.gz
- Modify license file
The AMDC license file needs to be mounted to the container's internal installation directory. The current example is amdc/license.xml. Please replace the license file before starting the container.
License file mounting instructions
- license.xml supports legacy licensing
- license.lic supports KBC authorization, place the requested license.lic file in the amdc directory and configure mounting in
amdc-dockercompose.yaml- acls.properties unified authorization configuration file needs to be added and mounted to container path:
/opt/amdc
- Image start and stop
- Start command:
docker-compose -f amdc-dockercompose.yaml up -d - Stop command:
docker-compose -f amdc-dockercompose.yaml down
amdc-dockercompose.yamlconfiguration description
version: '3'
services:
  amdc:
    image: harbor.apusic.com/apusic/amdc:V2.0.4.20260204-kylin-amd64
    ports:
      - 6359:6359
    volumes:
      - ./amdc/amdc.yaml:/opt/amdc/amdc.yaml:z       # Configuration file mount
      - ./amdc/license.xml:/opt/amdc/license.xml:z   # License file mount (if license.lic, please modify)
      - ./amdc/acls.properties:/opt/amdc/acls.properties:z # Unified authorization file mount
      - ./amdc/dump.rdb:/opt/amdc/dump.rdb:z          # Cache rdb file mount (needs to be added)
    working_dir: /opt/amdc
    command: ./amdc-server
2
3
4
5
6
7
8
9
10
11
12
13
# RPM Package Installation
RPM (Red Hat Package Manager) installation package is a format used for software package management in Linux systems, originally developed by Red Hat and now widely used in Red Hat-based distributions. AMDC provides RPM packages for ARM and x86 architectures, which can be installed using the rpm command. Supported operating systems include:
- Kylin
- OpenEuler
- CentOS
# Package Installation
- x86_64:
AMDC-2.0.4-20260206-1.el7.x86_64.rpm - arm64:
AMDC-2.0.4-20260206-1.el7.aarch64.rpm
- Installation command:
rpm -ivh AMDC-2.0.4-20260206-1.el7.x86_64.rpm
Preparing...                          ################################# [100%]
Updating / installing...
   1:amdc-2.0.4-1.el7                 ################################# [100%]
2
3
4
- After installation, the product media installation directory is
/opt/amdc-2.0.4 - Import the license file to
/opt/amdc-2.0.4/license.xml - Start command:
/opt/amdc-2.0.4/amdc-server
# Stopping Cache Core Service
AMDC cache core provides multiple stopping methods. To ensure data safety and system stability, it is recommended to choose the appropriate stopping method according to the following priority order:
# Stopping Methods
Send SHUTDOWN command via client
This is the safest stopping method. AMDC will complete data persistence before exiting, ensuring data integrity.
./amdc-cli -h [IP address] -p [port] -a [password] shutdown1Interactive client shutdown
When already connected to the AMDC client, you can directly execute the shutdown command:
127.0.0.1:6359> shutdown1
Execution flow:
- Disconnect all client connections
- Execute RDB/AOF persistence operations according to configuration
- Safely exit the service process
# Emergency Stopping Method
When AMDC service is unresponsive or cannot be stopped normally, this method can be used. Warning: This operation may cause data loss!
Operation steps:
Find AMDC process PID:
ss -nltp | grep amdc
# or
ps -ef | grep amdc
1
2
3Forcefully terminate process:
kill -9 [process_id]1
# Stopping Method Comparison
| Stopping Method | Data Safety | Applicable Scenario | Recommendation |
|---|---|---|---|
| Client SHUTDOWN command | High | Normal maintenance, planned shutdown | Recommended |
| Interactive shutdown | High | Debugging, testing environment | Recommended |
| Forced kill -9 | Low | Service unresponsive, emergency fault handling | Not recommended |
Important note: In production environments, please prioritize using graceful shutdown methods to avoid data loss risks caused by forced termination. Only consider using forced termination when AMDC service is completely unresponsive and cannot be stopped through normal methods.
# License Authorization Management
# Authorization Mode Overview
Apusic In-Memory Data Cache (AMDC) V2.0.4 supports three License authorization verification modes. Users can choose the appropriate authorization method according to actual needs:
| Authorization Mode | Applicable Scenario | Configuration File | Features |
|---|---|---|---|
| Kingdee Apusic Local Authorization | Independent deployment, offline environment | license.xml | Local file authorization, supports binding IP, MAC address |
| Kingdee KBC Authorization | Standard production environment | license.lic | Local authorization file, verified by authorization code |
| Kingdee Unified Authorization Center | Multi-tenant, cloud environment | acls.properties | Centralized authorization management, supports multi-tenant |
Default authorization mode: Kingdee Apusic local authorization and Kingdee KBC authorization verification
# Authorization Configuration Details
# Kingdee Apusic Local Authorization
Applicable scenarios: Offline environment, independent deployment, testing environment
Configuration steps:
- Obtain
license.xmlauthorization file - Place the authorization file in AMDC installation directory
- Configure authorization file path in
amdc.yaml:
license: "license.xml"
# Kingdee KBC Authorization
Applicable scenarios: Standard production environment, device binding scenarios, offline environment
Configuration steps:
Obtain device feature code
Execute AMDC service startup command, the system will automatically output the device feature code:
./amdc-server1Output example:
400987:C 05 Feb 2026 17:33:59.232 # Warning: no config file specified, using the ./amdc.yaml
400987:C 05 Feb 2026 17:33:59.232 # oO0OoO0OoO0Oo AMDC is starting oO0OoO0OoO0Oo
400987:C 05 Feb 2026 17:33:59.232 * AMDC KBC authorization code: 'SZTY-1486655719' for mac: 00-00-00-00-00-00 (Example MAC address)
400987:C 05 Feb 2026 17:33:59.235 # No valid license file found: ./license.xml or ./license.lic
400987:C 05 Feb 2026 17:33:59.235 # Local license verification failed!
1
2
3
4
5Feature code description:
- Format:
SZTY-XXXXXXXXXX(starting with SZTY) - Binding information: MAC address or other hardware features
- Note: Each device's feature code is unique and cannot be used across devices
- Format:
Request authorization file
- Access Kingdee KBC authorization system (this operation is performed by Kingdee Apusic sales, implementation or R&D personnel)
- Use the obtained feature code to request authorization
- Download the generated
license.licfile
Configure authorization file
- Place the
license.licfile in AMDC installation directory - Configure authorization file path in
amdc.yaml:
license: "license.lic"1- Place the
# Kingdee Unified Authorization Center
Applicable scenarios: Multi-tenant environment, cloud platform deployment, centralized authorization management
Configuration steps:
Create
acls.propertiesconfiguration fileConfigure authorization center connection information:
# Whether to enable unified authorization center
apusic_acls_enable=true

# Authorization center addresses (multiple addresses separated by commas)
apusic_acls_authUrls=192.168.1.100:8080,192.168.1.101:8080

# Namespace
apusic_acls_ns=public

# Tenant name (if unsure, can be filled as public)
apusic_acls_tenant=public
1
2
3
4
5
6
7
8
9
10
11Place the
acls.propertiesfile in AMDC installation directory
# Authorization File Management
# Authorization File Location
All authorization files must be placed in AMDC installation directory, at the same level as the amdc-server executable file.
# Authorization Hot Update
AMDC supports authorization file hot update without restarting the service:
- Directly replace existing authorization file content
- The system will automatically detect and load new authorization information
- Note: Ensure new authorization file format is correct to avoid authorization failure
# Authorization Verification Priority
When multiple authorization files exist simultaneously, AMDC verifies according to the following priority:
acls.properties(Unified Authorization Center)license.lic(KBC Authorization)license.xml(Local Authorization)
# Troubleshooting
# Common Error Messages
- "No valid license file found": No valid authorization file found
- "Local license verification failed": Authorization file invalid or expired
- "Authorization code mismatch": Feature code does not match device
# Solutions
- Confirm authorization file is placed in correct directory
- Verify authorization file format and content are correct
- Check if device feature code matches authorization file
- Confirm authorization file is within validity period
# Cache Core Service Parameter Description
# Network Configuration Parameters
# Listen Address Configuration
| Parameter Name | Default Value | Description | Usage |
|---|---|---|---|
bind | 127.0.0.1 -::1 | Network address to listen on, specifies IP address for client cache access, connections not possible except from bound addresses | Can bind multiple addresses, e.g.: bind:- "127.0.0.1"- "192.168.0.190" |
# Port Configuration
| Parameter Name | Default Value | Description | Usage |
|---|---|---|---|
port | 6359 | TCP port to listen on, set to 0 to not listen on TCP socket | port: 6359 |
# Protection Mode
| Parameter Name | Default Value | Description |
|---|---|---|
protected-mode | yes | Protection mode, when bind is not specified and no password, only allows local loopback address and Unix domain socket connections |
# Background Running Configuration
# Daemon Process Mode
| Parameter Name | Default Value | Description | Usage |
|---|---|---|---|
daemonize | no | Whether to run as daemon process, yes means background running and generates pid file | daemonize: yes, Note: logfile parameter needs to be filled in for log viewing |
# PID File Configuration
| Parameter Name | Default Value | Description | Usage |
|---|---|---|---|
pidfile | /var/run/amdc-sentinel.pid | pid file path, generated by default in daemon process mode | pidfile: "/var/run/amdc-server.pid" |
# Security Authentication Configuration
# Password Authentication
| Parameter Name | Description | Usage |
|---|---|---|
requirepass | Set password, can be empty. Slave node password should be consistent with master node password | requirepass: "123456"Note: When users.acl exists, server prioritizes password in users.acl |
masterauth | Master node password, if master node has no password then not needed, if password exists, all nodes need to fill this parameter regardless of master or slave | masterauth: "123456" |
# Cluster Configuration
# Cluster Mode
| Parameter Name | Default Value | Description | Usage |
|---|---|---|---|
cluster-enabled | - | Whether to enable cluster mode | cluster-enabled: "yes" |
# Cluster Configuration File
| Parameter Name | Default Value | Description |
|---|---|---|
cluster-config-file | - | Cluster configuration file path, automatically maintained by node |
# Cluster Port
| Parameter Name | Default Value | Description | Usage |
|---|---|---|---|
port | 6359 | TCP port to listen on, set to 0 to not listen on TCP socket | port: 6359 |
| Cluster Bus | 16359 | Gossip communication port between cluster nodes (= cache port + 10000) |
# Sentinel Configuration
# Sentinel Port
| Parameter Name | Default Value | Description |
|---|---|---|
port | 26359 | TCP port listened by sentinel process |
# Sentinel Monitoring Configuration
| Parameter Name | Description | Usage |
|---|---|---|
sentinel monitor | Configuration for master node being monitored | sentinel monitor: mymaster 127.0.0.1 6379 1 |
sentinel auth-pass | Master node password verification | sentinel auth-pass: mymaster 123456 |
# Master-Slave Mode
# Master-Slave Configuration
| Parameter Name | Description | Usage |
|---|---|---|
replicaof | Specify master node address and port | replicaof: "172.21.61.46 6359" |
# Storage Configuration
# Data File Configuration
| Parameter Name | Default Value | Description |
|---|---|---|
dbfilename | "dump.rdb" | RDB file name, not including path |
dir | "./" | RDB files, AOF folder, license file, apusic-acls file, aclfile file, cluster-config-file and other relative path files are all affected by dir parameter |
# AOF Persistence Configuration
| Parameter Name | Default Value | Description | Usage |
|---|---|---|---|
appendonly | no | Whether to enable AOF persistence | appendonly: yes |
appendfilename | "appendonly.aof" | AOF file name | appendfilename: "amdc.aof" |
appendfsync | everysec | AOF flush strategy:no (depends on system)always (every write)everysec (once per second) | appendfsync: everysec |
no-appendfsync-on-rewrite | no | Whether to disable main process fsync during AOF rewrite | no-appendfsync-on-rewrite: yes |
auto-aof-rewrite-percentage | 100 | Percentage trigger for AOF auto-rewrite | auto-aof-rewrite-percentage: 100 |
auto-aof-rewrite-min-size | 64mb | Minimum file size for AOF auto-rewrite | auto-aof-rewrite-min-size: 64mb |
aof-load-truncated | yes | Whether to load truncated AOF file at startup | aof-load-truncated: yes |
aof-use-rdb-preamble | yes | Whether to use RDB prefix during AOF rewrite | aof-use-rdb-preamble: yes |
# Important Configuration Examples
# Standalone Mode Configuration Example
NETWORK:
  bind:
    - "0.0.0.0"  # Allow all IP access
  port: 6359
  protected-mode: yes

GENERAL:
  daemonize: yes  # Background running
  pidfile: "/var/run/amdc-server.pid"

SECURITY:
  requirepass: "your_password"  # Set access password
2
3
4
5
6
7
8
9
10
11
12
# Master-Slave Mode Configuration Example
# Master node configuration
NETWORK:
  bind:
    - "172.21.61.46"  # Master node IP
  port: 6359

GENERAL:
  daemonize: yes

SECURITY:
  requirepass: "master_password"  # Master node password

# Slave node configuration
NETWORK:
  bind:
    - "172.21.61.66"  # Slave node IP
  port: 6359

GENERAL:
  daemonize: yes

REPLICATION:
  replicaof: "172.21.61.46 6359"  # Specify master node

SECURITY:
  requirepass: "master_password"  # Slave node password must be consistent with master
  masterauth: "master_password"   # Master node password
2
3
4
5
6
7
8
9
10
11
12
13
14
15
16
17
18
19
20
21
22
23
24
25
26
27
# Sentinel Mode Configuration Example
NETWORK:
  bind:
    - "172.21.61.46"  # Sentinel node IP
  port: 26359

GENERAL:
  daemonize: yes

SENTINEL:
  sentinel monitor: mymaster 172.21.61.46 6359 2  # Monitor master node
  sentinel auth-pass: mymaster master_password    # Master node password
2
3
4
5
6
7
8
9
10
11
# Cluster Mode Configuration Example
NETWORK:
  bind:
    - "172.21.61.46"  # Cluster node IP
  port: 6359

GENERAL:
  daemonize: yes

CLUSTER:
  cluster-enabled: yes  # Enable cluster mode
  cluster-config-file: "nodes.conf"  # Cluster configuration file

SECURITY:
  requirepass: "cluster_password"  # Cluster password
2
3
4
5
6
7
8
9
10
11
12
13
14
# Web Console Installation
# Installation Package Introduction
- Installation package:
AMDC-Console-[version]-[date]-[hardware-architecture].tar.gz
# Installation Steps
Main installation steps are:
- Upload AMDC console installation package to target server's installation directory (e.g., /opt directory)
- Extract installation package:
tar -zxf AMDC-Console-[version]-[date]-[hardware-architecture].tar.gz - Enter extracted folder:
cd amdc-console - Execute startup command:
nohup ./amdc-console >nohup.out 2>&1 & (background startup) - After startup, you can access AMDC console through browser: visit
http://ip:portusing browser (where ip represents the IP of the server where AMDC console is deployed, port is the console port, e.g.,192.168.0.129:9001`
After startup, you can access the console through browser.
# Stopping Web Console
To stop AMDC Web console service, you need to forcefully terminate the AMDC console service process.
Steps:
- Find console process PID through port process command:
netstat -nltp | grep 9001ornetstat -nltp | grep amdc-console - Execute kill -9 command to forcibly kill process:
kill -9 process_id