Installation Manual

# System Environment Requirements
There are no special requirements; choose the installation package corresponding to your system.
# Recommended Configuration
| Deployment Mode | Operating System | Installation Content | Hardware Specifications (CPU/Memory/Disk) | Number of Servers |
|---|---|---|---|---|
| Standalone | Linux | AMDC Console, AMDC Service | 8 cores/16GB/100GB | 1 |
| Master-Slave | Linux | AMDC Console, AMDC Service | 8 cores/16GB/100GB | 2 |
| Sentinel | Linux | AMDC Console, AMDC Service | 8 cores/16GB/100GB | 3 |
| Cluster | Linux | AMDC Console, AMDC Service | 8 cores/16GB/100GB | 3 |
# Supported Environments
| Platform Type | System Type |
|---|---|
| Chip Type | Huawei Kunpeng, Hisilicon, Phytium, Zhaoxin and other X86/ARM architecture chips |
| Operating Systems | NeoKylin series, UOS by UnionTech, NeoKylin and others |
| Other Linux Series | RedHat series, CentOS series, Ubuntu series and others |
# Mode Selection
- Standalone:Use in scenarios where dependence on cache is low and only serves to enhance system response speed.
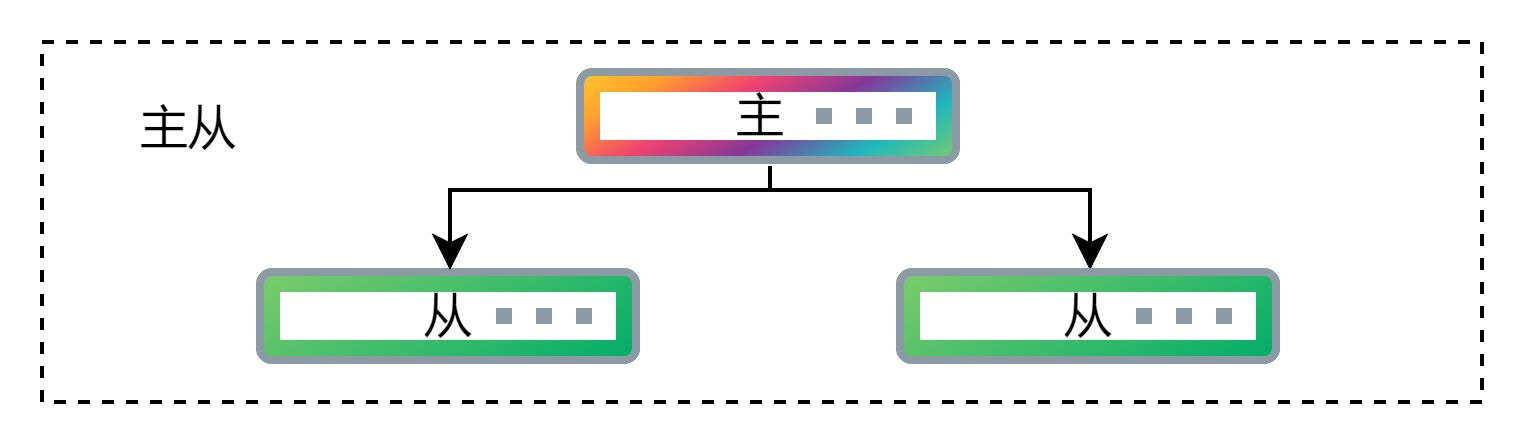
- Master-Slave:Use in scenarios where dependence on cache is low, enhances system response speed, but data is important or requires quick replacement.
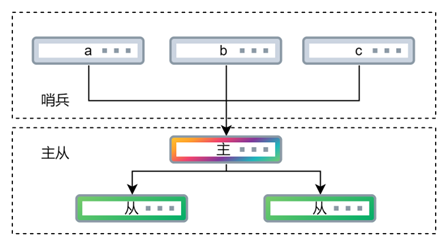
- Sentinel:Use in scenarios with high dependence on cache and needs rapid failover.
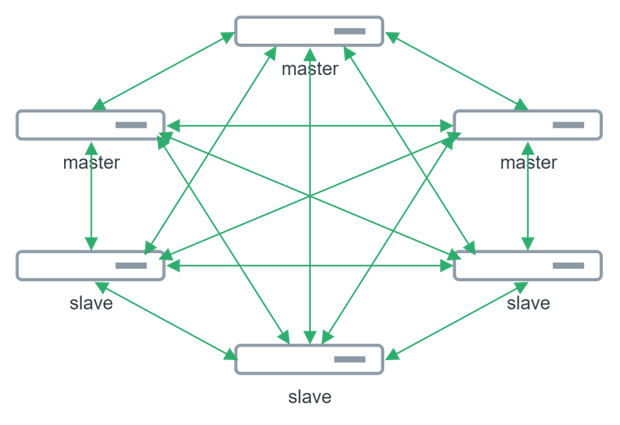
- Cluster:Use in scenarios with high dependence on cache, needs rapid failover, and provides elastic scaling capabilities (expansion or reduction of capacity).
# Installation
# AMDC Deployment and Start/Stop
AMDC is divided into two parts: "Cache Service" and "Console". The AMDC cache service primarily covers Redis features and supports national encryption standards, data persistence, etc. The AMDC management console supports cache monitoring, automatic deployment, cluster/node management, automatic alerts, real-time configuration, data operations, and permission control functions.
# Preparations Before Deployment
The AMDC cache service and console can be deployed separately or through the console. This section will introduce the installation and deployment of the AMDC cache service and AMDC console respectively.
# Obtaining the Installation Package
Download the AMDC software installation package from the Kingdee Apusic official website (opens new window), or obtain the corresponding installation package files from the AMDC product CD-ROM. Note the distinction between the AMDC cache service and AMDC console installation packages.
# Regarding License
- Use an officially authorized valid license file within its validity period.
- Use the official Kingdee Apusic authorization center.
- Use the KBC unified authorization center.
Obtaining the License File
The license file is generated using a feature code. Different machines have different feature codes, so they are not universal. When starting via terminal command, the feature code information will be printed in the terminal, starting with SZTY as shown in the figure below, the content highlighted in red is the feature code:

# Deploying the AMDC Console
The main steps for installation are:
- Upload the AMDC console installation package(amdc_console_release_[version]_[chip_type].tar.gz,hereafter omitting_[chip_type]) to the installation directory of the target server(e.g., /opt directory).
- Unpack the installation package:
tar -zxf amdc_console_release_v2.tar.gz - Enter the unpacked folder:
cd amdc-console - Execute the start command:
nohup ./amdc-console >nohup.out 2>&1 &(backend startup) - After starting, access the AMDC console through a browser: use Google Chrome or Firefox to visit
http://ip:port(where ip represents the IP address of the server where the AMDC console is deployed,portis the console port). e.g.192.168.0.129:9001
After starting, you can access the console through a browser.
# Stopping the AMDC Console
To stop the AMDC console service, forcibly terminate the AMDC console service process.
Steps:
- Find the console process PID via the port process command:
netstat -nltp | grep 9001 - Execute the kill -9 command to forcefully kill the process:
kill -9 Process ID
# Deploying the AMDC Cache Service
The AMDC caching service can be deployed with a single click through the AMDC Console's graphical user interface, or it can be deployed via the command line. Below, we will describe how to deploy the AMDC caching service through the command line method, as well as how to deploy it through the AMDC Console.
The main steps for deploying the AMDC cache service via the command line are:
# Standalone Mode
Steps:
- Upload the AMDC cache service installation package(amdc_amd64.tar.gz)to the installation directory of the target server (e.g., /opt directory)
- Unpack the installation package:
tar -zxf amdc-core-[version]-linux-[arch]-[date].tar.gz - Enter the unpacked folder:
cd amdc - Execute the start command to launch the AMDC cache service: :
./amdc-server(foreground start)/./amdc-server --daemonize yes(background start)
Relevant configuration items:
| Parameter Name | Explanation | Usage |
|---|---|---|
| Bind | Specifies the IP address that the client uses to access the cache. Apart from the bound address, connections cannot be made. For example: 127.0.0.1, accessible only by the local machine; 0.0.0.0 indicates all IP addresses of the local machine can access it | Listening IP address, when the default value is 0.0.0.0, no other address can be bound; additionally multiple addresses can be bound, it is recommended to add the local access IP and remote access IP, such as: Bind: - "127.0.0.1" - "192.168.0.190" |
| Port | Port number of the cache service | Port: 6359 |
| RequirePass | Set password | Authentication password, if the users.acl file exists, the server prioritizes the password in users.acl |
# Master-Slave Mode
- Upload the AMDC cache service installation package(amdc_amd64.tar.gz)to the installation directory of the target server (e.g., /opt directory).At least two nodes are required to form one master and one slave, more slave nodes can also be deployed to form one master and n slaves.
- Unpack the installation package:
tar -zxf amdc-core-[version]-linux-[arch]-[date].tar.gz - Enter the unpacked folder:
cd amdc - If this node is the master node, proceed to step (5); if this node is a slave node, configure the "ip port" of the master node in the Replicaof configuration item under the Replication section of the conf.yaml file.
- Execute the start command to launch the AMDC cache service:
./amdc-server(foreground start)/./amdc-server --daemonize yes(background start)
Master-Slave Deployment Diagram
Relevant configuration items:
| Parameter Name | Explanation | Usage |
|---|---|---|
| Bind | Specifies the IP address that the client uses to access the cache. Apart from the bound address, connections cannot be made. For example: 127.0.0.1, accessible only by the local machine; 0.0.0.0 indicates all IP addresses of the local machine can access it | Listening IP address, when the default value is 0.0.0.0, no other address can be bound; additionally multiple addresses can be bound, it is recommended to add the local access IP and remote access IP, such as: Bind: - "127.0.0.1" - "192.168.0.190" |
| Port | Port number of the cache service | Port: 6359 |
| RequirePass | Set password, can be left empty. It is recommended that the password of the slave node matches the password of the master node to ensure normal connection and usage after a master-slave switch. | Authentication password, if the users.acl file exists, the server prioritizes the password in users.acl, eg: RequirePass: "123456" |
| Replicaof | Specifies the IP and port of the master node | Set the server to start as a slave node of the specified server, eg: Replicaof: "127.0.0.1 6378" |
| MasterAuth | Password of the master node, not required if the master node has no password | MasterAuth: "123456" |
# Sentinel Mode
Set up an operational master-slave cluster model and place the sentinel files amdc-sentinel and sentinel.yaml under the target server directory;
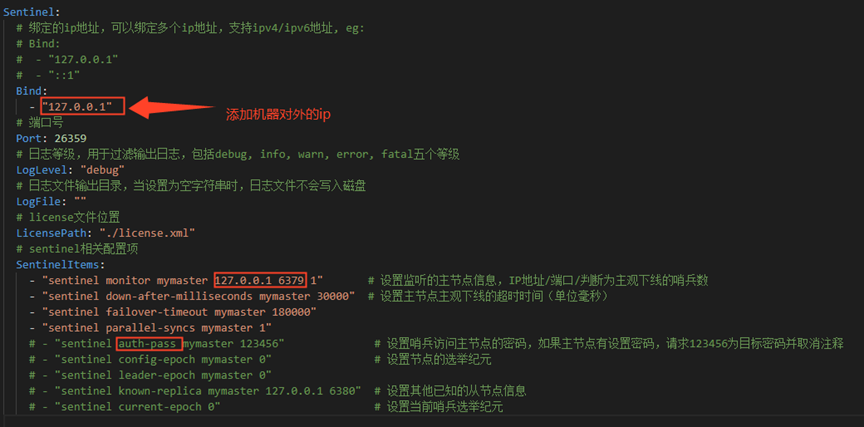
Configure the sentinel.yaml file for the sentinel. Bind specifies the IP for accessing the sentinel, and port is the port for the sentinel application. Among the SentinelItems, the sentinel monitor entry must be designated for the master node.
- sentinel monitor mymaster: Master service IP, Master service port, Quorum (The quorum value should be less than the total number of nodes but more than half the number of nodes).
- Execute the startup command to initiate the AMDC Sentinel:
nohup ./amdc-sentinel >sentinel.log 2>&1 &
Sentinel Deployment Diagram
Relevant Configuration Items:
| Parameter Name | Explanation | Usage |
|---|---|---|
| Bind | Specifies the IP address for client access to the sentinel. Connections cannot be made from outside the bound address. Default is 127.0.0.1, accessible only by the local machine. | Listening IP address, multiple addresses can be bound. It is recommended to add both local access IP and remote access IP, for example: Bind: - "127.0.0.1" - "192.168.0.190" |
| Port | The port number for the caching service. | Port: 6359 |
| SentinelItems | Detailed configuration for the sentinel, reference can be made to Redis sentinel configurations. | Other configurations can be modified according to needs, however, monitor must be set to the IP and port of the master node. - "sentinel monitor mymaster 127.0.0.1 6379 1" If the master node has a password, include the password validation parameter. - "sentinel auth-pass mymaster 123456" |
# Cluster Mode
Steps:
- Upload the AMDC cache service installation package(amdc_amd64.tar.gz)to the installation directory on the target server (e.g., /opt), requiring at least 3 master nodes to form a cluster, typically using 3 masters and 3 slaves.
- Extract the installation package:
tar -zxf amdc-core-[version]-linux-[arch]-[date].tar.gz - Enter the unpacked folder:
cd amdc - Configure parameters such as Bind, ClusterEnabled, etc., for all nodes, refer to the relevant configurations below.
- Execute the startup command to start the AMDC cache service:
./amdc-server(foreground startup)/./amdc-server --daemonize yes(background startup) - On any one of the nodes, send a command using amdc-cli:
./amdc-cli --cluster create [ip:port ...(multiple node information separated by spaces)] --cluster-replicas [number(number of slave nodes per master node)]
Cluster Deployment Diagram
Relevant Configuration Items:
| Parameter Name | Explanation | Usage |
|---|---|---|
| Bind | Specifies the IP address for clients to access the cache service, unable to connect from outside the bound address. Default is 127.0.0.1, accessible only by the local machine. | Listening IP address, multiple addresses can be bound. It is recommended to add both local access IP and remote access IP, for example: Bind: - "127.0.0.1" - "192.168.0.190" |
| Port | The port number for the cache service. | Port: 6359 |
| RequirePass | Set a password, the password must be consistent across all nodes, can be left blank. | Authentication password, in the presence of users.acl, the server prioritizes the password in users.acl, e.g.: RequirePass: "123456" |
| MasterAuth | Password for the master node, if the master node does not have a password, it doesn't need to be filled in. If there is a password, all nodes regardless of being master or slave need to specify this parameter. | MasterAuth: "123456" |
| ClusterEnabled | Whether to enable cluster mode. | yes / no,eg: ClusterEnabled: "yes" |
| ClusterConfigFile | Name of each cluster node's configuration file, automatically generated and updated by the node, cannot be renamed after generation, and cannot be manually edited. | ClusterConfigFile: "./node.conf" |
# Launching the AMDC Cache Service
There are two ways to launch the AMDC cache service: command-line startup and console startup (effective for services deployed through the console). When the console automatically deploys, the AMDC cache service is launched by default.
# Command Line Startup of the AMDC Cache Service
The command line has both front-end and back-end startup modes. In front-end startup mode, after starting, no other command-line operations can be performed in the terminal. If you want to operate, you must use Ctrl+C, which simultaneously stops the AMDC cache service. Therefore, when launching the AMDC cache service via the command line, it is recommended to use back-end startup mode.
Front-end startup command for the AMDC cache service:
./amdc-server [-conf conf.yaml]Back-end startup command for the AMDC cache service:
./amdc-server [-conf conf.yaml] --daemonize yes
At this point, the installation and launch of the AMDC cache service are complete.
Front-end startup screenshot:

Successful front-end startup:
Back-end startup screenshot:

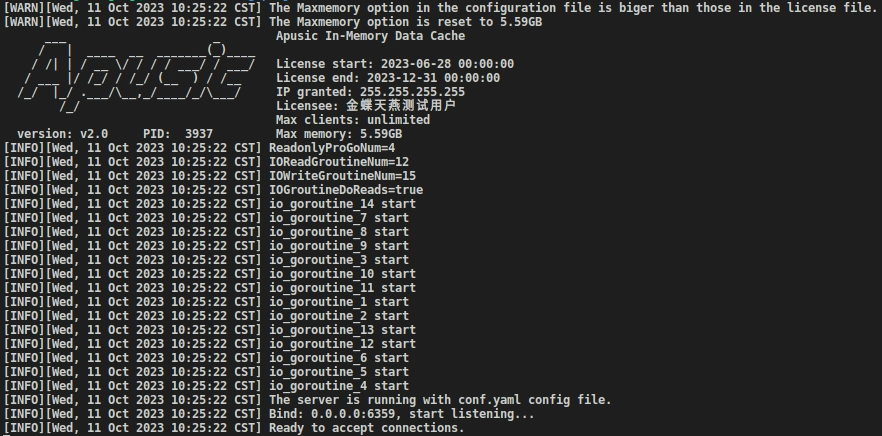
Upon successful back-end startup, the logs will point to the nohup.out file, as shown in the following figure:

# One-Click Start, Stop, and Restart of AMDC Cache Service via Console
For clusters automatically deployed on the console, the console offers one-click access to start, restart, or stop functionalities, achieving one-button start, stop, and restart. Log into the console, proceed to the [Service List]/[Tenant Details], click the [Settings] button under [Services], then on the cluster settings page, click the [Start], [Stop], [Restart] buttons under the nodes to accomplish one-click start, stop, and restart of the AMDC cache service.
# Stopping the AMDC Cache Service
There are three primary methods to halt the AMDC cache service:
- Client Command Method: Send a shutdown command to the AMDC from the client.
- Forced Process Termination: Terminate the AMDC cache service process forcibly through terminal commands.
- One-Click Stop via Console: Effective through the console for AMDC cache services automatically deployed.
Given that the AMDC cache service may be in the process of synchronizing data from memory to disk, forcefully terminating the AMDC cache service process might result in data loss.The proper method to stop the AMDC cache service is by sending a shutdown command from the client to the AMDC cache service, leading to its shutdown.
Method 1: Stopping the AMDC Cache Service via Client: Send a shutdown command to the AMDC cache service from the client.
Method 2: Under normal client connection conditions, input the shutdown command; once the AMDC cache service receives the shutdown command, it will sever all client connections, then execute persistence based on its configuration, and ultimately exit.
Method 3: Forcibly End the AMDC Cache Service Program: Utilize kill -9 on the process's PID to forcibly terminate the AMDC cache service process.
- Step 1: Identify the process PID by examining the port process command:
netstat -nltp |grep 6359 - Step 2: Execute the kill -9 command to forcefully kill the process:
kill -9 Process ID
- Step 1: Identify the process PID by examining the port process command:
Method 4: One-Click Stop of the AMDC Cache Service via the AMDC Console (valid for clusters automatically deployed on the console) — log in with an administrator account, navigate to [Tenant List] > [Tenant Details] > [Settings], select the [Node], then click the [Stop] button on the toolbar to achieve one-click stop.
# Deploying the AMDC National Cryptographic Proxy Service
The AMDC national cryptographic proxy service comprises server-side and client-side components, deployed through command-line methods. There is no requirement for a specific order in deploying the server and client sides. Below is an introduction to deploying the AMDC national cryptographic proxy service via the command line.
# Configuration Items
AMDC encryption-enabled configuration in conf.yaml
| Configuration Domain | Configuration Item | Description |
|---|---|---|
| Proxy | Enable | Whether to start encryption |
| Bind | Bind to the IP in the License | |
| Port | Proxy server port | |
| Proxy2IP | Bind the IP to be proxied | |
| Proxy2Port | Bind the port to be proxied | |
| CriptEnabled | Whether to encrypt | |
| GMflag | Whether to enable national cryptography | |
| CertPath | Location of the encryption certificate |
AMDC-proxy-client client-side configuration
| Configuration Domain | Configuration Item | Description |
|---|---|---|
| Network | Bind | Bind IP |
| Port | Proxy server port | |
| Proxy2IP | Bind the IP to be proxied | |
| Proxy2Port | Bind the port to be proxied | |
| Cript | GMflag | Whether to enable national cryptography |

Example:
- AMDC's IP is 192.168.0.1 with a port of 6359, the cryptographic proxy service port is 7000
- The client-proxy's IP is 192.168.0.2, the client-proxy port is 8000
- The customer's server IP is 192.168.0.3, the server port is 8080
Modify the AMDC configuration as follows (only showing the configuration items that need modification):
Network:
  Bind:
    - "192.168.0.1"
  Port: 6359
  Proxy:
  Enabled: "yes"
  Bind: "192.168.0.1"
  Port: 7000
  #Due to the ability to bind multiple IPs, the service IP still needs to be specified manually
  Proxy2IP: "192.168.0.1"
  Proxy2Port: 6359
2
3
4
5
6
7
8
9
10
11
Modify the client-proxy configuration as follows:
Network:
  Bind: "192.168.0.2"
  Port: 8000
  Proxy2IP: "192.168.0.1"
  Proxy2Port: 7000
2
3
4
5
After configuring, start the service. The business system should configure the access port for AMDC as the IP 192.168.0.2 and port 7000 of the client-proxy.
# Usage
The steps to deploy the AMDC national cryptographic proxy service via command-line are mainly:
- Edit the AMDC configuration file based on the description of the configuration items above.
- Start AMDC.
- Upload the AMDC national cryptographic proxy service client installation package (amdc_proxy_client.tar.gz) to the target server (does not need to be on the same server as the client).
- Unpack the installation package:
tar -zxf amdc_proxy_client.tar.gz - Enter the unpacked folder:
cd amdc-proxy-client - Edit the configuration file based on the description of the configuration items above.
- Start the proxy service with the command
nohup ./amdc-proxy-client -conf conf.yaml >nohup.out 2>&1 &
At this point, the national cryptographic proxy service will be fully set up, but using the national cryptographic proxy will reduce the overall performance of AMDC, with a performance loss of around 30%. Note: Encryption currently does not support cluster mode, which will be upgraded in future versions.
# Uninstallation of the AMDC Console and Cache Service
Before uninstalling the AMDC console and cache service, please confirm that the service has stopped. After the service has stopped, enter the installation directory and execute the deletion operation, deleting all files.
- Enter the AMDC installation directory:
cd /opt/ - Execute the command to delete the cache service:
rm -r amdc - Execute the command to delete the management console:
rm -r amdc-console/ - Delete the installation package:
rm -r [Package Name]
# Using the Redis Configuration File
Starting from AMDC v2.1, compatibility with Redis configuration files is provided, where AMDC automatically translates the contents of Redis.conf into AMDC configuration content.
Usage: ./amdc-server -conf redis.conf((specify the Redis configuration file)
# How AMDC Smoothly Replaces Redis
AMDC is compatible with the Redis protocol and various language clients. There are two approaches to smoothly replacing Redis with AMDC: promotion of a slave node and inheritance of RDB/AOF files.
# Promotion of a Slave Node
Utilize the data synchronization in the master-slave mode to obtain data from Redis. Once the synchronization is successfully completed, shut down the Redis node and manually or wait for the sentinel or cluster's automatic failover feature to switch AMDC to the master node.
To manually promote a slave node, choose one of the following methods:
- Use
amdc-cli -h <ip> -p <port> slaveof no one - Connect to the slave node and use the command
replicaof no one
Promotion of a slave node by the sentinel
Modify the AMDC configuration file to add the Redis master node to the AMDC configuration file
vim /installation_directory/amdc/conf.yaml
Modify the Replicaof field to:Replicaof: [Redis master service IP] [Master service port]After successful data synchronization, set AMDC as the sentinel master node and start the AMDC sentinel. Once the sentinel is started, the Redis node can be shut down. Successful synchronization:
Sentinel configuration:
| Configuration Item | Meaning |
|---|---|
| Bind | IP address bound to the sentinel, multiple IP addresses can be bound |
| Port | Port listened to by the sentinel |
| Sentinel monitor | Master service IP, port, quorum number (less than the number of slave nodes, more than half the number of slave nodes) |
# Inheritance of RDB/AOF Files
Step 1:Obtain the original Redis data persistence files RDB/AOF, place the persistence file in the location specified in the AMDC configuration file: cat /installation_directory/amdc/conf.yaml, determine the file location by checking the DbFileName, Dir fields.
| Configuration Item | Default Value | Meaning |
|---|---|---|
| DbFileName | "dump.rdb" | RDB file name, excluding path |
| Dir | "./" | RDB and AOF files stored in the installation directory |
Step 2: Restart the AMDC node.
# Replacement in Cluster Mode
In cluster mode, assistance from the RDB data migration tool is required. Refer to the section on the 《RDB Cluster Data Migration Tool》.