
开发手册

# 前言
本文档为金蝶Apusic分布式配置中心for Apollo(ADCC for Apollo)V1.0的开发手册,是指导各类业务应用安全、规范、稳定接入分布式配置中心的标准化技术指导文档。
# 适用对象
本文档适用于业务应用系统开发人员,以及基于产品进行二次迭代开发的研发工程师。
# 相关文档
了解更多ADCC for Apollo V1.0产品相关的信息,请参阅以下ADCC for Apollo V1.0产品手册文档集:
| 序号 | 手册文档 | 说明 |
|---|---|---|
| 1 | 金蝶Apusic分布式配置中心for Apollo V1.0 安装手册 | 详细介绍如何在各操作系统上安装ADCC for Apollo,以及服务组件实例启停操作,产品的注册过程。 |
| 2 | 金蝶Apusic分布式配置中心for Apollo V1.0 用户手册 | 详细介绍 ADCC 相关功能的使用、配置、管理及配套工具的使用方法。 |
| 3 | 金蝶Apusic分布式配置中心for Apollo V1.0 开发手册 | 详细介绍基于各种开发语言进行ADCC for Apollo客户端应用开发的说明。 |
| 4 | 金蝶Apusic分布式配置中心for Apollo V1.0 API开放平台手册 | 详细介绍ADCC for Apollo的标准API。 |
| 5 | 金蝶Apusic分布式配置中心for Apollo V1.0 常见问题 | 详细介ADCC for Apollo的常见问题及处理方法。 |
# 技术支持
ADCC for Apollo产品提供全面的技术支持服务,您可以通过以下方式获得技术支持:
网址:www.apusic.com
电话:400-855-5800
邮箱:support@apusic.com
金蝶云社区:https://vip.kingdee.com/?productId=73&productLineId=14&lang=zh-CN
您在取得技术支持时,请提供如下信息:
您的姓名
公司信息与联系方式
操作系统及其版本
产品版本号
出现异常及错误的日志、截图等详细信息
# 准备工作
# 环境要求
- Java: 1.8+
- 如需运行在 Java 1.7 运行时环境,请使用 1.x 版本的 apollo 客户端,如 1.9.1
- Guava: 20.0+
- Apollo客户端默认会引用Guava 29,如果你的项目引用了其它版本,请确保版本号大于等于20.0
注:对于Apollo客户端,如果有需要的话,可以做少量代码修改来降级到Java 1.6,详细信息可以参考Issue 483 (opens new window)
# 必选设置
Apollo客户端依赖于AppId,Apollo Meta Server等环境信息来工作,所以请确保阅读下面的说明并且做正确的配置:
# AppId
AppId是应用的身份信息,是从服务端获取配置的一个重要信息。
有以下几种方式设置,按照优先级从高到低分别为:
- System Property
Apollo支持通过System Property传入app.id信息,如
-Dapp.id=YOUR-APP-ID
- 操作系统的System Environment
Apollo支持通过操作系统的System Environment APP_ID来传入app.id信息,如
APP_ID=YOUR-APP-ID
- Spring Boot application.properties
Apollo支持通过Spring Boot的application.properties文件配置,如
app.id=YOUR-APP-ID
该配置方式不适用于多个war包部署在同一个tomcat的使用场景
- app.properties
确保classpath:/META-INF/app.properties文件存在,并且其中内容形如:
app.id=YOUR-APP-ID
文件位置参考如下:
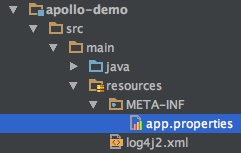
注:app.id是用来标识应用身份的唯一id,格式为string。
# Apollo Meta Server
Apollo支持应用在不同的环境有不同的配置,所以需要在运行提供给Apollo客户端当前环境的Apollo Meta Server信息。默认情况下,meta server和config service是部署在同一个JVM进程,所以meta server的地址就是config service的地址。
为了实现meta server的高可用,推荐通过SLB(Software Load Balancer)做动态负载均衡。Meta server地址也可以填入IP,如http://1.1.1.1:8080,http://2.2.2.2:8080,不过生产环境还是建议使用域名(走slb),因为机器扩容、缩容等都可能导致IP列表的变化。
1.0.0版本开始支持以下方式配置apollo meta server信息,按照优先级从高到低分别为:
- 通过Java System Property
apollo.meta- 可以通过Java的System Property
apollo.meta来指定 - 在Java程序启动脚本中,可以指定
-Dapollo.meta=http://config-service-url- 如果是运行jar文件,需要注意格式是
java -Dapollo.meta=http://config-service-url -jar xxx.jar
- 如果是运行jar文件,需要注意格式是
- 也可以通过程序指定,如
System.setProperty("apollo.meta", "http://config-service-url");
- 可以通过Java的System Property
- 通过Spring Boot的配置文件
- 可以在Spring Boot的
application.properties或bootstrap.properties中指定apollo.meta=http://config-service-url
- 可以在Spring Boot的
该配置方式不适用于多个war包部署在同一个tomcat的使用场景
- 通过操作系统的System Environment
APOLLO_META- 可以通过操作系统的System Environment
APOLLO_META来指定 - 注意key为全大写,且中间是
_分隔
- 可以通过操作系统的System Environment
- 通过
server.properties配置文件- 可以在
server.properties配置文件中指定apollo.meta=http://config-service-url - 对于Mac/Linux,默认文件位置为
/opt/settings/server.properties - 对于Windows,默认文件位置为
C:\opt\settings\server.properties
- 可以在
- 通过
app.properties配置文件- 可以在
classpath:/META-INF/app.properties指定apollo.meta=http://config-service-url
- 可以在
- 通过Java system property
${env}_meta- 如果当前env是
dev,那么用户可以配置-Ddev_meta=http://config-service-url - 使用该配置方式,那么就必须要正确配置Environment
- 如果当前env是
- 通过操作系统的System Environment
${ENV}_META- 如果当前env是
dev,那么用户可以配置操作系统的System EnvironmentDEV_META=http://config-service-url - 注意key为全大写
- 使用该配置方式,那么就必须要正确配置Environment
- 如果当前env是
- 通过
apollo-env.properties文件- 用户也可以创建一个
apollo-env.properties,放在程序的classpath下,或者放在spring boot应用的config目录下 - 使用该配置方式,那么就必须要正确配置Environment
- 文件内容形如:
- 用户也可以创建一个
dev.meta=http://1.1.1.1:8080
fat.meta=http://apollo.fat.xxx.com
uat.meta=http://apollo.uat.xxx.com
pro.meta=http://apollo.xxx.com
2
3
4
如果通过以上各种手段都无法获取到Meta Server地址,Apollo最终会fallback到
http://apollo.meta作为Meta Server地址
# 自定义Apollo Meta Server地址定位逻辑
Apollo提供了MetaServerProvider SPI,用户可以注入自己的MetaServerProvider来自定义Meta Server地址定位逻辑。
由于我们使用典型的Java Service Loader模式 (opens new window),所以实现起来还是比较简单的。
有一点需要注意的是,apollo会在运行时按照顺序遍历所有的MetaServerProvider,直到某一个MetaServerProvider提供了一个非空的Meta Server地址,因此用户需要格外注意自定义MetaServerProvider的Order。规则是较小的Order具有较高的优先级,因此Order=0的MetaServerProvider会排在Order=1的MetaServerProvider的前面。
如果你的公司有很多应用需要接入Apollo,建议封装一个jar包,然后提供自定义的Apollo Meta Server定位逻辑,从而可以让接入Apollo的应用零配置使用。比如自己写一个xx-company-apollo-client,该jar包依赖apollo-client,在该jar包中通过spi方式定义自定义的MetaServerProvider实现,然后应用直接依赖xx-company-apollo-client即可。
# 跳过Apollo Meta Server服务发现
一般情况下都建议使用Apollo的Meta Server机制来实现Config Service的服务发现,从而可以实现Config Service的高可用。不过apollo-client也支持跳过Meta Server服务发现,主要用于以下场景:
- Config Service部署在公有云上,注册到Meta Server的是内网地址,本地开发环境无法直接连接
- 如果通过公网 SLB 对外暴露 Config Service的话,记得要设置 IP 白名单,避免数据泄露
- Config Service部署在docker环境中,注册到Meta Server的是docker内网地址,本地开发环境无法直接连接
- Config Service部署在kubernetes中,希望使用kubernetes自带的服务发现能力(Service)
针对以上场景,可以通过直接指定Config Service地址的方式来跳过Meta Server服务发现,按照优先级从高到低分别为:
- 通过Java System Property
apollo.config-service(1.9.0+) 或者apollo.configService(1.9.0之前)- 可以通过Java的System Property
apollo.config-service(1.9.0+) 或者apollo.configService(1.9.0之前)来指定 - 在Java程序启动脚本中,可以指定
-Dapollo.config-service=http://config-service-url:port- 如果是运行jar文件,需要注意格式是
java -Dapollo.configService=http://config-service-url:port -jar xxx.jar
- 如果是运行jar文件,需要注意格式是
- 也可以通过程序指定,如
System.setProperty("apollo.config-service", "http://config-service-url:port");
- 可以通过Java的System Property
- 通过操作系统的System Environment
APOLLO_CONFIG_SERVICE(1.9.0+) 或者APOLLO_CONFIGSERVICE(1.9.0之前)- 可以通过操作系统的System Environment
APOLLO_CONFIG_SERVICE(1.9.0+) 或者APOLLO_CONFIGSERVICE(1.9.0之前)来指定 - 注意key为全大写,且中间是
_分隔
- 可以通过操作系统的System Environment
- 通过
server.properties配置文件- 可以在
server.properties配置文件中指定apollo.config-service=http://config-service-url:port(1.9.0+) 或者apollo.configService=http://config-service-url:port(1.9.0之前) - 对于Mac/Linux,默认文件位置为
/opt/settings/server.properties - 对于Windows,默认文件位置为
C:\opt\settings\server.properties
- 可以在
# 本地缓存路径
Apollo客户端会把从服务端获取到的配置在本地文件系统缓存一份,用于在遇到服务不可用,或网络不通的时候,依然能从本地恢复配置,不影响应用正常运行。
本地缓存路径默认位于以下路径,所以请确保/opt/data或C:\opt\data\目录存在,且应用有读写权限。
- Mac/Linux: /opt/data/{appId}/config-cache
- Windows: C:\opt\data\{appId}\config-cache
本地配置文件会以下面的文件名格式放置于本地缓存路径下:
{appId}+{cluster}+{namespace}.properties
- appId就是应用自己的appId,如100004458
- cluster就是应用使用的集群,一般在本地模式下没有做过配置的话,就是default
- namespace就是应用使用的配置namespace,一般是application

文件内容以properties格式存储,比如如果有两个key,一个是request.timeout,另一个是batch,那么文件内容就是如下格式:
request.timeout=2000
batch=2000
2
# 自定义缓存路径
1.0.0版本开始支持以下方式自定义缓存路径,按照优先级从高到低分别为:
- 通过Java System Property
apollo.cache-dir(1.9.0+) 或者apollo.cacheDir(1.9.0之前)- 可以通过Java的System Property
apollo.cache-dir(1.9.0+) 或者apollo.cacheDir(1.9.0之前)来指定 - 在Java程序启动脚本中,可以指定
-Dapollo.cache-dir=/opt/data/some-cache-dir(1.9.0+) 或者apollo.cacheDir=/opt/data/some-cache-dir(1.9.0之前)- 如果是运行jar文件,需要注意格式是
java -Dapollo.cache-dir=/opt/data/some-cache-dir -jar xxx.jar(1.9.0+) 或者java -Dapollo.cacheDir=/opt/data/some-cache-dir -jar xxx.jar(1.9.0之前)
- 如果是运行jar文件,需要注意格式是
- 也可以通过程序指定,如
System.setProperty("apollo.cache-dir", "/opt/data/some-cache-dir");(1.9.0+) 或者System.setProperty("apollo.cacheDir", "/opt/data/some-cache-dir");(1.9.0之前)
- 可以通过Java的System Property
- 通过Spring Boot的配置文件
- 可以在Spring Boot的
application.properties或bootstrap.properties中指定apollo.cache-dir=/opt/data/some-cache-dir(1.9.0+) 或者apollo.cacheDir=/opt/data/some-cache-dir(1.9.0之前)
- 可以在Spring Boot的
- 通过操作系统的System Environment
APOLLO_CACHE_DIR(1.9.0+) 或者APOLLO_CACHEDIR(1.9.0之前)- 可以通过操作系统的System Environment
APOLLO_CACHE_DIR(1.9.0+) 或者APOLLO_CACHEDIR(1.9.0之前)来指定 - 注意key为全大写,且中间是
_分隔
- 可以通过操作系统的System Environment
- 通过
server.properties配置文件- 可以在
server.properties配置文件中指定apollo.cache-dir=/opt/data/some-cache-dir(1.9.0+) 或者apollo.cacheDir=/opt/data/some-cache-dir(1.9.0之前) - 对于Mac/Linux,默认文件位置为
/opt/settings/server.properties - 对于Windows,默认文件位置为
C:\opt\settings\server.properties
- 可以在
注:本地缓存路径也可用于容灾目录,如果应用在所有config service都挂掉的情况下需要扩容,那么也可以先把配置从已有机器上的缓存路径复制到新机器上的相同缓存路径
# 可选设置
# Environment
Environment可以通过以下3种方式的任意一个配置:
通过Java System Property
- 可以通过Java的System Property
env来指定环境 - 在Java程序启动脚本中,可以指定
-Denv=YOUR-ENVIRONMENT- 如果是运行jar文件,需要注意格式是
java -Denv=YOUR-ENVIRONMENT -jar xxx.jar
- 如果是运行jar文件,需要注意格式是
- 注意key为全小写
- 可以通过Java的System Property
通过操作系统的System Environment
- 还可以通过操作系统的System Environment
ENV来指定 - 注意key为全大写
- 还可以通过操作系统的System Environment
通过配置文件
- 最后一个推荐的方式是通过配置文件来指定
env=YOUR-ENVIRONMENT - 对于Mac/Linux,默认文件位置为
/opt/settings/server.properties - 对于Windows,默认文件位置为
C:\opt\settings\server.properties
- 最后一个推荐的方式是通过配置文件来指定
文件内容形如:
env=DEV
目前,env支持以下几个值(大小写不敏感):
DEV
- 开发环境
FAT
- 功能验收测试环境
UAT
- 用户验收测试环境
PRO
- 生产环境
LPT
- 负载性能测试环境
UNKNOWN
- 未知环境
# Cluster(集群)
Apollo支持配置按照集群划分,也就是说对于一个appId和一个环境,对不同的集群可以有不同的配置。
1.0.0版本开始支持以下方式集群,按照优先级从高到低分别为:
- 通过Java System Property
apollo.cluster- 可以通过Java的System Property
apollo.cluster来指定 - 在Java程序启动脚本中,可以指定
-Dapollo.cluster=SomeCluster- 如果是运行jar文件,需要注意格式是
java -Dapollo.cluster=SomeCluster -jar xxx.jar
- 如果是运行jar文件,需要注意格式是
- 也可以通过程序指定,如
System.setProperty("apollo.cluster", "SomeCluster");
- 可以通过Java的System Property
- 通过Spring Boot的配置文件
- 可以在Spring Boot的
application.properties或bootstrap.properties中指定apollo.cluster=SomeCluster
- 可以在Spring Boot的
- 通过Java System Property
- 可以通过Java的System Property
idc来指定环境 - 在Java程序启动脚本中,可以指定
-Didc=xxx- 如果是运行jar文件,需要注意格式是
java -Didc=xxx -jar xxx.jar
- 如果是运行jar文件,需要注意格式是
- 注意key为全小写
- 可以通过Java的System Property
- 通过操作系统的System Environment
- 还可以通过操作系统的System Environment
IDC来指定 - 注意key为全大写
- 还可以通过操作系统的System Environment
- 通过
server.properties配置文件- 可以在
server.properties配置文件中指定idc=xxx - 对于Mac/Linux,默认文件位置为
/opt/settings/server.properties - 对于Windows,默认文件位置为
C:\opt\settings\server.properties
- 可以在
Cluster Precedence(集群顺序)
如果
apollo.cluster和idc同时指定:- 会首先尝试从
apollo.cluster指定的集群加载配置。如果没找到任何配置,会尝试从idc指定的集群加载配置 - 如果还是没找到,会从默认的集群(
default)加载
- 会首先尝试从
如果只指定了
apollo.cluster:- 会首先尝试从
apollo.cluster指定的集群加载配置。如果没找到,会从默认的集群(default)加载
- 会首先尝试从
如果只指定了
idc:- 会首先尝试从
idc指定的集群加载配置。如果没找到,会从默认的集群(default)加载
- 会首先尝试从
如果
apollo.cluster和idc都没有指定:- 我们会从默认的集群(
default)加载配置
- 我们会从默认的集群(
# 设置内存中的配置项是否保持和页面上的顺序一致
适用于1.6.0及以上版本
默认情况下,apollo client内存中的配置存放在Properties中(底下是Hashtable),不会刻意保持和页面上看到的顺序一致,对绝大部分的场景是没有影响的。不过有些场景会强依赖配置项的顺序(如spring cloud zuul的路由规则),针对这种情况,可以开启OrderedProperties特性来使得内存中的配置顺序和页面上看到的一致。
配置方式按照优先级从高到低分别为:
- 通过Java System Property
apollo.property.order.enable- 可以通过Java的System Property
apollo.property.order.enable来指定 - 在Java程序启动脚本中,可以指定
-Dapollo.property.order.enable=true- 如果是运行jar文件,需要注意格式是
java -Dapollo.property.order.enable=true -jar xxx.jar
- 如果是运行jar文件,需要注意格式是
- 也可以通过程序指定,如
System.setProperty("apollo.property.order.enable", "true");
- 可以通过Java的System Property
- 通过Spring Boot的配置文件
- 可以在Spring Boot的
application.properties或bootstrap.properties中指定apollo.property.order.enable=true
- 可以在Spring Boot的
- 通过
app.properties配置文件- 可以在
classpath:/META-INF/app.properties指定apollo.property.order.enable=true
- 可以在
# 配置访问密钥
Apoll提供访问密钥机制,只有经过身份验证的客户端才能访问敏感配置。如果应用开启了访问密钥,客户端需要配置密钥,否则无法获取配置。
配置方式按照优先级从高到低分别为:
- 通过Java System Property
apollo.access-key.secret(1.9.0+) 或者apollo.accesskey.secret(1.9.0之前)- 可以通过Java的System Property
apollo.access-key.secret(1.9.0+) 或者apollo.accesskey.secret(1.9.0之前)来指定 - 在Java程序启动脚本中,可以指定
-Dapollo.access-key.secret=1cf998c4e2ad4704b45a98a509d15719(1.9.0+) 或者-Dapollo.accesskey.secret=1cf998c4e2ad4704b45a98a509d15719(1.9.0之前)- 如果是运行jar文件,需要注意格式是
java -Dapollo.access-key.secret=1cf998c4e2ad4704b45a98a509d15719 -jar xxx.jar(1.9.0+) 或者java -Dapollo.accesskey.secret=1cf998c4e2ad4704b45a98a509d15719 -jar xxx.jar(1.9.0之前)
- 如果是运行jar文件,需要注意格式是
- 也可以通过程序指定,如
System.setProperty("apollo.access-key.secret", "1cf998c4e2ad4704b45a98a509d15719");(1.9.0+) 或者System.setProperty("apollo.accesskey.secret", "1cf998c4e2ad4704b45a98a509d15719");(1.9.0之前)
- 可以通过Java的System Property
- 通过Spring Boot的配置文件
- 可以在Spring Boot的
application.properties或bootstrap.properties中指定apollo.access-key.secret=1cf998c4e2ad4704b45a98a509d15719(1.9.0+) 或者apollo.accesskey.secret=1cf998c4e2ad4704b45a98a509d15719(1.9.0之前)
- 可以在Spring Boot的
- 通过操作系统的System Environment
- 还可以通过操作系统的System Environment
APOLLO_ACCESS_KEY_SECRET(1.9.0+) 或者APOLLO_ACCESSKEY_SECRET(1.9.0之前)来指定 - 注意key为全大写
- 还可以通过操作系统的System Environment
- 通过
app.properties配置文件- 可以在
classpath:/META-INF/app.properties指定apollo.access-key.secret=1cf998c4e2ad4704b45a98a509d15719(1.9.0+) 或者apollo.accesskey.secret=1cf998c4e2ad4704b45a98a509d15719(1.9.0之前)
- 可以在
# 自定义server.properties路径
支持以下方式自定义server.properties路径,按照优先级从高到低分别为:
- 通过Java System Property
apollo.path.server.properties- 可以通过Java的System Property
apollo.path.server.properties来指定 - 在Java程序启动脚本中,可以指定
-Dapollo.path.server.properties=/some-dir/some-file.properties- 如果是运行jar文件,需要注意格式是
java -Dapollo.path.server.properties=/some-dir/some-file.properties -jar xxx.jar
- 如果是运行jar文件,需要注意格式是
- 也可以通过程序指定,如
System.setProperty("apollo.path.server.properties", "/some-dir/some-file.properties");
- 可以通过Java的System Property
- 通过操作系统的System Environment
APOLLO_PATH_SERVER_PROPERTIES- 可以通过操作系统的System Environment
APOLLO_PATH_SERVER_PROPERTIES来指定 - 注意key为全大写,且中间是
_分隔
- 可以通过操作系统的System Environment
# 开启propertyNames缓存
在使用@ConfigurationProperties和存在大量配置项场景下,Spring容器的启动速度会变慢。通过开启该配置可以显著提升启动速度,当配置发生变化时缓存会自动清理,默认为false。详见:issue 3800 (opens new window)
配置方式按照优先级从高到低依次为:
- 通过Java System Property
apollo.property.names.cache.enable- 可以通过Java的System Property
apollo.property.names.cache.enable来指定 - 在Java程序启动脚本中,可以指定
-Dapollo.property.names.cache.enable=true- 如果是运行jar文件,需要注意格式是
java -Dapollo.property.names.cache.enable=true -jar xxx.jar
- 如果是运行jar文件,需要注意格式是
- 也可以通过程序指定,如
System.setProperty("apollo.property.names.cache.enable", "true");
- 可以通过Java的System Property
- 通过系统环境变量
- 在启动程序前配置环境变量
APOLLO_PROPERTY_NAMES_CACHE_ENABLE=true来指定 - 注意key为全大写,且中间是
_分隔
- 在启动程序前配置环境变量
- 通过Spring Boot的配置文件
- 可以在Spring Boot的
application.properties或bootstrap.properties中指定apollo.property.names.cache.enable=true
- 可以在Spring Boot的
- 通过
app.properties配置文件- 可以在
classpath:/META-INF/app.properties指定apollo.property.names.cache.enable=true
- 可以在
# ApolloLabel
ApolloLabel是应用的标签信息,是从服务端获取配置的一个重要信息,用于灰度规则的配置。
有以下几种方式设置,按照优先级从高到低分别为:
- System Property
Apollo支持通过System Property传入apollo.label信息,如
-Dapollo.label=YOUR-APOLLO-LABEL
- 操作系统的System Environment
Apollo支持通过操作系统的System Environment APP_LABEL来传入apollo.label信息,如
APOLLO_LABEL=YOUR-APOLLO-LABEL
- Spring Boot application.properties
Apollo支持通过Spring Boot的application.properties文件配置,如
apollo.label=YOUR-APOLLO-LABEL
该配置方式不适用于多个war包部署在同一个tomcat的使用场景
- app.properties
确保classpath:/META-INF/app.properties文件存在,并且其中内容形如:
apollo.label=YOUR-APOLLO-LABEL
文件位置参考如下:
注:apollo.label是用来标识应用身份的标签,格式为string。
# 覆盖系统属性
apollo.override-system-properties 标识Apollo的远程属性是否应该覆盖Java的系统属性。默认为 true。
配置方式按照优先级从高到低分别为:
- 通过Java System Property
apollo.override-system-properties- 可以通过Java的System Property
apollo.override-system-properties来指定 - 在Java程序启动脚本中,可以指定
-Dapollo.override-system-properties=true- 如果是运行jar文件,需要注意格式是
java -Dapollo.override-system-properties=true -jar xxx.jar
- 如果是运行jar文件,需要注意格式是
- 也可以通过程序指定,如
System.setProperty("apollo.override-system-properties", "true");
- 可以通过Java的System Property
- 通过Spring Boot的配置文件
- 可以在Spring Boot的
application.properties或bootstrap.properties中指定apollo.override-system-properties=true
- 可以在Spring Boot的
- 通过
app.properties配置文件- 可以在
classpath:/META-INF/app.properties指定apollo.override-system-properties=true
- 可以在
# Maven依赖
Apollo的客户端jar包已经上传到中央仓库,应用在实际使用时只需要按照如下方式引入即可。
    <dependency>
        <groupId>com.ctrip.framework.apollo</groupId>
        <artifactId>apollo-client</artifactId>
        <version>1.7.0</version>
    </dependency>
2
3
4
5
# 客户端用法
Apollo支持API方式和Spring整合方式,该怎么选择用哪一种方式?
- API方式灵活,功能完备,配置值实时更新(热发布),支持所有Java环境。
- Spring方式接入简单,结合Spring有N种酷炫的玩法,如
- Placeholder方式:
- 代码中直接使用,如:
@Value("${someKeyFromApollo:someDefaultValue}") - 配置文件中使用替换placeholder,如:
spring.datasource.url: ${someKeyFromApollo:someDefaultValue} - 直接托管spring的配置,如在apollo中直接配置
spring.datasource.url=jdbc:mysql://localhost:3306/somedb?characterEncoding=utf8
- 代码中直接使用,如:
- Spring boot的@ConfigurationProperties (opens new window)方式
- 从v0.10.0开始的版本支持placeholder在运行时自动更新,具体参见PR #972 (opens new window)。(v0.10.0之前的版本在配置变化后不会重新注入,需要重启才会更新,如果需要配置值实时更新,可以参考后续3.2.2 Spring Placeholder的使用的说明)
- Placeholder方式:
- Spring方式也可以结合API方式使用,如注入Apollo的Config对象,就可以照常通过API方式获取配置了:
@ApolloConfig
private Config config; //inject config for namespace application
1
2 - 更多有意思的实际使用场景和示例代码,请参考apollo-use-cases (opens new window)
# API使用方式
API方式是最简单、高效使用Apollo配置的方式,不依赖Spring框架即可使用。
# 获取默认namespace的配置(application)
Config config = ConfigService.getAppConfig(); //config instance is singleton for each namespace and is never null
String someKey = "someKeyFromDefaultNamespace";
String someDefaultValue = "someDefaultValueForTheKey";
String value = config.getProperty(someKey, someDefaultValue);
2
3
4
通过上述的config.getProperty可以获取到someKey对应的实时最新的配置值。
另外,配置值从内存中获取,所以不需要应用自己做缓存。
# 监听配置变化事件
监听配置变化事件只在应用真的关心配置变化,需要在配置变化时得到通知时使用,比如:数据库连接串变化后需要重建连接等。
如果只是希望每次都取到最新的配置的话,只需要按照上面的例子,调用config.getProperty即可。
Config config = ConfigService.getAppConfig(); //config instance is singleton for each namespace and is never null
config.addChangeListener(new ConfigChangeListener() {
    @Override
    public void onChange(ConfigChangeEvent changeEvent) {
        System.out.println("Changes for namespace " + changeEvent.getNamespace());
        for (String key : changeEvent.changedKeys()) {
            ConfigChange change = changeEvent.getChange(key);
            System.out.println(String.format("Found change - key: %s, oldValue: %s, newValue: %s, changeType: %s", change.getPropertyName(), change.getOldValue(), change.getNewValue(), change.getChangeType()));
        }
    }
});
2
3
4
5
6
7
8
9
10
11
# 获取公共Namespace的配置
String somePublicNamespace = "CAT";
Config config = ConfigService.getConfig(somePublicNamespace); //config instance is singleton for each namespace and is never null
String someKey = "someKeyFromPublicNamespace";
String someDefaultValue = "someDefaultValueForTheKey";
String value = config.getProperty(someKey, someDefaultValue);
2
3
4
5
# 获取非properties格式namespace的配置
# yaml/yml格式的namespace
apollo-client 1.3.0版本开始对yaml/yml做了更好的支持,使用起来和properties格式一致。
Config config = ConfigService.getConfig("application.yml");
String someKey = "someKeyFromYmlNamespace";
String someDefaultValue = "someDefaultValueForTheKey";
String value = config.getProperty(someKey, someDefaultValue);
2
3
4
# 非yaml/yml格式的namespace
获取时需要使用ConfigService.getConfigFile接口并指定Format,如ConfigFileFormat.XML。
String someNamespace = "test";
ConfigFile configFile = ConfigService.getConfigFile("test", ConfigFileFormat.XML);
String content = configFile.getContent();
2
3
# Spring整合方式
# 配置
Apollo也支持和Spring整合(Spring 3.1.1+),只需要做一些简单的配置就可以了。
Apollo目前既支持比较传统的基于XML的配置,也支持目前比较流行的基于Java(推荐)的配置。
如果是Spring Boot环境,建议参照3.2.1.3 Spring Boot集成方式(推荐)配置。
需要注意的是,如果之前有使用org.springframework.beans.factory.config.PropertyPlaceholderConfigurer的,请替换成org.springframework.context.support.PropertySourcesPlaceholderConfigurer。Spring 3.1以后就不建议使用PropertyPlaceholderConfigurer了,要改用PropertySourcesPlaceholderConfigurer。
如果之前有使用<context:property-placeholder>,请注意xml中引入的spring-context.xsd版本需要是3.1以上(一般只要没有指定版本会自动升级的),建议使用不带版本号的形式引入,如:http://www.springframework.org/schema/context/spring-context.xsd
注1:yaml/yml格式的namespace从1.3.0版本开始支持和Spring整合,注入时需要填写带后缀的完整名字,比如application.yml
注2:非properties、非yaml/yml格式(如xml,json等)的namespace暂不支持和Spring整合。
# 基于XML的配置
注:需要把apollo相关的xml namespace加到配置文件头上,不然会报xml语法错误。
1.注入默认namespace的配置到Spring中
<?xml version="1.0" encoding="UTF-8"?>
<beans xmlns="http://www.springframework.org/schema/beans"
       xmlns:xsi="http://www.w3.org/2001/XMLSchema-instance"
       xmlns:apollo="http://www.ctrip.com/schema/apollo"
       xsi:schemaLocation="http://www.springframework.org/schema/beans http://www.springframework.org/schema/beans/spring-beans.xsd
       http://www.ctrip.com/schema/apollo http://www.ctrip.com/schema/apollo.xsd">
    <!-- 这个是最简单的配置形式,一般应用用这种形式就可以了,用来指示Apollo注入application namespace的配置到Spring环境中 -->
    <apollo:config/>
    <bean class="com.ctrip.framework.apollo.spring.TestXmlBean">
        <property name="timeout" value="${timeout:100}"/>
        <property name="batch" value="${batch:200}"/>
    </bean>
</beans>
2
3
4
5
6
7
8
9
10
11
12
13
14
2.注入多个namespace的配置到Spring中
<?xml version="1.0" encoding="UTF-8"?>
<beans xmlns="http://www.springframework.org/schema/beans"
       xmlns:xsi="http://www.w3.org/2001/XMLSchema-instance"
       xmlns:apollo="http://www.ctrip.com/schema/apollo"
       xsi:schemaLocation="http://www.springframework.org/schema/beans http://www.springframework.org/schema/beans/spring-beans.xsd
       http://www.ctrip.com/schema/apollo http://www.ctrip.com/schema/apollo.xsd">
    <!-- 这个是最简单的配置形式,一般应用用这种形式就可以了,用来指示Apollo注入application namespace的配置到Spring环境中 -->
    <apollo:config/>
    <!-- 这个是稍微复杂一些的配置形式,指示Apollo注入FX.apollo和application.yml namespace的配置到Spring环境中 -->
    <apollo:config namespaces="FX.apollo,application.yml"/>
    <bean class="com.ctrip.framework.apollo.spring.TestXmlBean">
        <property name="timeout" value="${timeout:100}"/>
        <property name="batch" value="${batch:200}"/>
    </bean>
</beans>
2
3
4
5
6
7
8
9
10
11
12
13
14
15
3.注入多个namespace,并且指定顺序
Spring的配置是有顺序的,如果多个property source都有同一个key,那么最终是顺序在前的配置生效。
apollo:config如果不指定order,那么默认是最低优先级。
<?xml version="1.0" encoding="UTF-8"?>
<beans xmlns="http://www.springframework.org/schema/beans"
       xmlns:xsi="http://www.w3.org/2001/XMLSchema-instance"
       xmlns:apollo="http://www.ctrip.com/schema/apollo"
       xsi:schemaLocation="http://www.springframework.org/schema/beans http://www.springframework.org/schema/beans/spring-beans.xsd
       http://www.ctrip.com/schema/apollo http://www.ctrip.com/schema/apollo.xsd">
    <apollo:config order="2"/>
    <!-- 这个是最复杂的配置形式,指示Apollo注入FX.apollo和application.yml namespace的配置到Spring环境中,并且顺序在application前面 -->
    <apollo:config namespaces="FX.apollo,application.yml" order="1"/>
    <bean class="com.ctrip.framework.apollo.spring.TestXmlBean">
        <property name="timeout" value="${timeout:100}"/>
        <property name="batch" value="${batch:200}"/>
    </bean>
</beans>
2
3
4
5
6
7
8
9
10
11
12
13
14
# 基于Java的配置(推荐)
相对于基于XML的配置,基于Java的配置是目前比较流行的方式。
注意@EnableApolloConfig要和@Configuration一起使用,不然不会生效。
1.注入默认namespace的配置到Spring中
//这个是最简单的配置形式,一般应用用这种形式就可以了,用来指示Apollo注入application namespace的配置到Spring环境中
@Configuration
@EnableApolloConfig
public class AppConfig {
  @Bean
  public TestJavaConfigBean javaConfigBean() {
    return new TestJavaConfigBean();
  }
}
2
3
4
5
6
7
8
9
2.注入多个namespace的配置到Spring中
@Configuration
@EnableApolloConfig
public class SomeAppConfig {
  @Bean
  public TestJavaConfigBean javaConfigBean() {
    return new TestJavaConfigBean();
  }
}

//这个是稍微复杂一些的配置形式,指示Apollo注入FX.apollo和application.yml namespace的配置到Spring环境中
@Configuration
@EnableApolloConfig({"FX.apollo", "application.yml"})
public class AnotherAppConfig {}
2
3
4
5
6
7
8
9
10
11
12
13
3.注入多个namespace,并且指定顺序
//这个是最复杂的配置形式,指示Apollo注入FX.apollo和application.yml namespace的配置到Spring环境中,并且顺序在application前面
@Configuration
@EnableApolloConfig(order = 2)
public class SomeAppConfig {
  @Bean
  public TestJavaConfigBean javaConfigBean() {
    return new TestJavaConfigBean();
  }
}
@Configuration
@EnableApolloConfig(value = {"FX.apollo", "application.yml"}, order = 1)
public class AnotherAppConfig {}
2
3
4
5
6
7
8
9
10
11
12
# Spring Boot集成方式(推荐)
Spring Boot除了支持上述两种集成方式以外,还支持通过application.properties/bootstrap.properties来配置,该方式能使配置在更早的阶段注入,比如使用@ConditionalOnProperty的场景或者是有一些spring-boot-starter在启动阶段就需要读取配置做一些事情(如dubbo-spring-boot-project (opens new window)),所以对于Spring Boot环境建议通过以下方式来接入Apollo(需要0.10.0及以上版本)。
使用方式很简单,只需要在application.properties/bootstrap.properties中按照如下样例配置即可。
- 注入默认
applicationnamespace的配置示例
     # will inject 'application' namespace in bootstrap phase
     apollo.bootstrap.enabled = true
2
- 注入非默认
applicationnamespace或多个namespace的配置示例
     apollo.bootstrap.enabled = true
     # will inject 'application', 'FX.apollo' and 'application.yml' namespaces in bootstrap phase
     apollo.bootstrap.namespaces = application,FX.apollo,application.yml
2
3
- 将Apollo配置加载提到初始化日志系统之前(1.2.0+)
从1.2.0版本开始,如果希望把日志相关的配置(如logging.level.root=info或logback-spring.xml中的参数)也放在Apollo管理,那么可以额外配置apollo.bootstrap.eagerLoad.enabled=true来使Apollo的加载顺序放到日志系统加载之前,更多信息可以参考PR 1614 (opens new window)。参考配置示例如下:
     # will inject 'application' namespace in bootstrap phase
     apollo.bootstrap.enabled = true
     # put apollo initialization before logging system initialization
     apollo.bootstrap.eagerLoad.enabled=true
2
3
4
# Spring Boot Config Data Loader (Spring Boot 2.4+, Apollo Client 1.9.0+ 推荐)
对于 Spring Boot 2.4 以上版本还支持通过 Config Data Loader 模式来加载配置
# 添加 maven 依赖
apollo-client-config-data 已经依赖了 apollo-client, 所以只需要添加这一个依赖即可, 无需再添加 apollo-client 的依赖
<dependencies>
    <dependency>
        <groupId>com.ctrip.framework.apollo</groupId>
        <artifactId>apollo-client-config-data</artifactId>
        <version>1.9.0</version>
    </dependency>
</dependencies>
2
3
4
5
6
7
# 参照前述的方式配置 app.id, env, apollo.meta(或者 apollo.config-service), apollo.cluster
# 配置application.properties
使用默认的 namespace application
# old way
# apollo.bootstrap.enabled=true
# 不配置 apollo.bootstrap.namespaces
# new way
spring.config.import=apollo://
2
3
4
5
6
或者:
# old way
# apollo.bootstrap.enabled=true
# apollo.bootstrap.namespaces=application
# new way
spring.config.import=apollo://application
2
3
4
5
6
使用自定义 namespace
# old way
# apollo.bootstrap.enabled=true
# apollo.bootstrap.namespaces=your-namespace
# new way
spring.config.import=apollo://your-namespace
2
3
4
5
6
使用多个 namespaces
注: spring.config.import 是从后往前加载配置的, 而 apollo.bootstrap.namespaces 是从前往后加载的, 刚好相反。为了保证和原有逻辑一致, 请颠倒 namespaces 的顺序
# old way
# apollo.bootstrap.enabled=true
# apollo.bootstrap.namespaces=namespace1,namespace2,namespace3
# new way
spring.config.import=apollo://namespace3, apollo://namespace2, apollo://namespace1
2
3
4
5
6
# Spring Boot Config Data Loader (Spring Boot 2.4+, Apollo Client 1.9.0+ 推荐) + webClient 扩展
对于 Spring Boot 2.4 以上版本还支持通过 Config Data Loader 模式来加载配置
Apollo 的 Config Data Loader 还提供了基于 webClient 的 http 客户端来替换原有的 http 客户端, 从而方便的对 http 客户端进行扩展
# 添加 maven 依赖
webClient 可以基于多种实现 (reactor netty httpclient, jetty reactive httpclient, apache httpclient5), 所需添加的依赖如下
- reactor netty httpclient
<dependencies>
   <dependency>
      <groupId>com.ctrip.framework.apollo</groupId>
      <artifactId>apollo-client-config-data</artifactId>
      <version>1.9.0</version>
   </dependency>
   <!-- webclient -->
   <dependency>
      <groupId>org.springframework</groupId>
      <artifactId>spring-webflux</artifactId>
   </dependency>
   <!-- reactor netty httpclient -->
   <dependency>
      <groupId>io.projectreactor.netty</groupId>
      <artifactId>reactor-netty-http</artifactId>
   </dependency>
</dependencies>
2
3
4
5
6
7
8
9
10
11
12
13
14
15
16
17
- jetty reactive httpclient
<dependencies>
    <dependency>
        <groupId>com.ctrip.framework.apollo</groupId>
        <artifactId>apollo-client-config-data</artifactId>
        <version>1.9.0</version>
    </dependency>
    <!-- webclient -->
    <dependency>
        <groupId>org.springframework</groupId>
        <artifactId>spring-webflux</artifactId>
    </dependency>
    <!-- jetty reactive httpclient -->
    <dependency>
       <groupId>org.eclipse.jetty</groupId>
       <artifactId>jetty-reactive-httpclient</artifactId>
    </dependency>
</dependencies>
2
3
4
5
6
7
8
9
10
11
12
13
14
15
16
17
- apache httpclient5 spring boot 没有指定 apache httpclient5 的版本, 所以这里需要手动指定一下版本
<dependencies>
    <dependency>
        <groupId>com.ctrip.framework.apollo</groupId>
        <artifactId>apollo-client-config-data</artifactId>
        <version>1.9.0</version>
    </dependency>
    <!-- webclient -->
    <dependency>
        <groupId>org.springframework</groupId>
        <artifactId>spring-webflux</artifactId>
    </dependency>
    <!-- apache httpclient5 -->
    <dependency>
       <groupId>org.apache.httpcomponents.client5</groupId>
       <artifactId>httpclient5</artifactId>
       <version>5.1</version>
    </dependency>
    <dependency>
       <groupId>org.apache.httpcomponents.core5</groupId>
       <artifactId>httpcore5-reactive</artifactId>
       <version>5.1</version>
    </dependency>
</dependencies>
2
3
4
5
6
7
8
9
10
11
12
13
14
15
16
17
18
19
20
21
22
23
# 参照前述的方式配置 app.id, env, apollo.meta(或者 apollo.config-service), apollo.cluster
# 配置 application.properties 或 application.yml
这里以默认 namespace 为例, namespace 的配置详见 3.2.1.4.3
spring.config.import=apollo://application
apollo.client.extension.enabled=true
2
3
# 提供 spi 的实现
提供接口 com.ctrip.framework.apollo.config.data.extension.webclient.customizer.spi.ApolloClientWebClientCustomizerFactory 的 spi 实现。
在配置了 apollo.client.extension.enabled=true 之后, Apollo 的 Config Data Loader 会尝试去加载该 spi 的实现类来定制 webClient。
# Spring Placeholder的使用
Spring应用通常会使用Placeholder来注入配置,使用的格式形如${someKey:someDefaultValue},如${timeout:100}。冒号前面的是key,冒号后面的是默认值。
建议在实际使用时尽量给出默认值,以免由于key没有定义导致运行时错误。
从v0.10.0开始的版本支持placeholder在运行时自动更新,具体参见PR #972 (opens new window)。
如果需要关闭placeholder在运行时自动更新功能,可以通过以下两种方式关闭:
通过设置System Property
apollo.autoUpdateInjectedSpringProperties,如启动时传入-Dapollo.autoUpdateInjectedSpringProperties=false通过设置META-INF/app.properties中的
apollo.autoUpdateInjectedSpringProperties属性,如
app.id=SampleApp
apollo.autoUpdateInjectedSpringProperties=false
2
# XML使用方式
假设我有一个TestXmlBean,它有两个配置项需要注入:
public class TestXmlBean {
  private int timeout;
  private int batch;

  public void setTimeout(int timeout) {
    this.timeout = timeout;
  }

  public void setBatch(int batch) {
    this.batch = batch;
  }

  public int getTimeout() {
    return timeout;
  }

  public int getBatch() {
    return batch;
  }
}
2
3
4
5
6
7
8
9
10
11
12
13
14
15
16
17
18
19
20
那么,我在XML中会使用如下方式来定义(假设应用默认的application namespace中有timeout和batch的配置项):
<?xml version="1.0" encoding="UTF-8"?>
<beans xmlns="http://www.springframework.org/schema/beans"
       xmlns:xsi="http://www.w3.org/2001/XMLSchema-instance"
       xmlns:apollo="http://www.ctrip.com/schema/apollo"
       xsi:schemaLocation="http://www.springframework.org/schema/beans http://www.springframework.org/schema/beans/spring-beans.xsd
       http://www.ctrip.com/schema/apollo http://www.ctrip.com/schema/apollo.xsd">
    <apollo:config/>
    <bean class="com.ctrip.framework.apollo.spring.TestXmlBean">
        <property name="timeout" value="${timeout:100}"/>
        <property name="batch" value="${batch:200}"/>
    </bean>
</beans>
2
3
4
5
6
7
8
9
10
11
12
# Java Config使用方式
假设我有一个TestJavaConfigBean,通过Java Config的方式还可以使用@Value的方式注入:
public class TestJavaConfigBean {
  @Value("${timeout:100}")
  private int timeout;
  private int batch;

  @Value("${batch:200}")
  public void setBatch(int batch) {
    this.batch = batch;
  }

  public int getTimeout() {
    return timeout;
  }

  public int getBatch() {
    return batch;
  }
}
2
3
4
5
6
7
8
9
10
11
12
13
14
15
16
17
18
在Configuration类中按照下面的方式使用(假设应用默认的application namespace中有timeout和batch的配置项):
@Configuration
@EnableApolloConfig
public class AppConfig {
  @Bean
  public TestJavaConfigBean javaConfigBean() {
    return new TestJavaConfigBean();
  }
}
2
3
4
5
6
7
8
# ConfigurationProperties使用方式
Spring Boot提供了@ConfigurationProperties (opens new window)把配置注入到bean对象中。
Apollo也支持这种方式,下面的例子会把redis.cache.expireSeconds和redis.cache.commandTimeout分别注入到SampleRedisConfig的expireSeconds和commandTimeout字段中。
@ConfigurationProperties(prefix = "redis.cache")
public class SampleRedisConfig {
  private int expireSeconds;
  private int commandTimeout;

  public void setExpireSeconds(int expireSeconds) {
    this.expireSeconds = expireSeconds;
  }

  public void setCommandTimeout(int commandTimeout) {
    this.commandTimeout = commandTimeout;
  }
}
2
3
4
5
6
7
8
9
10
11
12
13
在Configuration类中按照下面的方式使用(假设应用默认的application namespace中有redis.cache.expireSeconds和redis.cache.commandTimeout的配置项):
@Configuration
@EnableApolloConfig
public class AppConfig {
  @Bean
  public SampleRedisConfig sampleRedisConfig() {
    return new SampleRedisConfig();
  }
}
2
3
4
5
6
7
8
需要注意的是,@ConfigurationProperties如果需要在Apollo配置变化时自动更新注入的值,需要配合使用EnvironmentChangeEvent (opens new window)或RefreshScope (opens new window)。相关代码实现,可以参考apollo-use-cases项目中的ZuulPropertiesRefresher.java (opens new window)和apollo-demo项目中的SampleRedisConfig.java (opens new window)以及SpringBootApolloRefreshConfig.java (opens new window)
# Spring Annotation支持
Apollo同时还增加了几个新的Annotation来简化在Spring环境中的使用。
- @ApolloConfig
- 用来自动注入Config对象
- @ApolloConfigChangeListener
- 用来自动注册ConfigChangeListener
- @ApolloJsonValue
- 用来把配置的json字符串自动注入为对象
使用样例如下:
public class TestApolloAnnotationBean {
  @ApolloConfig
  private Config config; //inject config for namespace application
  @ApolloConfig("application")
  private Config anotherConfig; //inject config for namespace application
  @ApolloConfig("FX.apollo")
  private Config yetAnotherConfig; //inject config for namespace FX.apollo
  @ApolloConfig("application.yml")
  private Config ymlConfig; //inject config for namespace application.yml

  /**
   * ApolloJsonValue annotated on fields example, the default value is specified as empty list - []
   * <br />
   * jsonBeanProperty=[{"someString":"hello","someInt":100},{"someString":"world!","someInt":200}]
   */
  @ApolloJsonValue("${jsonBeanProperty:[]}")
  private List<JsonBean> anotherJsonBeans;

  @Value("${batch:100}")
  private int batch;

  //config change listener for namespace application
  @ApolloConfigChangeListener
  private void someOnChange(ConfigChangeEvent changeEvent) {
    //update injected value of batch if it is changed in Apollo
    if (changeEvent.isChanged("batch")) {
      batch = config.getIntProperty("batch", 100);
    }
  }

  //config change listener for namespace application
  @ApolloConfigChangeListener("application")
  private void anotherOnChange(ConfigChangeEvent changeEvent) {
    //do something
  }

  //config change listener for namespaces application, FX.apollo and application.yml
  @ApolloConfigChangeListener({"application", "FX.apollo", "application.yml"})
  private void yetAnotherOnChange(ConfigChangeEvent changeEvent) {
    //do something
  }

  //example of getting config from Apollo directly
  //this will always return the latest value of timeout
  public int getTimeout() {
    return config.getIntProperty("timeout", 200);
  }

  //example of getting config from injected value
  //the program needs to update the injected value when batch is changed in Apollo using @ApolloConfigChangeListener shown above
  public int getBatch() {
    return this.batch;
  }

  private static class JsonBean{
    private String someString;
    private int someInt;
  }
}
2
3
4
5
6
7
8
9
10
11
12
13
14
15
16
17
18
19
20
21
22
23
24
25
26
27
28
29
30
31
32
33
34
35
36
37
38
39
40
41
42
43
44
45
46
47
48
49
50
51
52
53
54
55
56
57
58
59
在Configuration类中按照下面的方式使用:
@Configuration
@EnableApolloConfig
public class AppConfig {
  @Bean
  public TestApolloAnnotationBean testApolloAnnotationBean() {
    return new TestApolloAnnotationBean();
  }
}
2
3
4
5
6
7
8
# 已有配置迁移
很多情况下,应用可能已经有不少配置了,比如Spring Boot的应用,就会有bootstrap.properties/yml, application.properties/yml等配置。
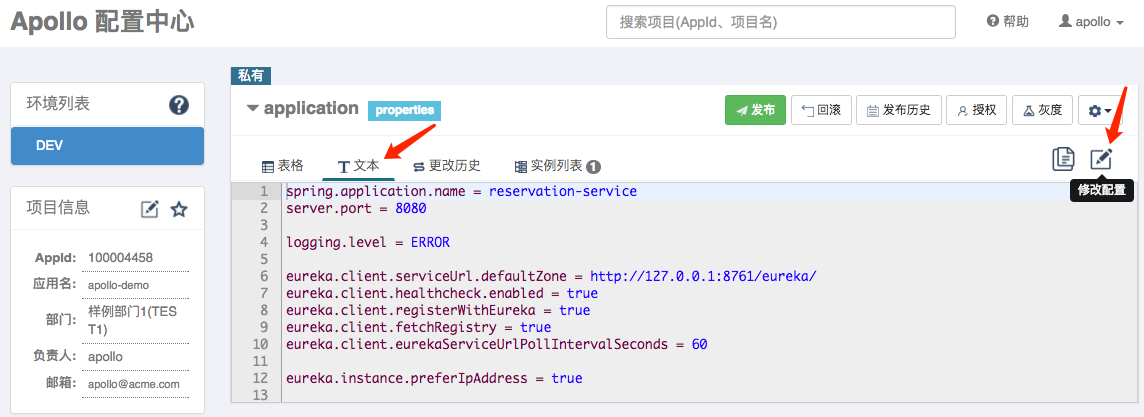
在应用接入Apollo之后,这些配置是可以非常方便的迁移到Apollo的,具体步骤如下:
- 在Apollo为应用新建项目
- 在应用中配置好META-INF/app.properties
- 建议把原先配置先转为properties格式,然后通过Apollo提供的文本编辑模式全部粘帖到应用的application namespace,发布配置
- 如果原来格式是yml,可以使用YamlPropertiesFactoryBean.getObject (opens new window)转成properties格式
- 如果原来是yml,想继续使用yml来编辑配置,那么可以创建私有的application.yml namespace,把原来的配置全部粘贴进去,发布配置
- 需要apollo-client是1.3.0及以上版本
- 把原先的配置文件如bootstrap.properties/yml, application.properties/yml从项目中删除
- 如果需要保留本地配置文件,需要注意部分配置如
server.port必须确保本地文件已经删除该配置项
- 如果需要保留本地配置文件,需要注意部分配置如
如:
spring.application.name = reservation-service
server.port = 8080

logging.level = ERROR

eureka.client.serviceUrl.defaultZone = http://127.0.0.1:8761/eureka/
eureka.client.healthcheck.enabled = true
eureka.client.registerWithEureka = true
eureka.client.fetchRegistry = true
eureka.client.eurekaServiceUrlPollIntervalSeconds = 60

eureka.instance.preferIpAddress = true
2
3
4
5
6
7
8
9
10
11
12
# Demo样例
项目中有一个样例客户端的项目:apollo-demo,具体信息可以参考Apollo开发指南中的2.3 Java样例客户端启动部分。
# 客户端设计
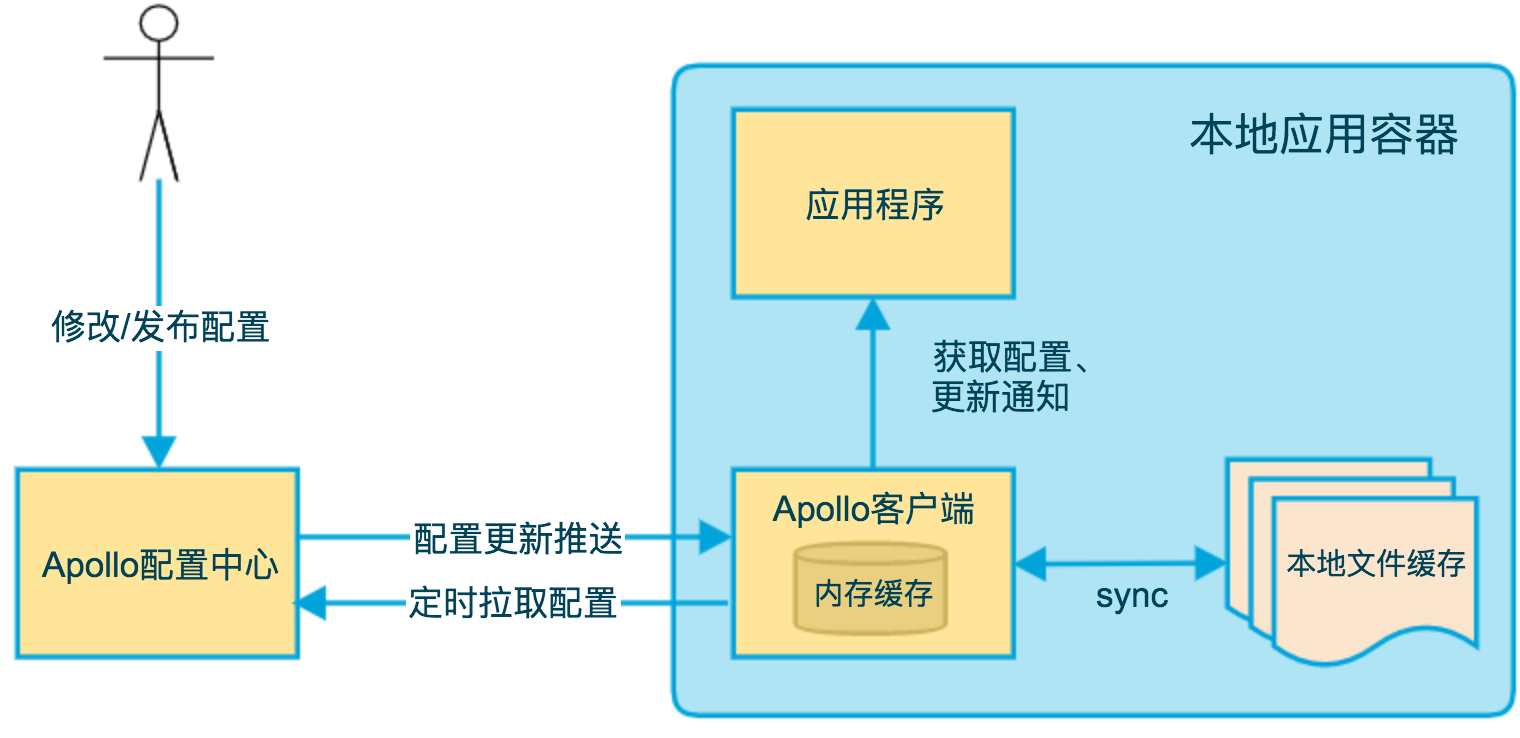
上图简要描述了Apollo客户端的实现原理:
- 客户端和服务端保持了一个长连接,从而能第一时间获得配置更新的推送。(通过Http Long Polling实现)
- 客户端还会定时从Apollo配置中心服务端拉取应用的最新配置。
- 这是一个fallback机制,为了防止推送机制失效导致配置不更新
- 客户端定时拉取会上报本地版本,所以一般情况下,对于定时拉取的操作,服务端都会返回304 - Not Modified
- 定时频率默认为每5分钟拉取一次,客户端也可以通过在运行时指定System Property:
apollo.refreshInterval来覆盖,单位为分钟。
- 客户端从Apollo配置中心服务端获取到应用的最新配置后,会保存在内存中
- 客户端会把从服务端获取到的配置在本地文件系统缓存一份
- 在遇到服务不可用,或网络不通的时候,依然能从本地恢复配置
- 应用程序可以从Apollo客户端获取最新的配置、订阅配置更新通知
# 本地开发模式
Apollo客户端还支持本地开发模式,这个主要用于当开发环境无法连接Apollo服务器的时候,比如在邮轮、飞机上做相关功能开发。
在本地开发模式下,Apollo只会从本地文件读取配置信息,不会从Apollo服务器读取配置。
可以通过下面的步骤开启Apollo本地开发模式。
# 修改环境
修改/opt/settings/server.properties(Mac/Linux)或C:\opt\settings\server.properties(Windows)文件,设置env为Local:
env=Local
更多配置环境的方式请参考1.2.4.1 Environment
# 准备本地配置文件
在本地开发模式下,Apollo客户端会从本地读取文件,所以我们需要事先准备好配置文件。
# 本地配置目录
本地配置目录位于:
- Mac/Linux: /opt/data/{appId}/config-cache
- Windows: C:\opt\data\{appId}\config-cache
appId就是应用的appId,如100004458。
请确保该目录存在,且应用程序对该目录有读权限。
【小技巧】 推荐的方式是先在普通模式下使用Apollo,这样Apollo会自动创建该目录并在目录下生成配置文件。
# 本地配置文件
本地配置文件需要按照一定的文件名格式放置于本地配置目录下,文件名格式如下:
{appId}+{cluster}+{namespace}.properties
- appId就是应用自己的appId,如100004458
- cluster就是应用使用的集群,一般在本地模式下没有做过配置的话,就是default
- namespace就是应用使用的配置namespace,一般是application
文件内容以properties格式存储,比如如果有两个key,一个是request.timeout,另一个是batch,那么文件内容就是如下格式:
request.timeout=2000
batch=2000
2
# 修改配置
在本地开发模式下,Apollo不会实时监测文件内容是否有变化,所以如果修改了配置,需要重启应用生效。
# 测试模式
1.1.0版本开始增加了apollo-mockserver,从而可以很好地支持单元测试时需要mock配置的场景,使用方法如下:
# 引入POM依赖
<dependency>
    <groupId>com.ctrip.framework.apollo</groupId>
    <artifactId>apollo-mockserver</artifactId>
    <version>1.7.0</version>
</dependency>
2
3
4
5
6
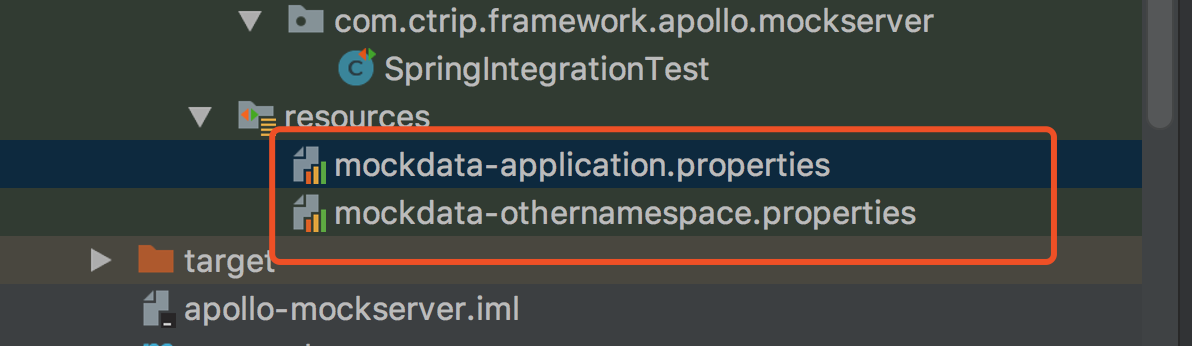
# 在test的resources下放置mock的数据
文件名格式约定为mockdata-{namespace}.properties
# 写测试类
更多使用demo可以参考ApolloMockServerApiTest.java (opens new window)和ApolloMockServerSpringIntegrationTest.java (opens new window)。
@RunWith(SpringJUnit4ClassRunner.class)
@SpringApplicationConfiguration(classes = TestConfiguration.class)
public class SpringIntegrationTest {
  // 启动apollo的mockserver
  @ClassRule
  public static EmbeddedApollo embeddedApollo = new EmbeddedApollo();

  @Test
  @DirtiesContext  // 这个注解很有必要,因为配置注入会弄脏应用上下文
  public void testPropertyInject(){
    assertEquals("value1", testBean.key1);
    assertEquals("value2", testBean.key2);
  }

  @Test
  @DirtiesContext
  public void testListenerTriggeredByAdd() throws InterruptedException, ExecutionException, TimeoutException {
    String otherNamespace = "othernamespace";
    embeddedApollo.addOrModifyPropery(otherNamespace,"someKey","someValue");
    ConfigChangeEvent changeEvent = testBean.futureData.get(5000, TimeUnit.MILLISECONDS);
    assertEquals(otherNamespace, changeEvent.getNamespace());
    assertEquals("someValue", changeEvent.getChange("someKey").getNewValue());
  }

  @EnableApolloConfig("application")
  @Configuration
  static class TestConfiguration{
    @Bean
    public TestBean testBean(){
      return new TestBean();
    }
  }

  static class TestBean{
    @Value("${key1:default}")
    String key1;
    @Value("${key2:default}")
    String key2;

    SettableFuture<ConfigChangeEvent> futureData = SettableFuture.create();

    @ApolloConfigChangeListener("othernamespace")
    private void onChange(ConfigChangeEvent changeEvent) {
      futureData.set(changeEvent);
    }
  }
}
2
3
4
5
6
7
8
9
10
11
12
13
14
15
16
17
18
19
20
21
22
23
24
25
26
27
28
29
30
31
32
33
34
35
36
37
38
39
40
41
42
43
44
45
46
47