
User Manual

# Preface
This document is the user manual for Apusic Load Balancer Software V2.0.5 Standard Edition, introducing the Apusic Load Balancer product to users and helping them get started quickly.
# Target Audience
This user manual is primarily intended for developers using Apusic Load Balancer, as well as related management personnel and operations staff.
# Version Update Notes
This document is updated according to actual circumstances, and the latest version includes historical modification records.
| Date | Manual Version | Applicable Product | Update Description |
|---|---|---|---|
| December 2024 | V2.0.2 | ALB V2.0.2 Agile Edition | Modified ALB high availability and authentication usage documentation |
| August 2025 | V2.0.5 | ALB V2.0.5 Standard Edition | New version user manual, added console usage instructions |
| December 2025 | V2.0.5 | ALB V2.0.5 Standard Edition | Added user case configuration and ebpf usage documentation |
# Product Introduction
# Product Overview
Apusic Load Balancer Software Standard Edition (Apusic Load Balancer, ALB) is a lightweight, high-performance, and highly available load balancer software. ALB can effectively address the challenges of request and traffic management for large-scale service clusters when facing clients, taking on the responsibilities of request security control, verification, filtering, as well as load balancing and reverse proxy. Through these functions, ALB successfully isolates the direct impact of client access on service application systems, platforms, and their resources, achieving effective control, refined management, and balanced distribution of cluster access traffic, ensuring service stability and efficiency.
# Core Functions
| Function | Description |
|---|---|
| Static File Service | Supports static file caching, resumable downloads, and other features to achieve fast, low-latency static content distribution. |
| Reverse Proxy | Supports HTTP, HTTPS, TCP, UDP, and other protocols to implement reverse proxy functionality. |
| Mail Proxy | Supports mail protocols to implement mail proxy functionality. |
| Load Balancing | Supports Layer 4 and Layer 7 load balancing. |
| Security | Supports HTTPS protocol and Chinese national cryptography SSL mutual authentication, ensuring secure and trusted communication between clients and servers. |
| Lua Extension | Supports writing extension plugins in Lua language to implement custom traffic processing logic. |
| Cross-Platform | Supports domestic software and hardware platforms, including: Kunpeng, Loongson, Zhaoxin, Hygon, and other domestic software and hardware platforms. |
| Monitoring | Supports monitoring collection and display of ALB node running status, traffic, performance, configuration, logs, etc. |
# Product Architecture and Functions
The architecture design of ALB Standard Edition is efficient, stable, and easy to extend. It uses a multi-process model to handle network requests, ensuring high performance and high concurrency capabilities. Through modular design, ALB Standard Edition can flexibly add new functions to meet different business scenario requirements. ALB Standard Edition architecture supports various network services from simple web servers to complex load balancing and reverse proxy, while ensuring ease of operation and service reliability.
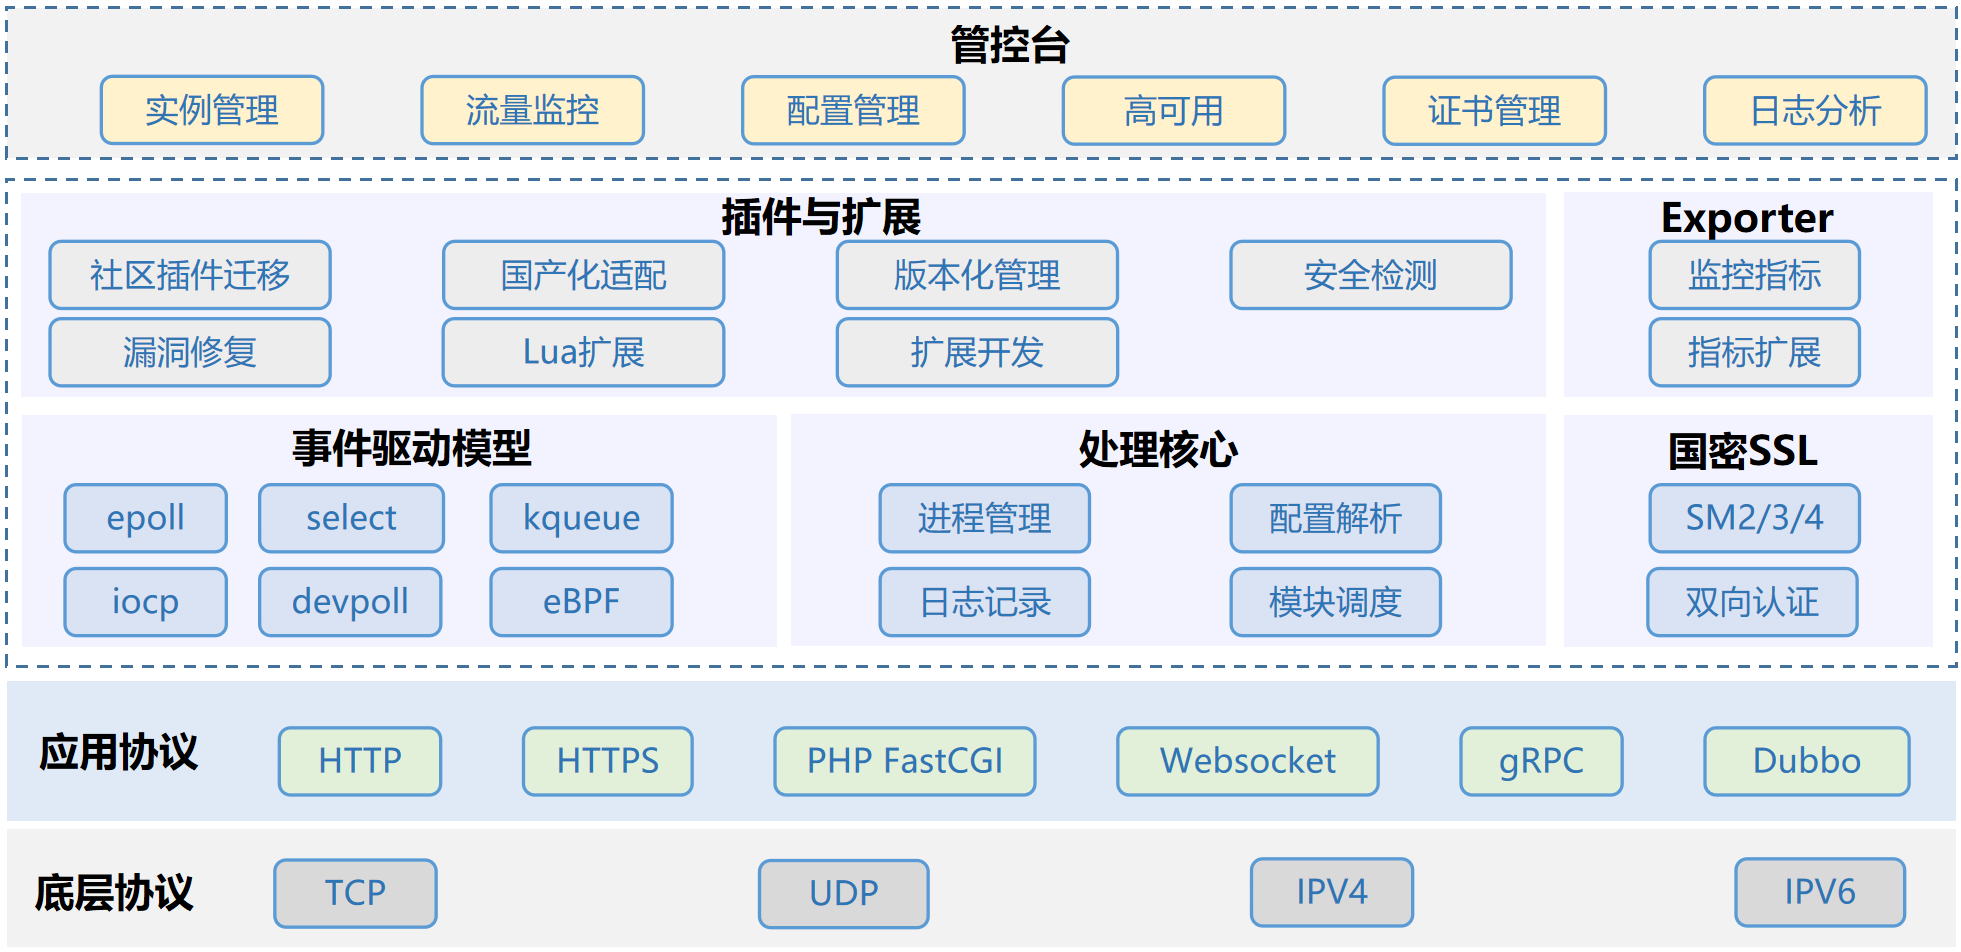
# Service Proxy
| Function | Description |
|---|---|
| Static File Service | Supports static file caching, resumable downloads, and other features to achieve fast, low-latency static content distribution. |
| Reverse Proxy | Supports HTTP, HTTPS, FastCGI, WebSocket, gRPC, TCP, UDP, and other protocol proxies. |
| Mail Proxy | Supports mail protocols to implement mail proxy functionality. |
| Protocol Support | HTTP2/HTTP3, supports IPv4 and IPv6 protocols |
| High Availability | Supports high availability cluster deployment, achieving active-standby high availability through VIP |
# Load Balancing
| Function | Description |
|---|---|
| Round Robin | Each request is assigned to different backend servers in chronological order. |
| Weighted Round Robin | Generates node traffic ratio based on node weights, used when backend server performance is uneven. |
| Least Connections | Selects the node with the fewest connections to upstream service nodes as the forwarding node. |
| Sticky Session | Maintains client association with session, ensuring requests from the same client are always directed to the same backend server during the session, achieving session consistency. |
| IP Hash | Calculates target node based on IP address hash, ensuring each visitor accesses a fixed backend server, which can solve session consistency issues. |
# Traffic Management
| Function | Description |
|---|---|
| Request Rate Limiting | Limits request rate to prevent upstream services from being overwhelmed by too many requests at the same time. |
| Request Count Limiting | Limits the number of client requests per unit time. |
| Concurrency Limiting | Limits the number of connections allowed per unit time for clients. |
| Canary Release | Implements canary release for services, testing new features to ensure new features work properly. |
# Security
| Function | Description |
|---|---|
| HTTP/HTTPS Protocol | Supports HTTP/HTTPS protocols, ensuring secure and trusted communication between clients and servers. |
| Chinese National Cryptography SSL | Supports Chinese national cryptography SSL mutual authentication, ensuring secure and trusted communication between clients and servers. |
| Access Control | Supports IP access control, IP blacklist/whitelist, referer blacklist/whitelist, static resource anti-hotlinking, and other features. |
# Management and Control
| Function | Description |
|---|---|
| Three-tier Role-based Access Control | Supports three-tier permission control, managing users, roles, and permissions. |
| Audit | Supports audit functionality, can view user operation logs. |
| Traffic Monitoring | Supports viewing real-time traffic data, as well as server load and other information |
| Configuration Management | Supports online management of configuration files, and automatic hot update of services |
# Deployment Architecture
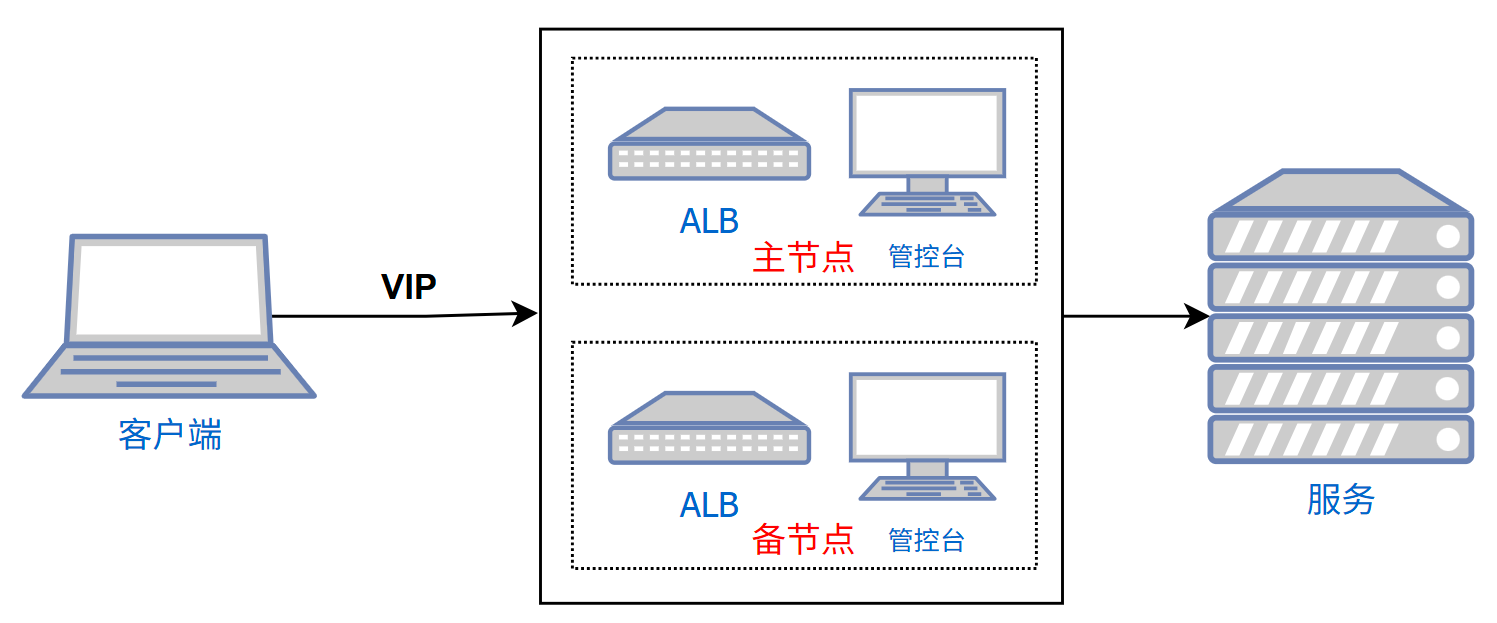
The active-standby high availability deployment architecture of ALB Standard Edition is shown in the figure above, mainly including the following components:
- Active-standby ALB nodes: Provide load balancing services and configuration management.
- Console: Manages ALB node configuration, monitoring, high availability, etc.
- Services: Reverse proxy carrying business application systems.
- VIP: Virtual IP address, dynamically pointing to active-standby ALB nodes.
# Product Installation
# Installation Package Description
The ALB Standard Edition installation package name structure is:
ALB-version-SE-build-date-CPU-architecture.tar.gz or ALB-version-SE-build-date-CPU-architecture-ebpf.tar.gz
Currently only supports arm64 and amd64 architectures on Linux platform:
- Linux-arm64 architecture installation package:
ALB-V2.0.5-SE-build-date-arm64.tar.gz - Linux-amd64(x86_64) architecture installation package:
ALB-V2.0.5-SE-build-date-amd64.tar.gz - Linux-arm64 architecture
ebpffeature installation package:ALB-V2.0.5-SE-build-date-arm64-ebpf.tar.gz - Linux-amd64(x86_64) architecture
ebpffeature installation package:ALB-V2.0.5-SE-build-date-amd64-ebpf.tar.gz
Note: The build date is the specific build date of the ALB product package. The same version may have multiple build dates. Please use the latest date when obtaining the installation package. The installation package names in all demonstrations in this manual have removed the build date.
Note: For ebpf feature installation package, Linux kernel version should not be lower than 4.19.
# Installation Media
- tar.gz compressed package:
ALB-version-SE-build-date-CPU-architecture.tar.gzcan be extracted to any path on the target machine for use. - Docker image:
ALB-version-SE-build-date-CPU-architecture-docker.tar.gzorALB-version-SE-Docker-build-date-CPU-architecture-base-os.tar.gz. - RPM package:
ALB-version-SE-build-date-CPU-architecture.rpm, install usingrpm -ivh package-name, after installation, the installation path is/opt/ALB-SE-version
# Single Node Deployment
Obtain software installation package ALB installation media is: ALB-V2.0.5-SE-amd64.tar.gz or ALB-V2.0.5-SE-arm64.tar.gz
Copy installation package to target host
Extract: ALB-V2.0.5-SE-amd64.tar.gz to target installation path (example is /opt directory)
tar -zxvf ALB-V2.0.5-SE-amd64.tar.gz -C /opt/For ALB usage, refer to the [Quick Start] section.
Note: If you don't have permission, please use root account or sudo
# Cluster Deployment
The cluster deployment architecture is shown in the figure above. After completing the single node installation steps on the active and standby nodes respectively, refer to the high availability deployment document in this document for configuration.
# Docker Deployment
ALB Standard Edition provides Docker system installation packages for arm and x86, and ALB can be deployed directly through the ALB Docker installation package.
# Installation Package Description
- ALB compressed installation package name
ALB-V2.0.5-SE-docker-amd64.tar.gzorALB-V2.0.5-SE-Docker-20250225-amd64-kylin.tar.gzALB-V2.0.5-SE-docker-arm64.tar.gzorALB-V2.0.5-SE-Docker-20250225-arm64-kylin.tar.gz
Note: The installation package date may be different, please choose according to the actual situation.
- Installation package directory structure
tree -l 1 ALB-V2.0.5-SE-Docker-20250225-amd64-kylin
ALB-V2.0.5-SE-Docker-20250225-amd64-kylin            # Directory after docker installation package extraction
|-- ALB-V2.0.5-SE-Docker-20250225-amd64-kylin.tar.gz # Docker image file
|-- alb                                              # ALB startup configuration file, license file, logs and other mount directory
|   |-- alb.conf                                     # ALB configuration file
|   |-- license.xml                                  # License file
-- alb-standard-dockercompose.yaml                      # docker compose configuration file
2
3
4
5
6
7
# Installation Steps
The following operations use ALB-V2.0.5-SE-Docker-20250225-amd64-kylin.tar.gz as an example
- Extract and import image
- Extract
tar -zxvf ALB-V2.0.5-SE-Docker-20250225-amd64-kylin.tar.gz - Enter the extracted folder
cd ALB-V2.0.5-SE-Docker-20250225-amd64-kylin - Load image:
docker load < ALB-V2.0.5-SE-Docker-20250225-amd64-kylin.tar.gz
- Modify license file
ALB license file needs to be mounted to the container internal installation directory, the current example is alb/license.xml, please replace the license file before starting the container.
License file mount description
- license.xml supports legacy license
- license.xml supports KBC license (if it is KBC license, copy the kbc license content to license.xml)
- acls.properties unified license configuration file needs to be added and mounted to the container path:
/opt/ALB-V2.0.5-SE
- Image startup and stop
- Start command:
docker-compose -f alb-standard-docker-compose.yaml up -d - Stop command:
docker-compose -f alb-standard-docker-compose.yaml down
alb-standard-docker-compose.yamlconfiguration description
version: '3'
services:
  alb:
    image: harbor.apusic.com/apusic/alb:V2.0.5-ae.20250225-kylin-amd64   # ALB image
    ports:
      - 8080:8080          # ALB http external port
      - 8887:8887          # ALB console port
    volumes:
      - ./alb/alb.conf:/opt/ALB-V2.0.5-SE/conf/alb.conf      # alb configuration file
      - ./alb/license.xml:/opt/ALB-V2.0.5-SE/license.xml     # alb license file
      - ./alb/logs:/opt/ALB-V2.0.5-SE/logs                   # alb access and error log storage directory
    command: bash /opt/ALB-V2.0.5-SE/bin/start-alb-and-console.sh
2
3
4
5
6
7
8
9
10
11
12
# K8s Deployment
ALB Standard Edition supports deployment through Kubernetes. Below are the detailed deployment steps.
# Preparation
Environment Requirements
- kubectl is installed and Kubernetes cluster access permissions are configured.
- If using a private image registry (such as Harbor), ensure the cluster has permission to pull images.
Image Preparation
- Upload Docker image to image registry (using AMD64 image as example)
# Extract installation package
tar -zxvf ALB-V2.0.5-SE-Docker-20250225-amd64-kylin.tar.gz
# Switch to extracted installation package
cd ALB-V2.0.5-SE-Docker-20250225-amd64-kylin
# Import ALB image
docker load < ALB-V2.0.5-SE-Docker-20250225-amd64-kylin.tar.gz
# Re-tag image, please modify according to your image registry address
docker tag [Image ID] harbor.apusic.com/apusic/alb:V2.0.5-ae.20250225-kylin-amd64
# Push image to image registry
docker push [Image ID]
1
2
3
4
5
6
7
8
9
10
# Configuration File and License Management
- Create ConfigMap
Mount
alb.confconfiguration file to container:
kubectl create configmap alb-config --from-file=./alb/alb.conf
- Create Secret
Store
license.xmllicense file as Secret (sensitive information is recommended to use Secret):
kubectl create secret generic alb-license --from-file=./alb/license.xml
# Deploy ALB Service
- Create Deployment Write alb-deployment.yaml file:
apiVersion: apps/v1
kind: Deployment
metadata:
  name: alb
spec:
  replicas: 1
  selector:
    matchLabels:
      app: alb
  template:
    metadata:
      labels:
        app: alb
    spec:
      containers:
      - name: alb
        image: harbor.apusic.com/apusic/alb:V2.0.5-se.20250225-kylin-amd64 # Please modify according to registry address
        command: ["bash", "/opt/ALB-V2.0.5-SE/bin/start-alb-and-console.sh"]
        ports:
        - containerPort: 8080
        - containerPort: 8887
        volumeMounts:
        - name: alb-config
          mountPath: "/opt/ALB-V2.0.5-SE/conf/alb.conf"
          subPath: "alb.conf"
        - name: alb-license
          mountPath: "/opt/ALB-V2.0.5-SE/license.xml"
          subPath: "license.xml"
        - name: alb-logs
          mountPath: "/opt/ALB-V2.0.5-SE/logs"
      volumes:
      - name: alb-config
        configMap:
          name: alb-config
      - name: alb-license
        secret:
          secretName: alb-license
      - name: alb-logs
        hostPath:
          path: "/var/alb/logs"
          type: DirectoryOrCreate
2
3
4
5
6
7
8
9
10
11
12
13
14
15
16
17
18
19
20
21
22
23
24
25
26
27
28
29
30
31
32
33
34
35
36
37
38
39
40
41
Parameter description
- image: Replace with actual image address.
- hostPath: Log directory mount path, can be changed to PVC as needed (such as using cloud storage).
- Create Service
apiVersion: v1
kind: Service
metadata:
  name: alb-service
spec:
  type: NodePort
  selector:
    app: alb
  ports:
  - name: http
    port: 8080
    targetPort: 8080
    nodePort: 30080
  - name: console
    port: 8887
    targetPort: 8887
    nodePort: 30887
2
3
4
5
6
7
8
9
10
11
12
13
14
15
16
17
Parameter description
- nodePort default range is 30000-32767, if port is omitted, it will be automatically assigned by the system
- In cloud environment, type can be changed to LoadBalancer to directly get external IP
- Apply configuration
kubectl apply -f alb-deployment.yaml
kubectl apply -f alb-service.yaml
2
# Deployment Verification
- Check Pod status
kubectl get pods -l app=alb
- Access service
- HTTP service:
http://<node-ip>:30080 - Console:
http://<node-ip>:30887
# Stop and Cleanup
- Delete deployment
kubectl delete -f alb-deployment.yaml -f alb-service.yaml
- Clean up configuration
kubectl delete configmap alb-config
kubectl delete secret alb-license
2
# Quick Start
Before using the product, you need to switch to the ALB installation directory, example is /opt/ALB-V2.0.5-SE-amd64, and place the applied ALB Standard Edition KBC license file license.lic in the installation directory.
# Product Configuration
ALB core is compatible with Nginx configuration, the specific configuration file conf/alb.conf path is:
Installation path/conf/alb.conf
You can use Nginx configuration methods and content to configure ALB
# Product Startup, Stop, Hot Reload, Uninstall, Verify Configuration File and Get License Code
- Start ALB instance and management console
cd /opt/ALB-V2.0.5-SE-amd64            # Enter installation directory
./bin/start-alb-and-console.sh                   # Start alb and management console
2
- Start ALB instance without starting console
cd /opt/ALB-V2.0.5-SE-amd64            # Enter installation directory
./bin/start-alb.sh                   # Start alb
2
- Stop ALB instance and management console
cd /opt/ALB-V2.0.5-SE-amd64            # Enter installation directory
./bin/stop-alb-and-console.sh                    # Stop alb and management console
2
- Stop ALB instance
cd /opt/ALB-V2.0.5-SE-amd64            # Enter installation directory
./bin/stop-alb.sh                    # Stop alb
2
- Hot reload
cd /opt/ALB-V2.0.5-SE-amd64            # Enter installation directory
./bin/reload-alb.sh                  # Stop alb
2
Uninstall
- Extract installation package
- Directly delete installation directory
- rpm:
- x86:
rpm -e ALB-SE-2.0.5-1.el7.x86_64 - arm64:
rpm -e ALB-SE-2.0.5-1.el7.aarch64
- x86:
- Extract installation package
Verify configuration file
You can use -t parameter to verify if the configuration file has errors
Successful verification prompt: syntax is ok and test is successful
cd /opt/ALB-V2.0.5-SE-amd64            # Enter installation directory
./sbin/alb -t                          # Verify if conf/alb.conf configuration file has syntax errors
2
To verify a specific configuration file, you can use -c parameter to specify the configuration file
cd /opt/ALB-V2.0.5-SE-amd64            # Enter installation directory
./sbin/alb -t -c conf/alb.conf         # Specify to verify if conf/alb.conf configuration file has syntax errors

# Output
alb:the configuration file /opt/ALB-V2.0.5-SE-amd64/conf/alb.conf syntax is ok
alb:configuration file /opt/ALB-V2.0.5-SE-amd64/conf/alb.conf test is successful
2
3
4
5
6
- Get product license code
cd /opt/ALB-V2.0.5-SE-amd64            # Enter installation directory
./bin/alb-authcode                 # Get alb license code on current node
# Note: If multiple license codes appear, you can choose any one to apply for license file

./bin/alb-authcode -ac eth0              # Get license code for specified network interface
./bin/alb-authcode -ac 172.21.61.110     # Get license code for specified IP
2
3
4
5
6
# Configure Reverse Proxy
Steps are as follows:
- Prepare the target reverse proxy server IP and service port.
- Modify ALB configuration file, configure listening port and reverse proxy to target server.
- Use hot reload command to update alb configuration.
- Verify reverse proxy test.
Example: There is an ftp server: 172.21.32.42:8080, need to publish content through alb proxy, if alb node can access ftp server normally, you can configure alb's reverse proxy to proxy ftp service.
- Target proxy service: 172.21.32.42:8080
- Modify alb.conf file, configure listening port and reverse proxy to target server.
# Add proxy server block in http block
http{
  # Omit other configuration content, the following server block is added content
  server {
      listen 80;   # Listen on port 80

      location / {   # Forward all accessed urls to 172.21.32.42:8080
          proxy_pass http://172.21.32.42:8080/;
      }
  }
}
2
3
4
5
6
7
8
9
10
11
- Use hot reload command to update alb configuration.
./bin/reload-alb.sh
- Verify reverse proxy test.
curl http://172.21.32.42:80
# Configure Static Resource Proxy
Steps are as follows:
- Prepare static resources, upload to ALB node (172.21.32.42) /data/www directory.
- Modify ALB configuration file, add static resource proxy configuration.
- Use hot reload command to update alb configuration.
Example: First have a pure HTML and other static resources website, need to publish website through alb.
- Extract target website static resources to ALB node directory.
- Modify alb.conf file, add static resource proxy configuration.
# Add proxy server block in http block
http{
  server {
    listen 80;
    location / {
      root /data/www;                   # Through root directive, specify static resource path
      index index.html;                 # Default file for accessing homepage, for example directly accessing /, then access index.html
      try_files $uri $uri/ /index.html; # Try to access uri, if failed then try to access uri/, finally access index.html
    }
  }
}
2
3
4
5
6
7
8
9
10
11
- Use hot reload command to update alb configuration.
./bin/reload-alb.sh
- Verify static resource test.
curl http://172.21.32.42:80/index.html
# Configure Dynamic and Static Separation
Steps are as follows:
- Prepare static resources, upload to ALB node (172.21.32.42).
- Prepare backend server nodes to be proxied.
- Modify ALB configuration file, add dynamic and static separation configuration.
- Use hot reload command to update alb configuration.
Example: There is a dynamic and static separation website, need to proxy static resources with url starting with static and API interfaces with url starting with api through ALB.
- Prepare static resources, upload to ALB node /data/www directory.
- Backend API proxy service: 172.21.32.42:8080 and 172.21.32.43.8080.
- Modify alb.conf file, add dynamic and static separation configuration.
http{

  # Define backend api server address
  upstream api {
    server 172.21.32.42:8080;
    server 172.21.32.43:8080;
  }

  server {
    listen 80;
    location /static/ {   # Forward url starting with static to /data/www/static/
      root /data/www;
      index index.html;
    }
    location /api/ {   # Forward url starting with api to defined upstream api
      proxy_pass http://api/;
    }
  }
}
2
3
4
5
6
7
8
9
10
11
12
13
14
15
16
17
18
19
- Use hot reload command to update alb configuration.
./bin/reload-alb.sh
- Verify dynamic and static separation test.
# Get static resource index.html
curl http://172.21.32.42:80/static/index.html
# Request api
curl http://172.21.32.42:80/api/user/list
2
3
4
# Console Usage Instructions
ALB Console is a web-based management and monitoring tool that provides visual management of ALB load balancer, reducing the difficulty of direct user operations while improving management efficiency. ALB Console supports monitoring ALB running status, data traffic, node load conditions, configuration management, certificate management, high availability configuration, operation logs, etc.
# Three-tier Role-based Access Control
ALB Console uses three-tier role management, the system provides four default roles:
- admin-security (Security Administrator), Security Administrator is mainly responsible for user management operations, such as: user registration, deletion, editing, viewing user list, viewing user details.
- admin-audit (Audit Administrator), Audit Administrator is mainly responsible for security audit operations, such as: viewing operation log list, viewing operation log details.
- admin-alb (System Administrator), System Administrator is mainly responsible for all ALB management operations, such as: instance traffic viewing, configuration management, SSL certificate management, log viewing, high availability configuration, etc.
- user-alb (Regular User), Regular User only supports viewing of all ALB operations, without any modification permissions.
Four roles initial default users and passwords:
| Role Name | Username | Initial Password |
|---|---|---|
| Security Administrator | admin-security | Apusic@alb@admin1 |
| Audit Administrator | admin-audit | Apusic@alb@admin2 |
| System Administrator | admin-alb | Apusic@alb123 |
# Console Login
The console login URLs are divided into the following two types:
- Security Administrator/Audit Administrator: http://{ALB_IP}:8887/admin
- System Administrator/Regular User: http://{ALB_IP}:8887

If you want to use https protocol, you need to open ALB console configuration file ALB installation directory/console/conf/config.yaml and modify the following configuration to enable https protocol:
......
system:
  ......
  # Use https
  https: true
  certfile: "./cert/cert.pem" # Default certificate file
  keyfile: "./cert/key.key" # Default key file
......
2
3
4
5
6
7
8
If you don't use the default certificate and key files, directly put your certificate and key files in ALB installation directory/console/cert/ directory. Or put them in any directory, then modify configuration items certfile and keyfile to point to the corresponding files.
# Security Administrator Operations
After the Security Administrator logs in successfully, the default page is as follows:
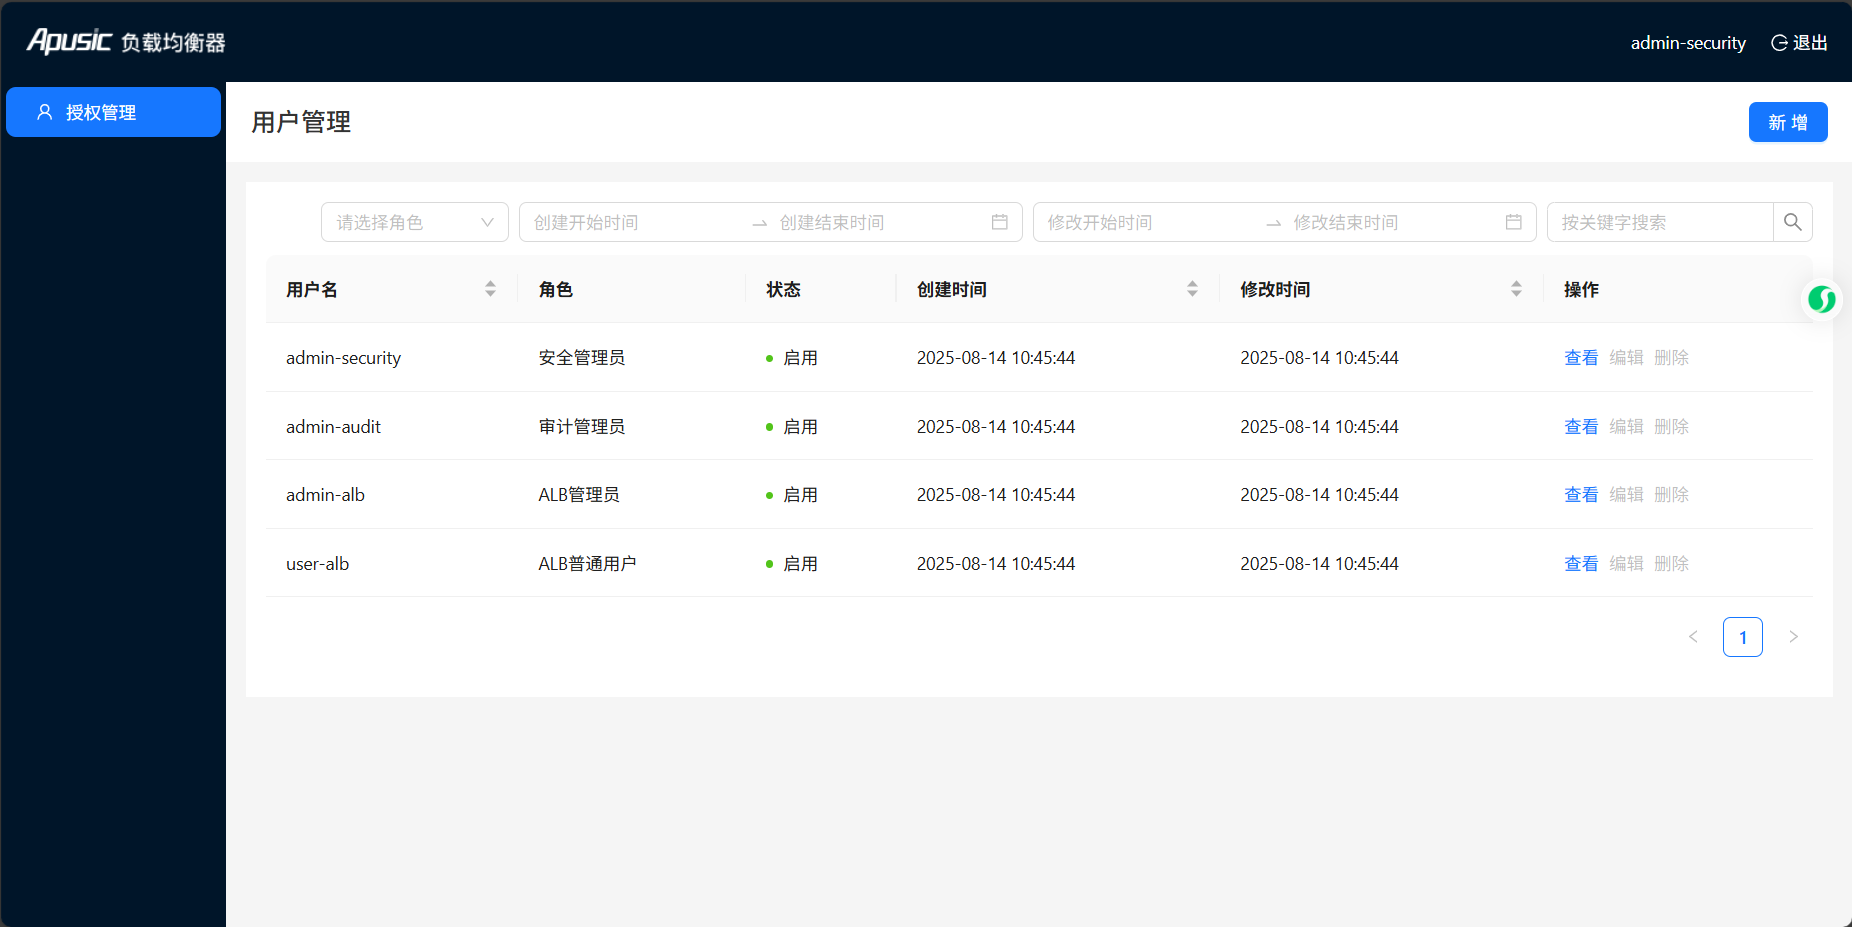
For each record, the following information is provided:
- Username: Indicates the user's name, unique user identifier
- Role: Indicates the user's role
- Status: Indicates the user's current status
- Created Time: Indicates the time when the user registered
- Modified Time: Indicates the time when the user was modified
# Register User
Click "New" to enter the register user page
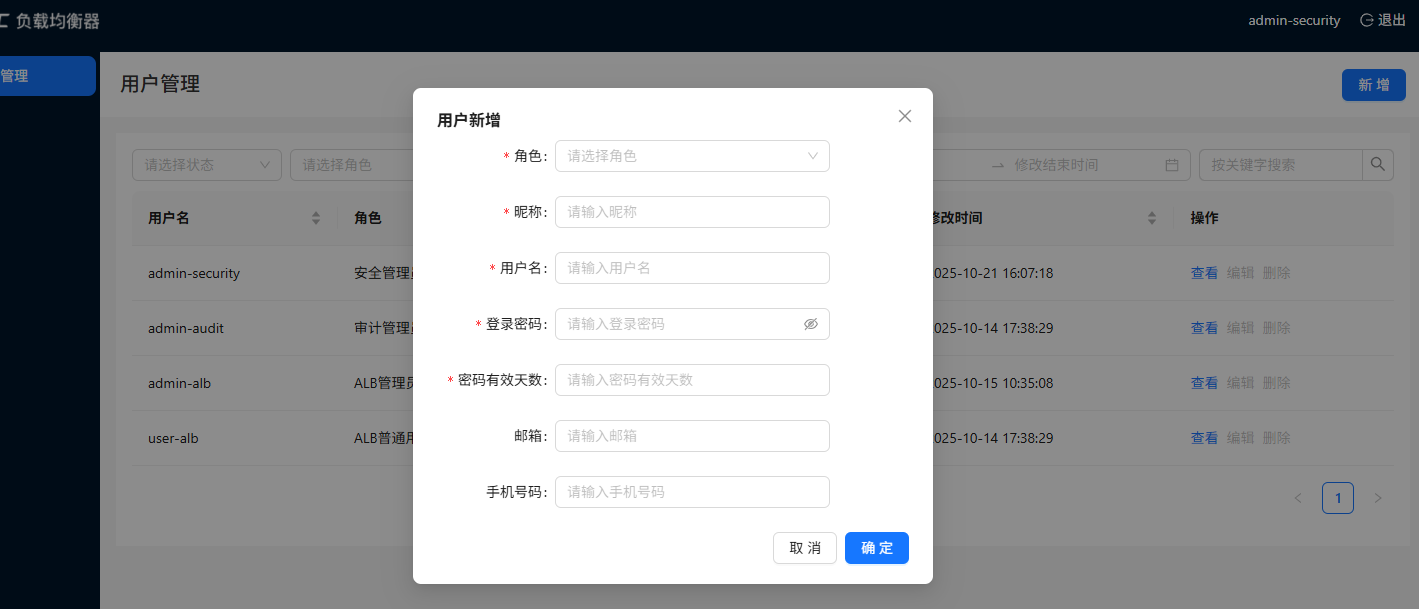
User information field description:
- Role: Select one of the four default roles provided by the system
- Nickname: User's alias, cannot be empty
- Username: User's identifier when logging into the system, unique, composed only of uppercase and lowercase letters, numbers, dots, underscores, hyphens
- Login Password: Composed of three of uppercase and lowercase letters, numbers, special characters (such as
!@#$%^&*), and length between 8 to 50 characters - Password Validity Days: The valid duration of the password since creating user/editing user password/user self-modifying password, unit is days, exceeding the duration, user needs to modify password, otherwise will be disabled. One week before password expiration, each login will prompt the password expiration time. User first login will also prompt to modify password. -1 means permanently valid
- Email: Conforms to common email format (not required)
- Phone: Conforms to Chinese mobile phone number format (not required)
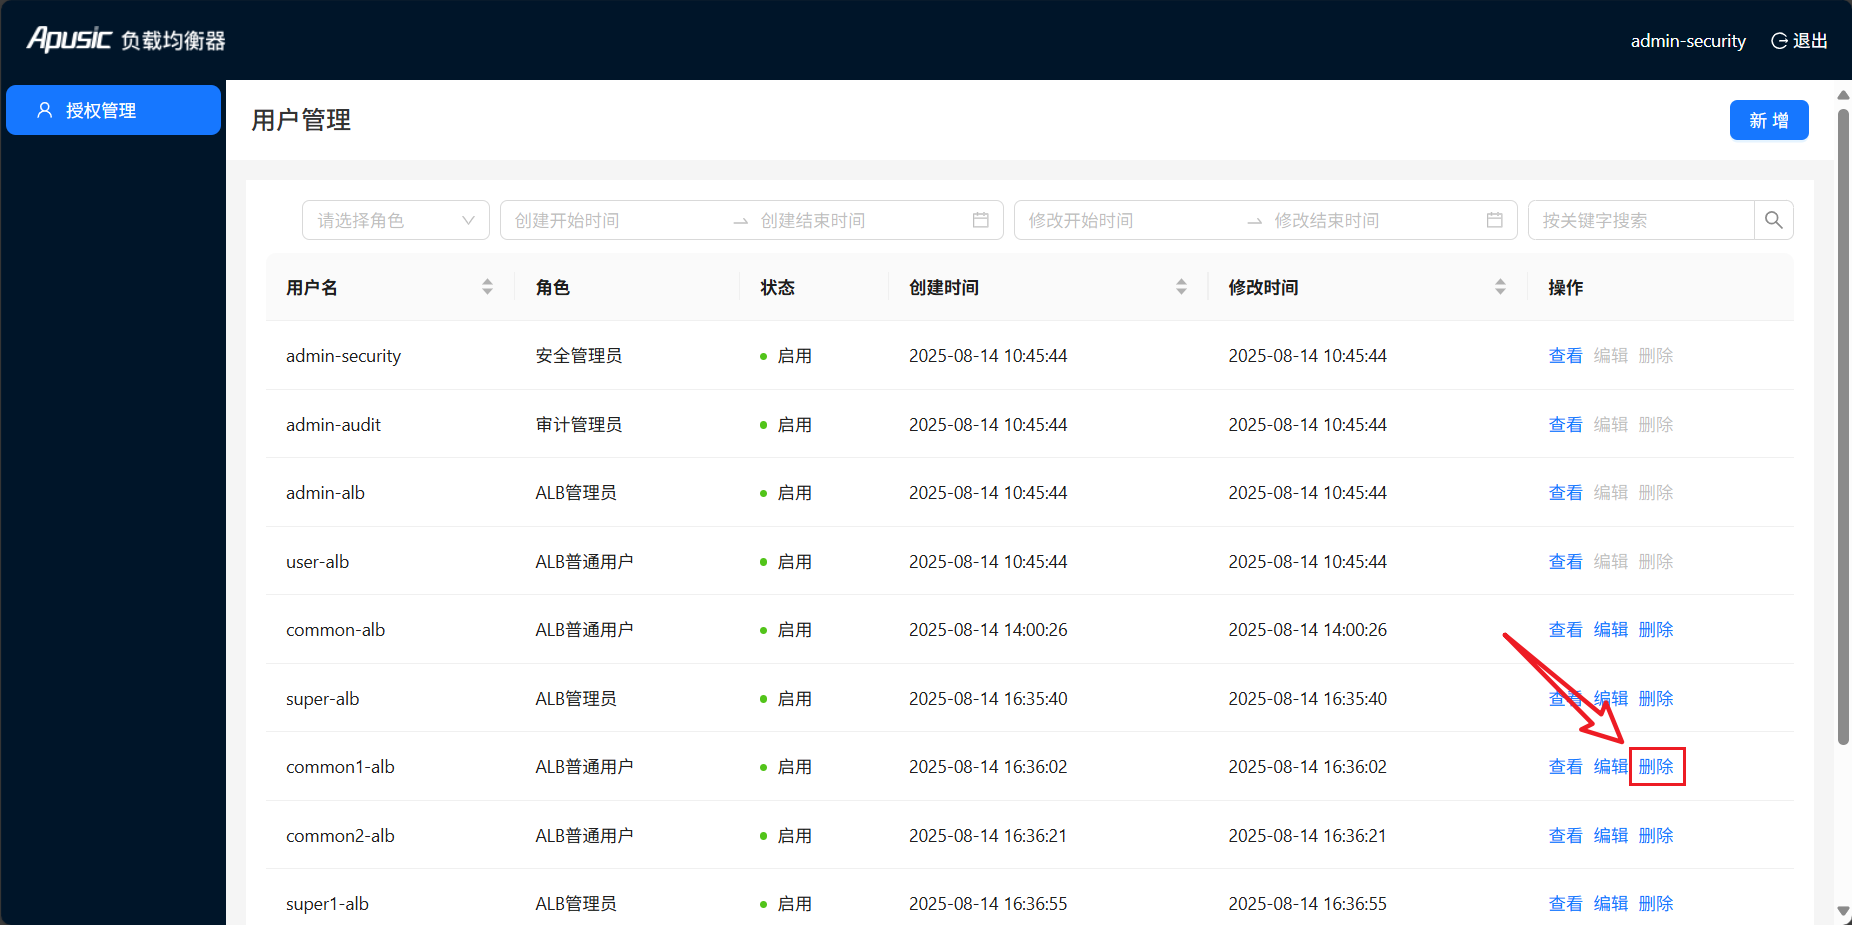
# Delete User
Select user, click "Delete" to delete the user, default users cannot be deleted
# Edit User
Select user, click "Edit" to enter the edit page, you can edit user basic information, if the information before and after editing has not changed, it will prompt related information. Default users cannot be edited
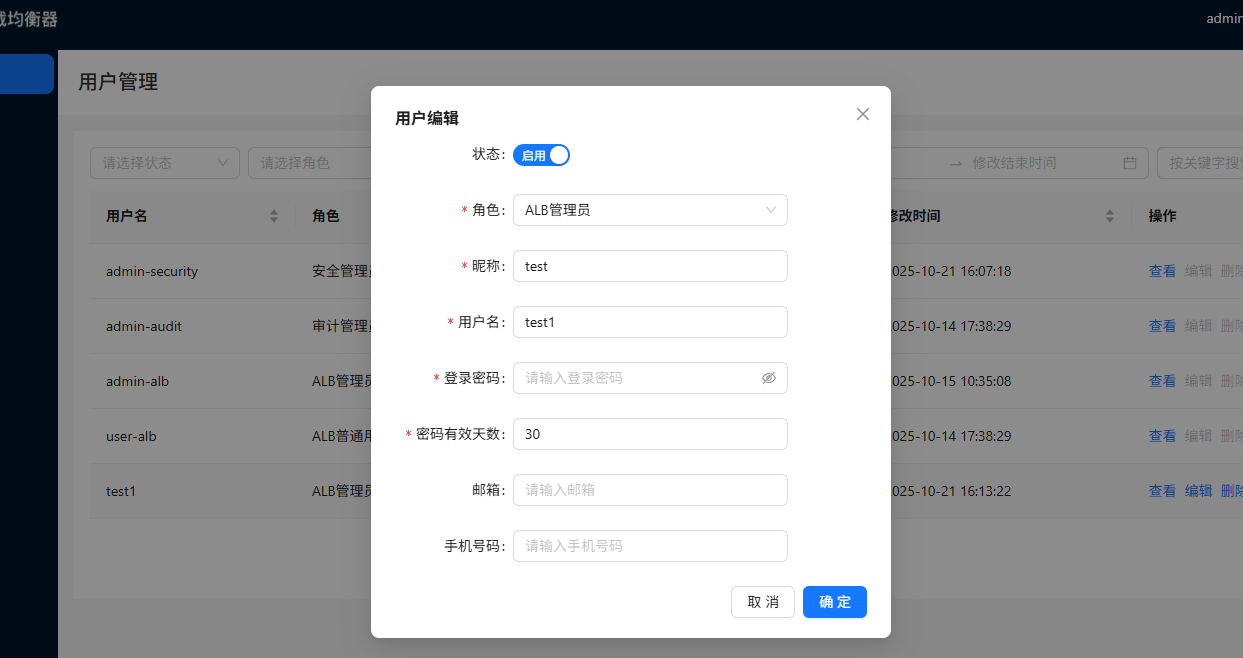
The difference between editing user and registering user is that editing user can change user status
Status description:
Normal: User is in normal status, can do any non-overriding operations
Disabled: User is in disabled status, cannot do any operations, including login
# View User List
Supports paginated user list retrieval by conditions
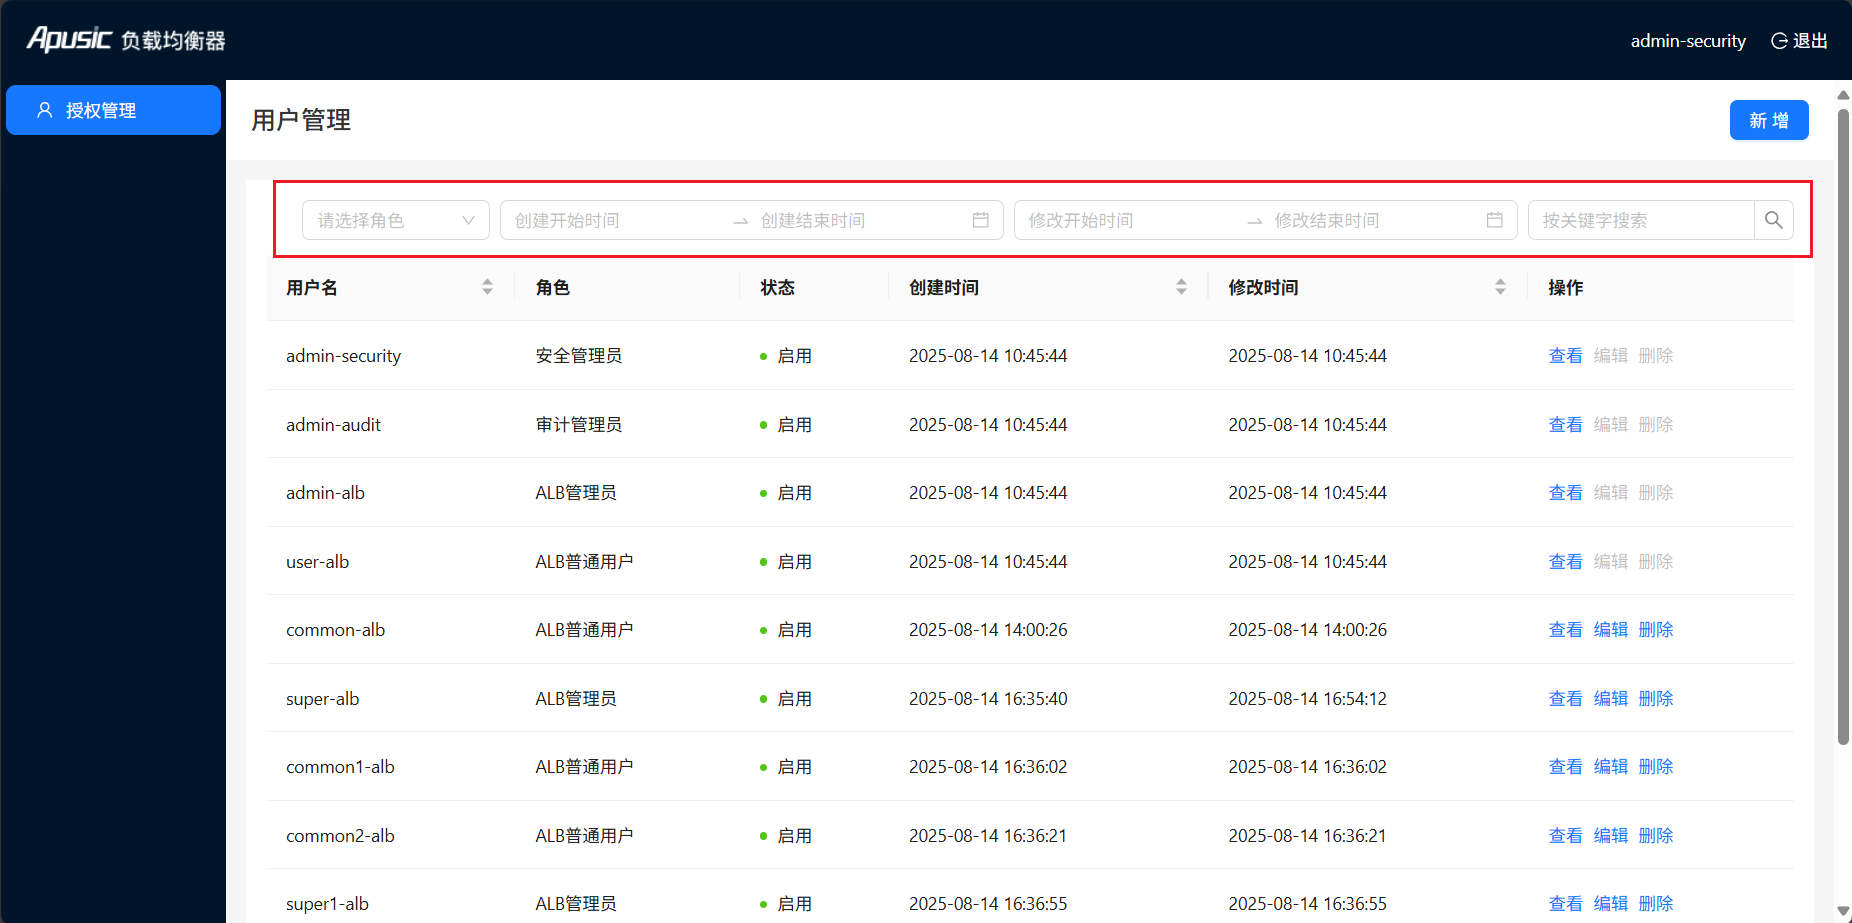
The following are condition and pagination descriptions, each condition is optional:
Role: Can select the four roles provided by the system for filtering
Time: Can filter by creation time and modification time
Username: Can enter username in the search box for filtering, supports fuzzy matching
User Status: Can select status for filtering
Sort Field: Supports sorting by username, creation time, modification time, default is sorted by the order of user creation. Click username, creation time, modification time field to select descending or ascending order
Sort Order: Supports ascending or descending order, default is ascending
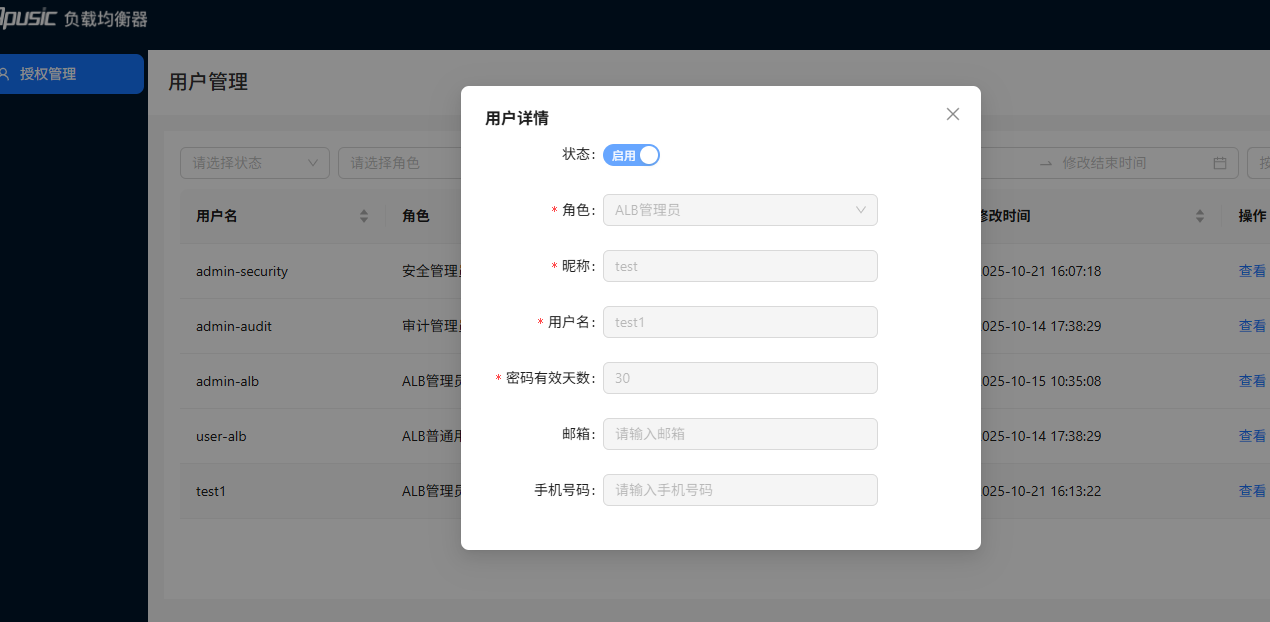
# View User Details
Select user, click "View" to view user details
# Audit Administrator Operations
After the Audit Administrator logs in successfully, the default page is as follows:
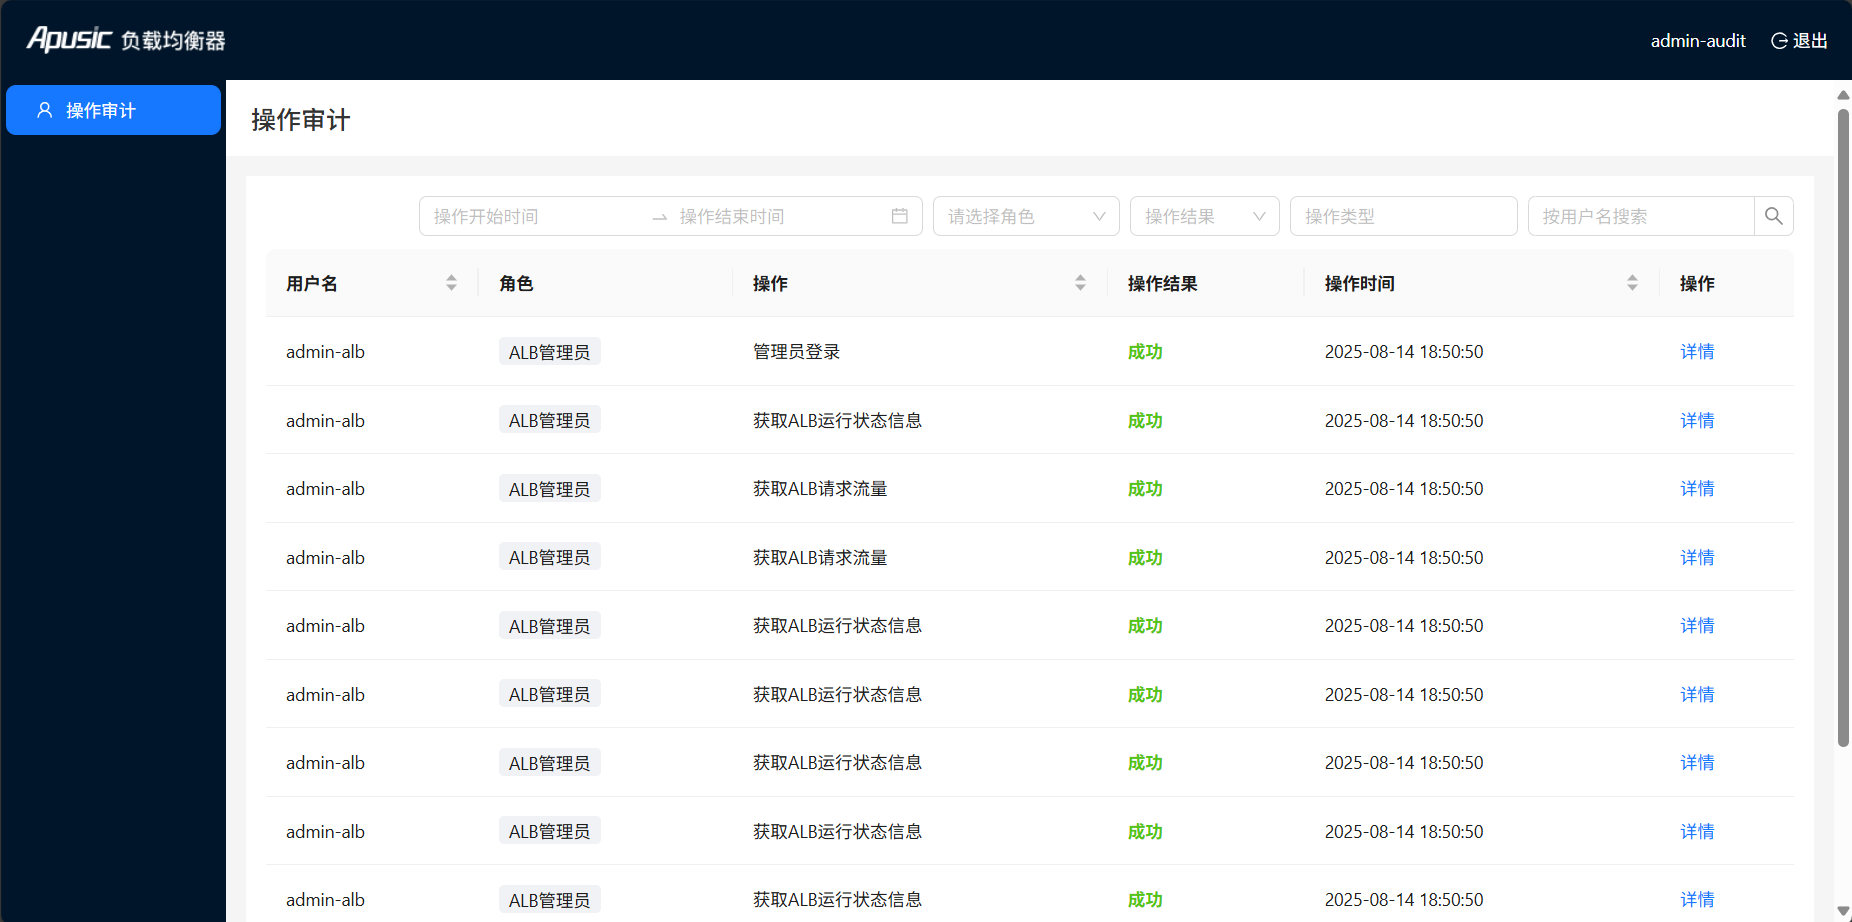
For each record, the following information is provided:
- Username: Indicates who performed this operation
- Role: Indicates the role of the operating user
- Operation: Indicates what operation the user performed
- Operation Result: Indicates whether the user operation was successful
- Operation Time: Indicates the time when the user performed the operation
# View Operation Log List
Supports paginated operation log list retrieval by conditions
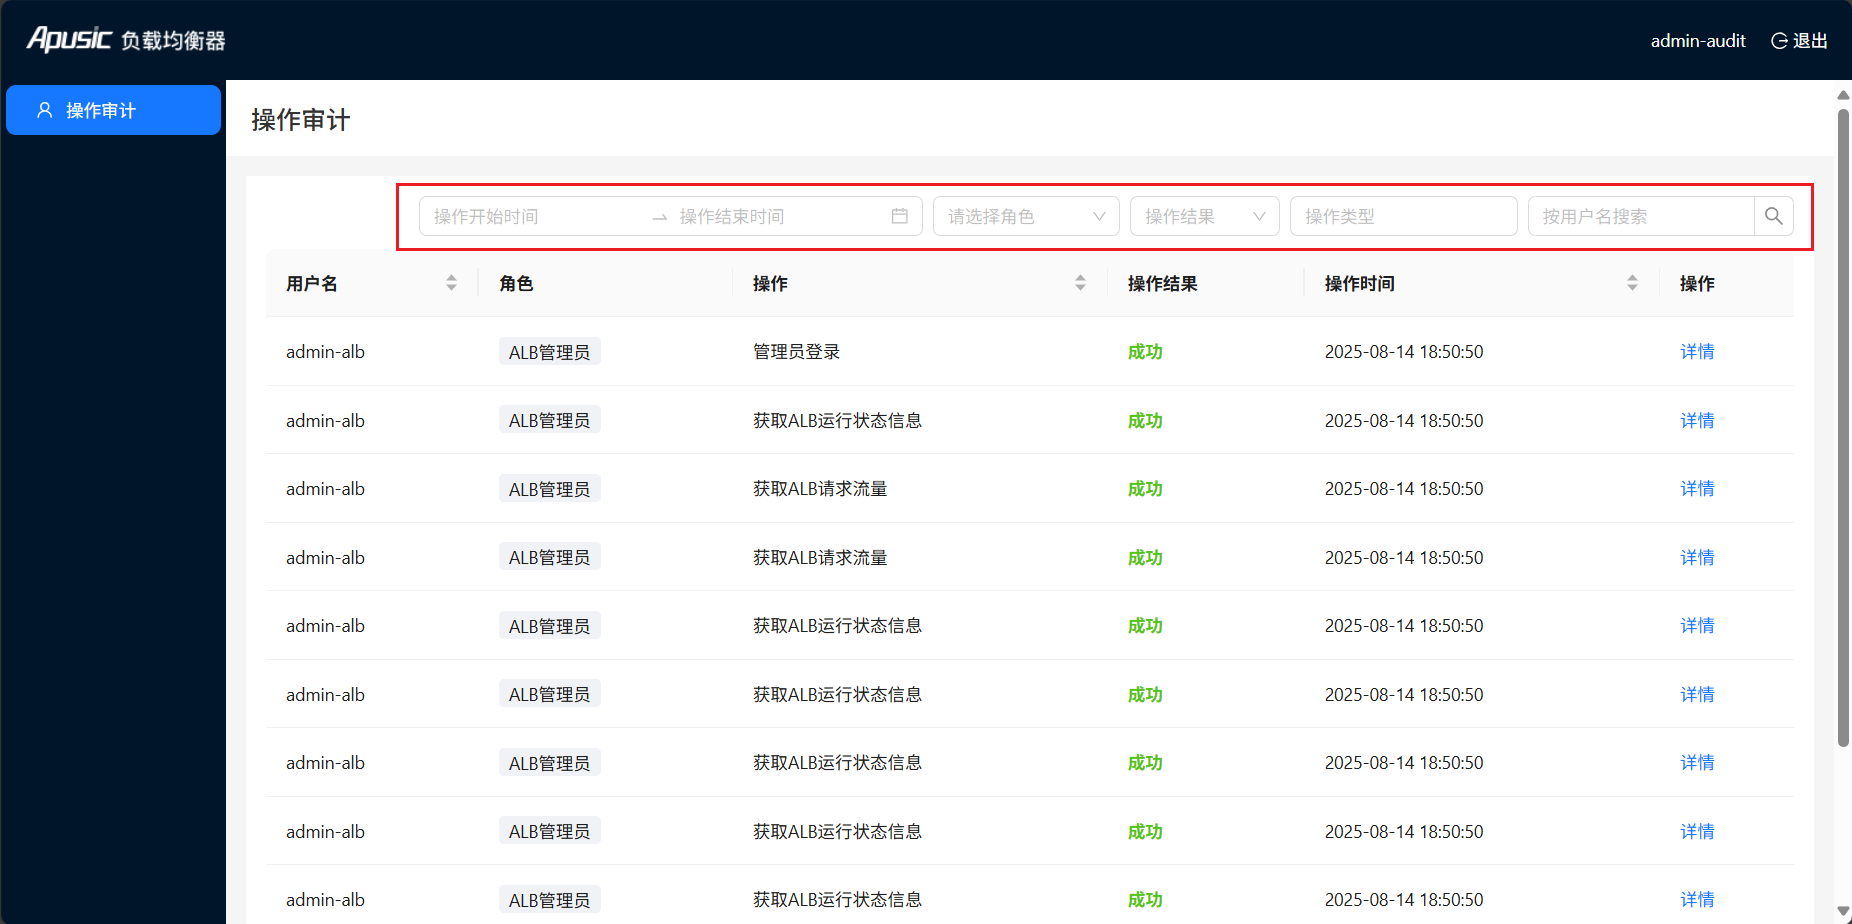
The following are condition and pagination descriptions, each condition is optional:
- Username: Can enter username in the username search box for filtering, supports fuzzy matching
- Role: Can select the four roles provided by the system for filtering
- Operation: Can enter operation keyword in the operation type search box for filtering, supports fuzzy matching
- Operation Result: Can select operation result for filtering
- Time: Can filter by operation time
- Sort Field: Supports sorting by username, operation, operation time, default is sorted by operation time
- Sort Order: Supports ascending or descending order, default is ascending
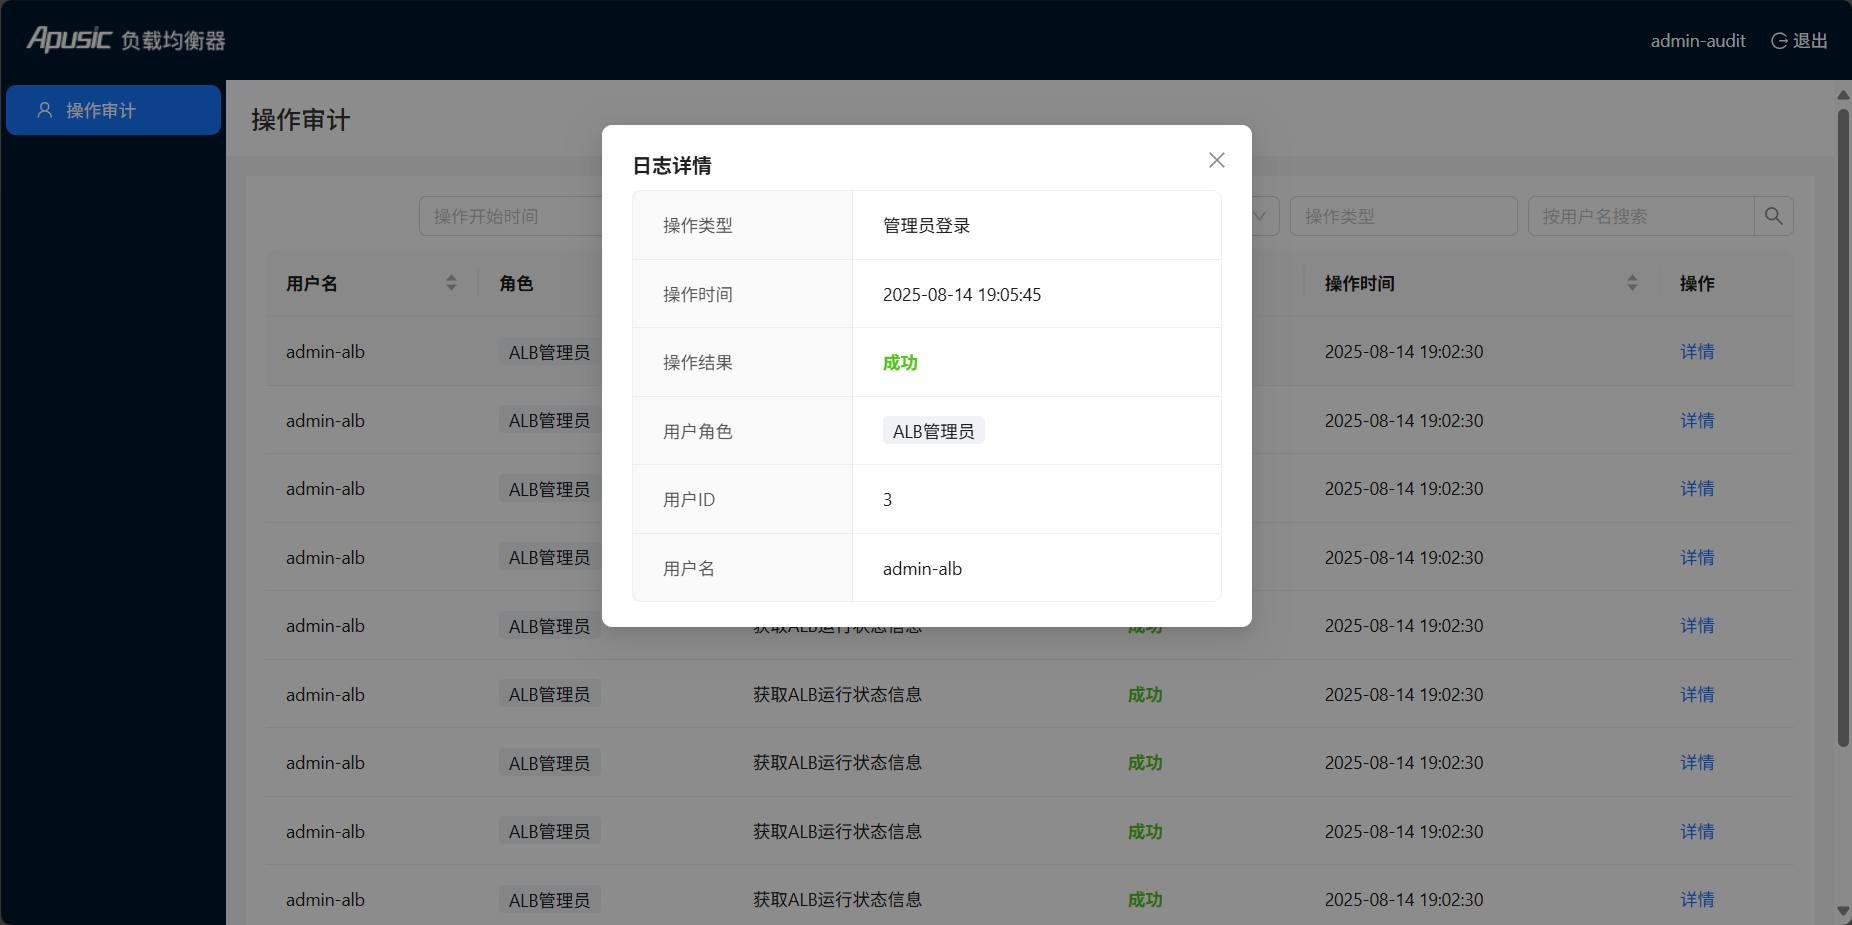
# View Operation Log Details
Select log, click "View" to view log details
# System Administrator Operations
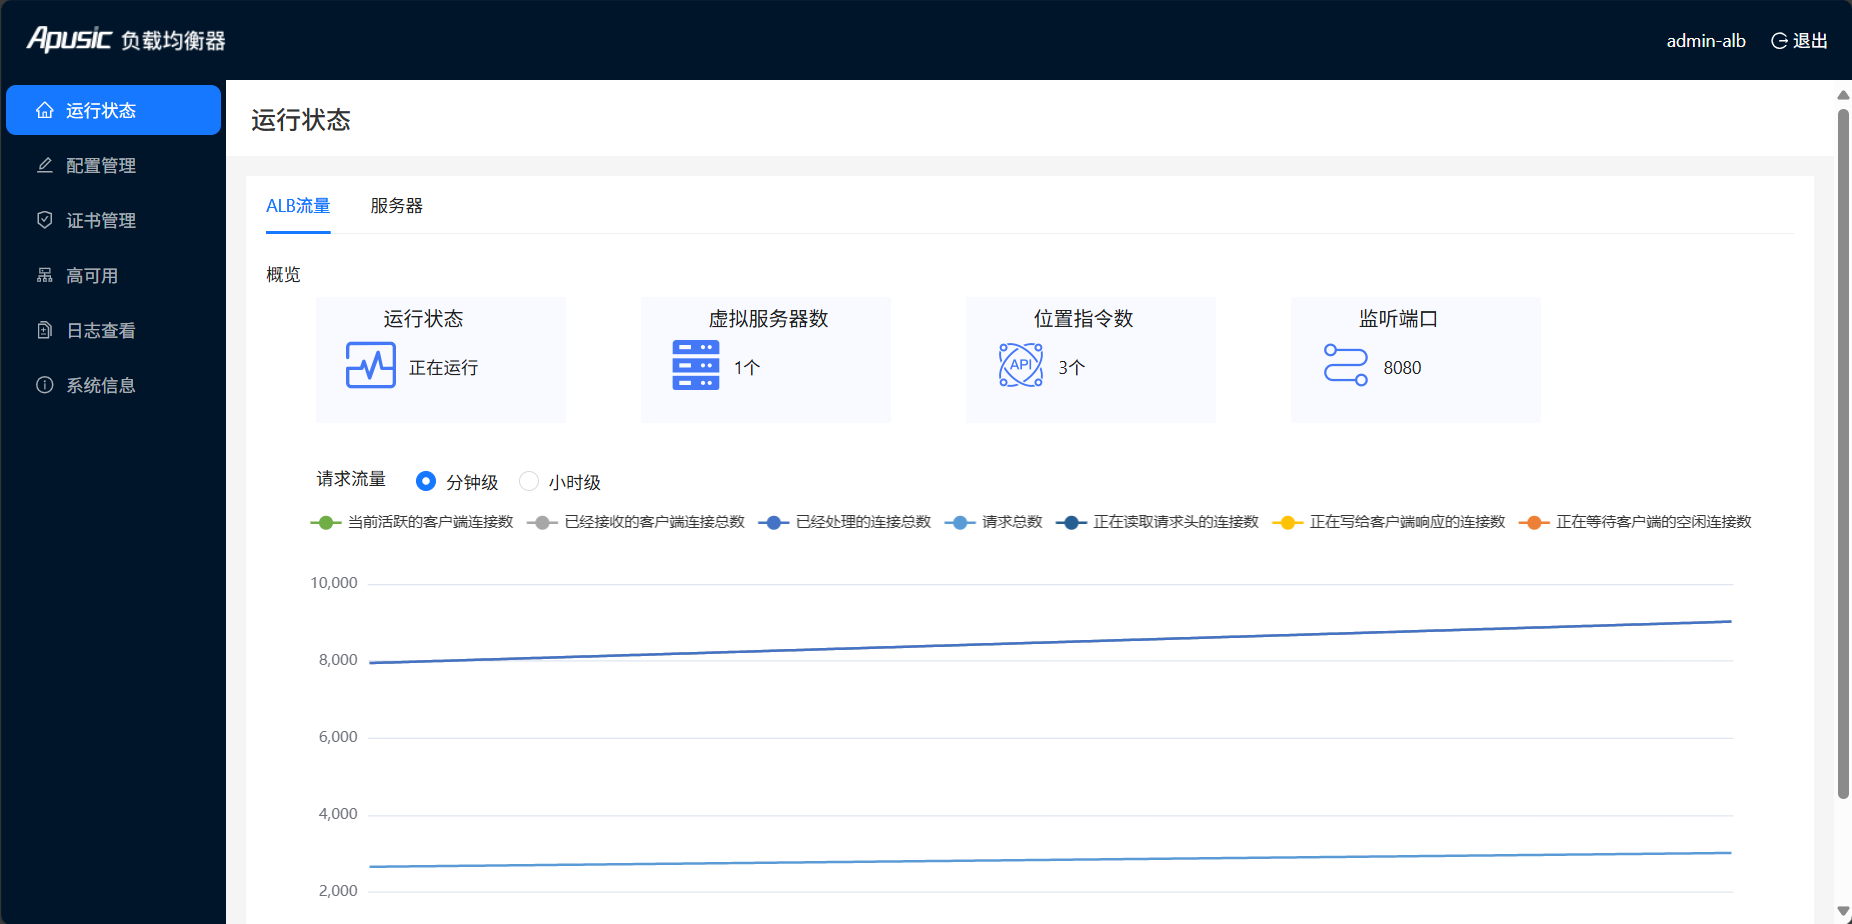
After the System Administrator logs in successfully, the default page is as follows:
# Running Status
The running status page is the monitoring entry, you can monitor ALB traffic and node load conditions
Under the ALB traffic tab, you can monitor ALB node request data and virtual server information, as shown below:
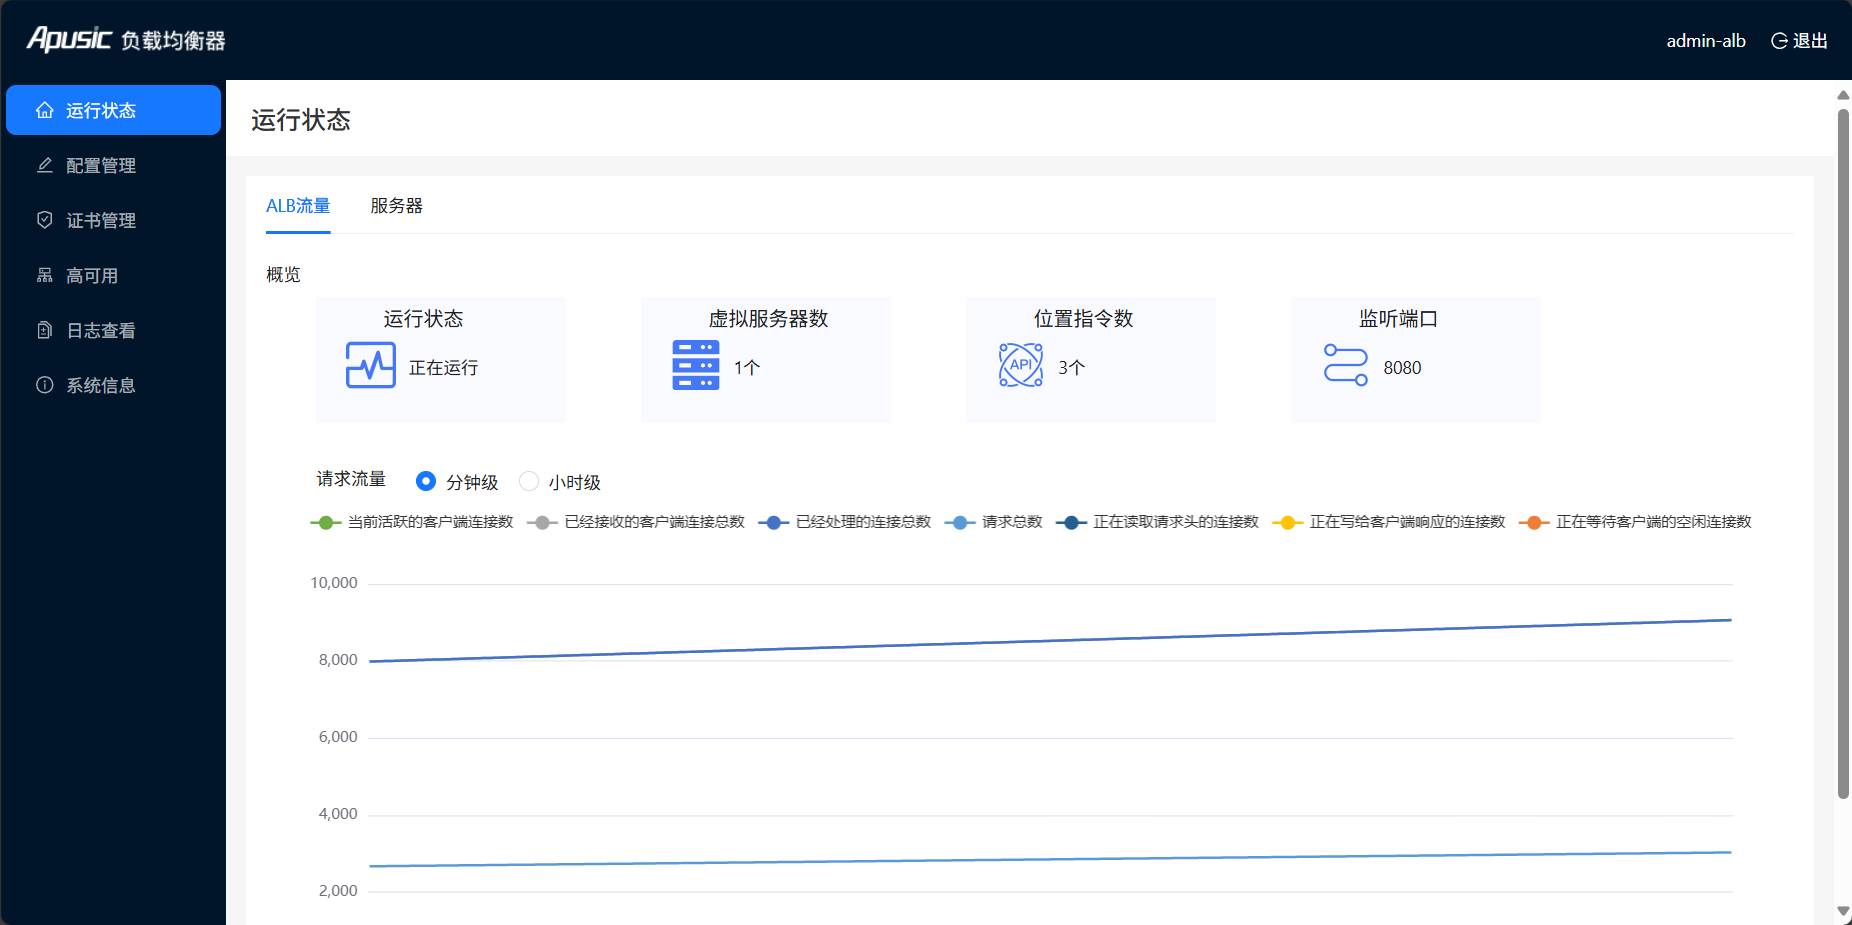
Page information description:
Running Status: Whether ALB is running
Virtual Server Count: Total number of ALB virtual servers
Location Directive Count: Total number of routing blocks in all virtual services
Listening Ports: All ports that virtual services listen on
Request Traffic: Display traffic trend in the form of line chart, supports viewing ALB traffic conditions by minute and hour, such as currently active client connections, processed connections, total requests, etc.
Under the server tab, you can monitor the load conditions of the node where ALB is deployed:
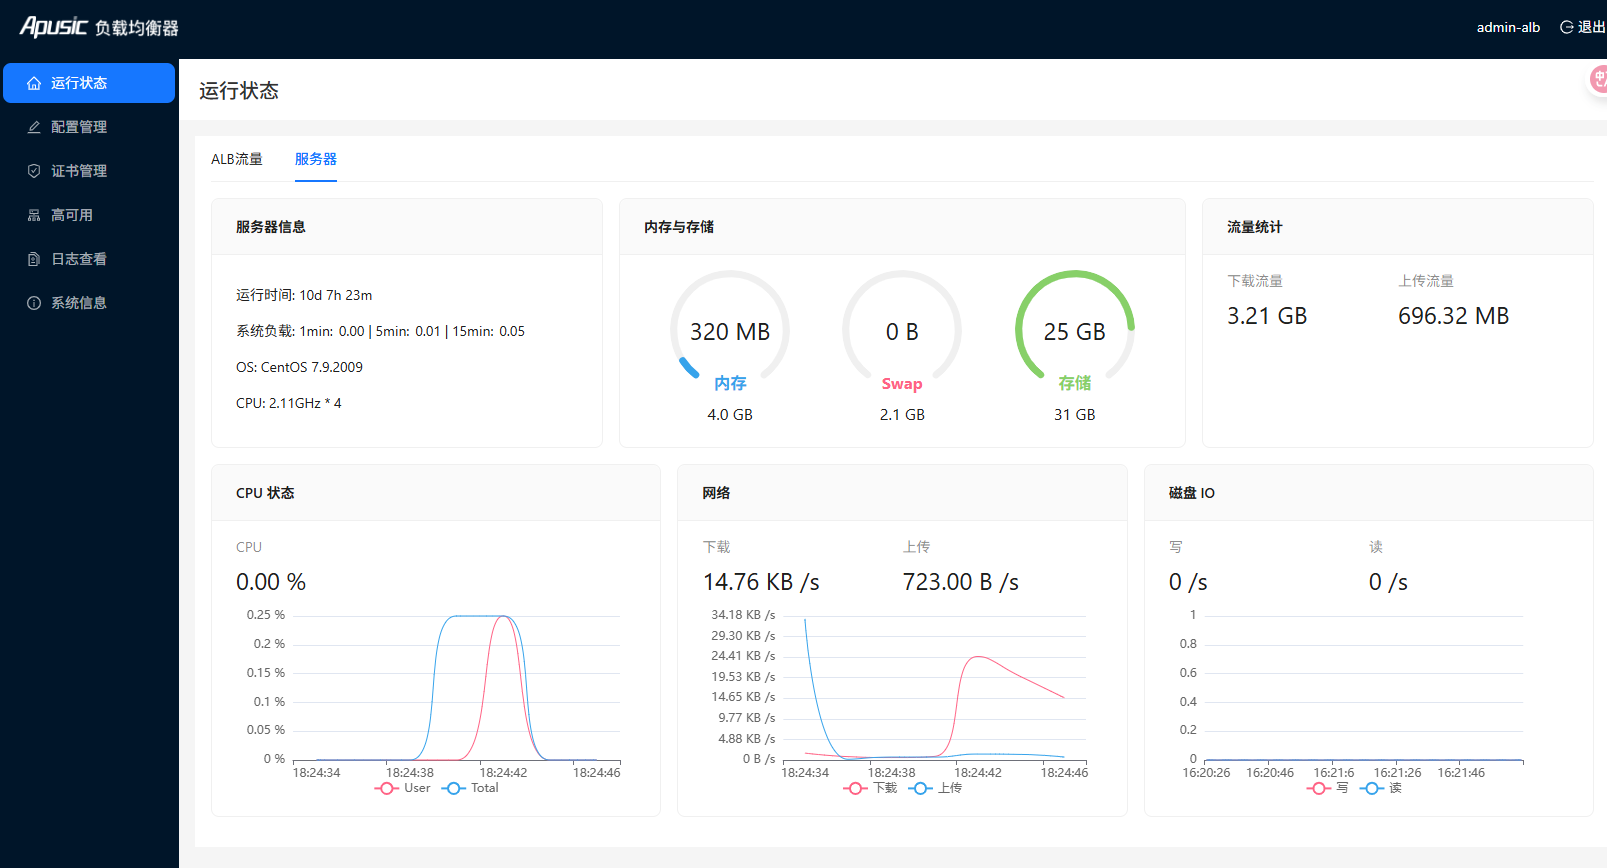
Page information description:
- Server Information: ALB running time, format is day/hour/minute; system load conditions; operating system platform identifier; CPU main frequency
- Memory and Storage: Memory size
- Traffic Statistics: Data sent by client to server (upload traffic) and data sent by server to client (download traffic)
- CPU Status: CPU usage rate
- Network: Network upload and download rates
- Disk IO: Disk IO rates
# Configuration Management
The configuration page is the entry for all ALB configuration management, managing all files in the conf folder under ALB installation directory
All files in the following page are default configuration files:
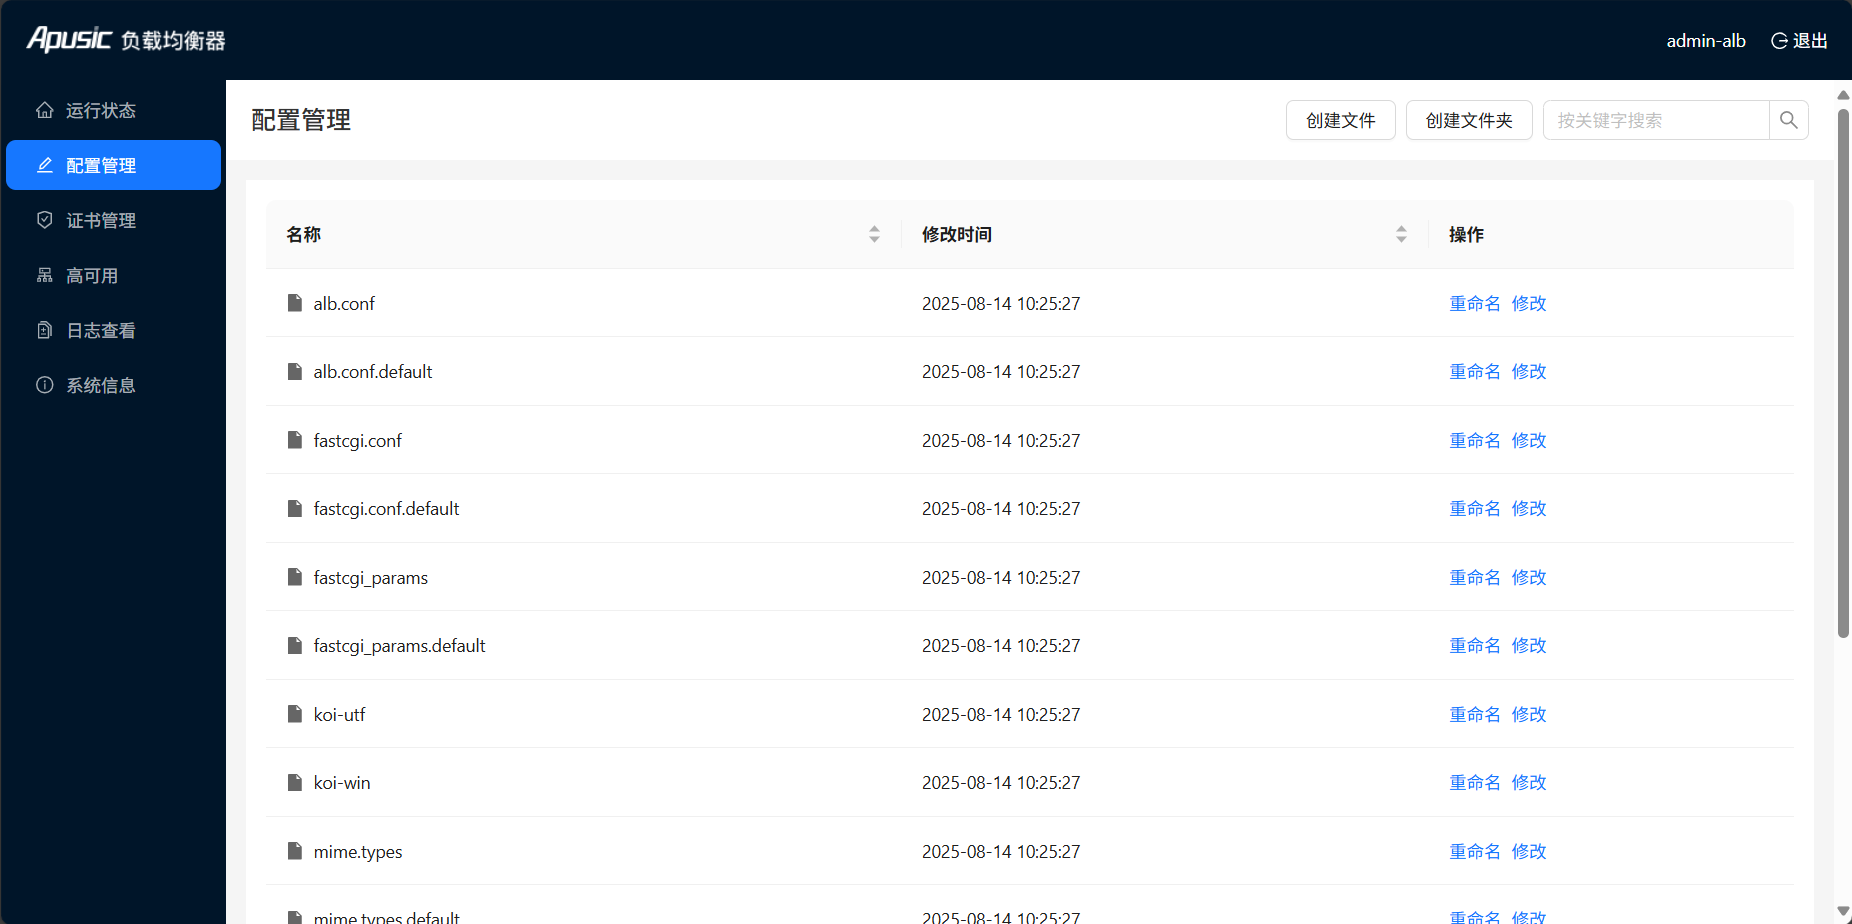
Page information description:
Name: Configuration file name
Modified Time: The time when the file was last modified
Create Folder: Click "Create Folder" button to enter the following page to create a folder. File name naming rule is a string with length between 1~255, and the string cannot contain
\/:*?"<>|characters, and ASCII control characters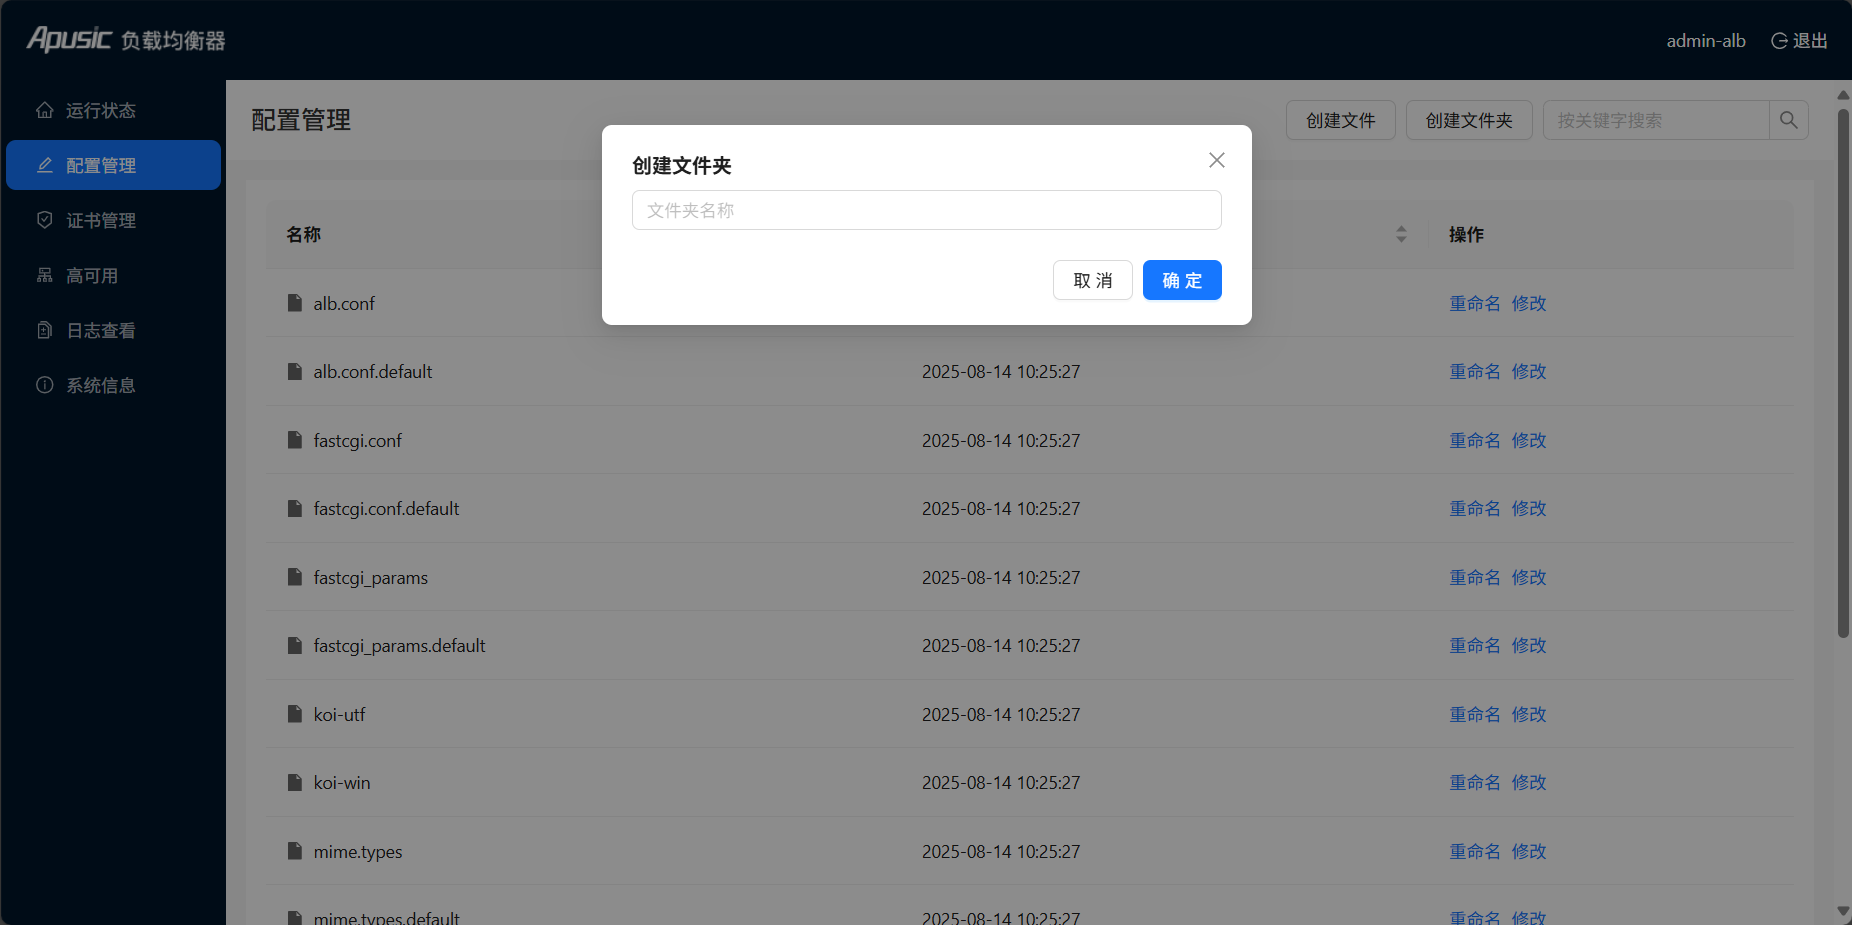
Create File: Click "Create File" button to enter the following page, customize configuration file content and filename, click save to complete. File name naming rule is a string with length between 1~255, and the string cannot contain
\/:*?"<>|characters, and ASCII control characters. The "Code Format" button in the page can format the file content. The page also shows the absolute path and modification time of the file. If the edited file content is not saved and you return, it will prompt accordingly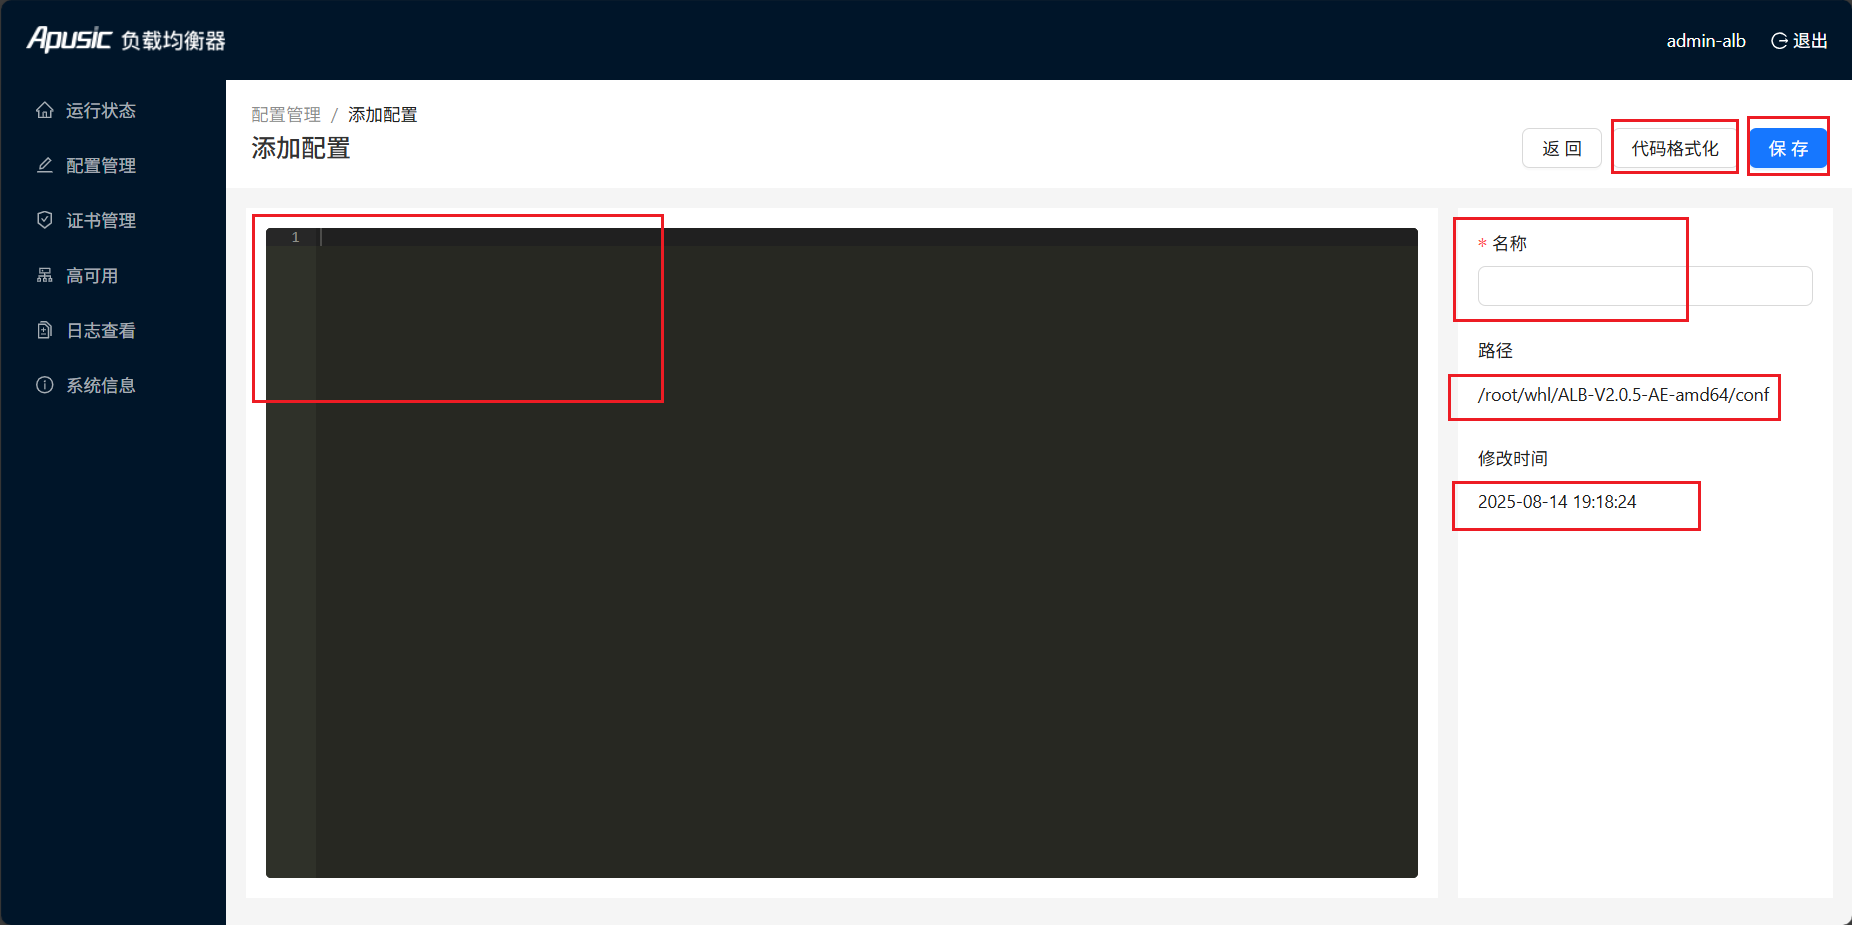
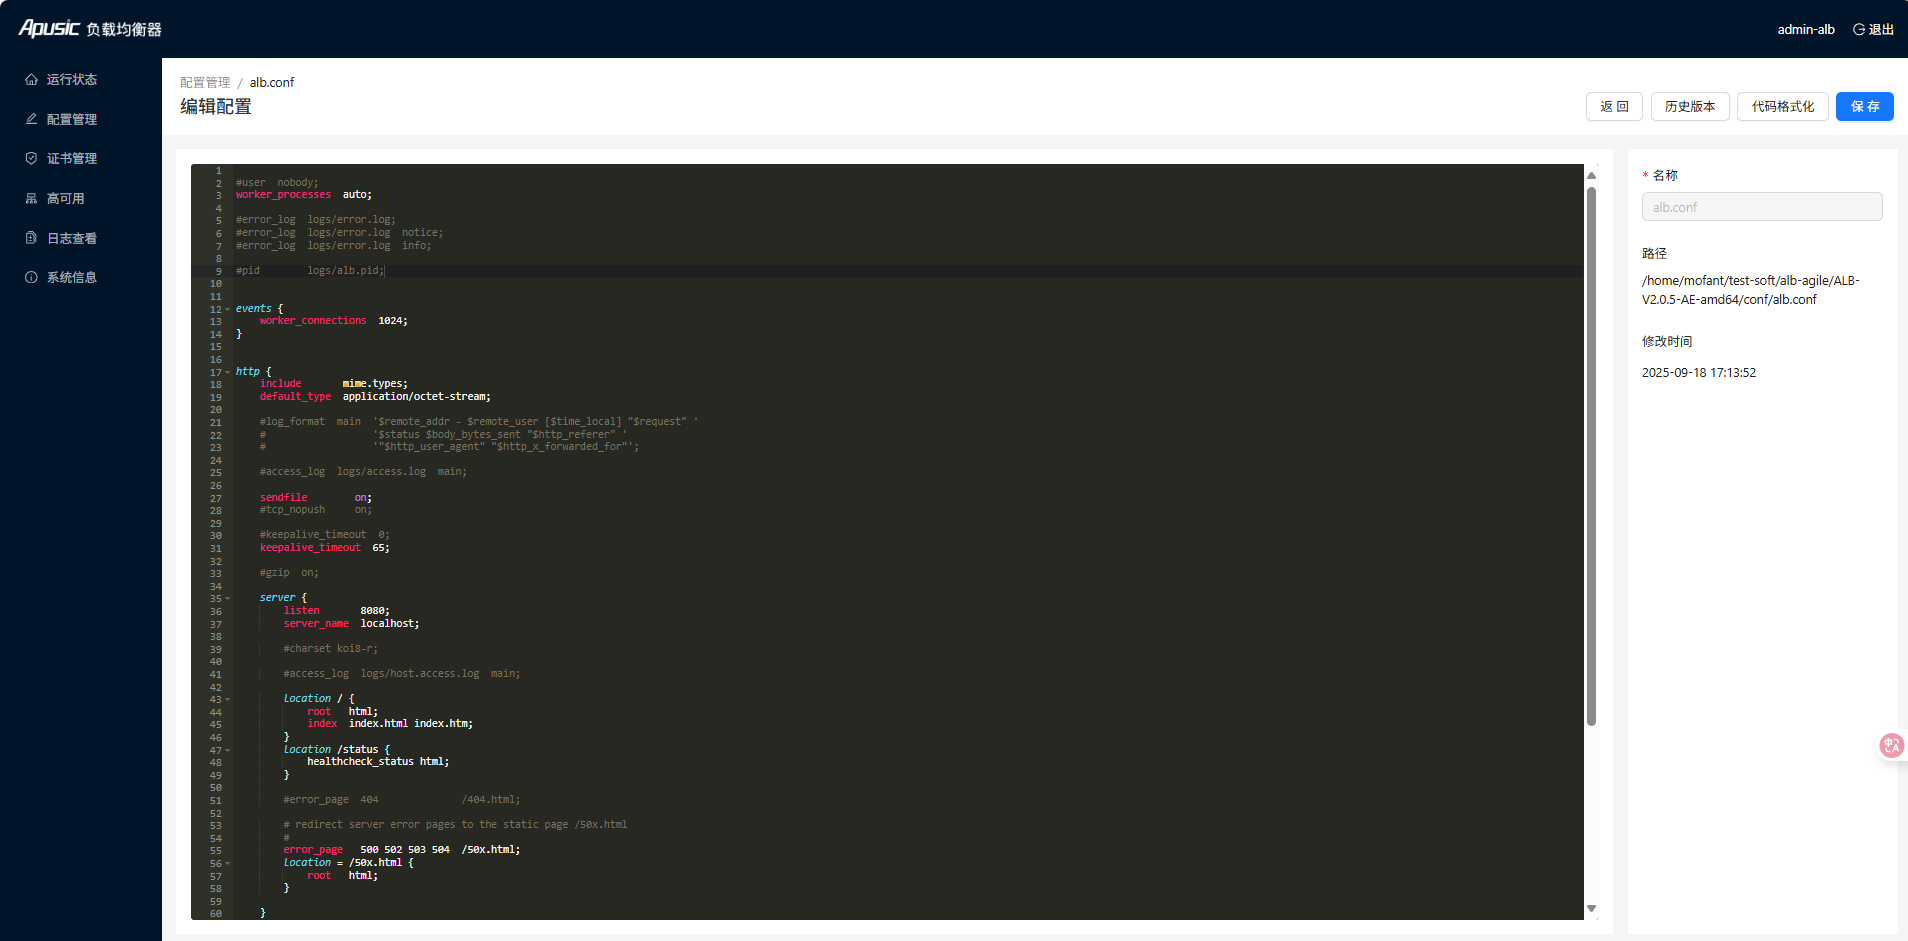
Modify: Select the corresponding file and click "Modify" button to enter the following page, modify the configuration file content, click save to complete editing. If the file is not saved and you return directly, it will also prompt accordingly. The page also shows the file name, path and modification time
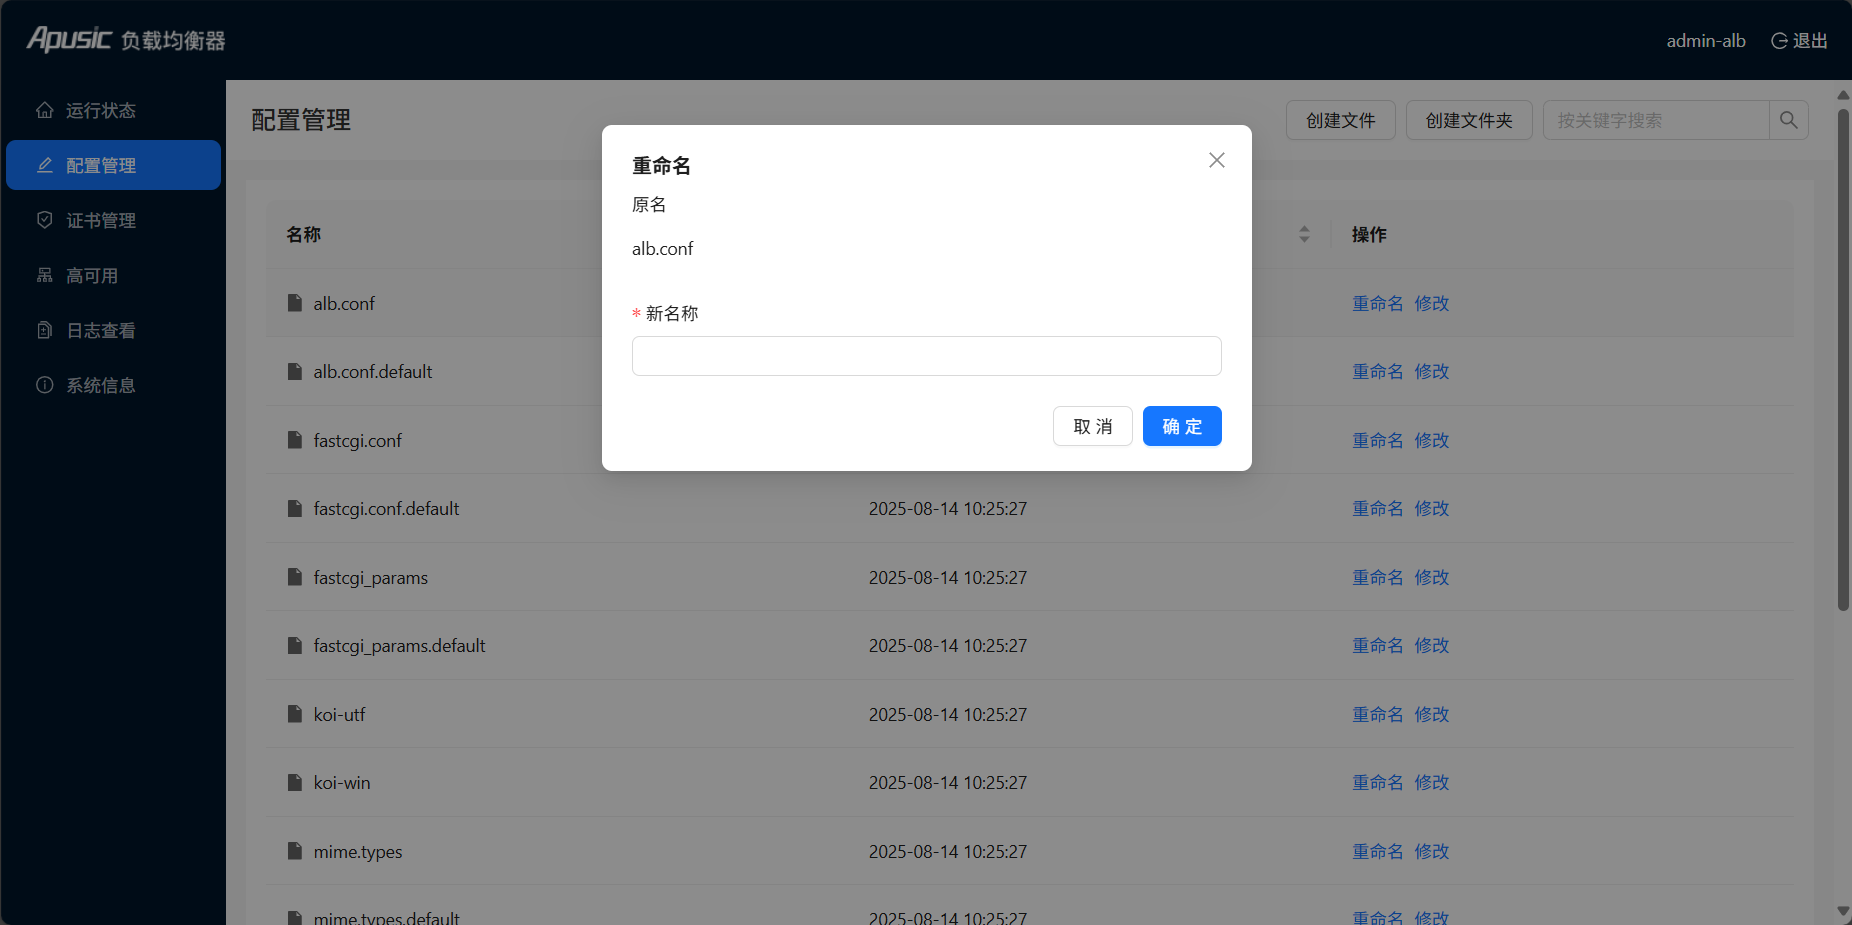
Rename: Select the corresponding file and click "Rename" button to enter the following page, you can rename configuration file or folder, renaming also needs to follow the file naming rules
History Version: Can view file modification history versions
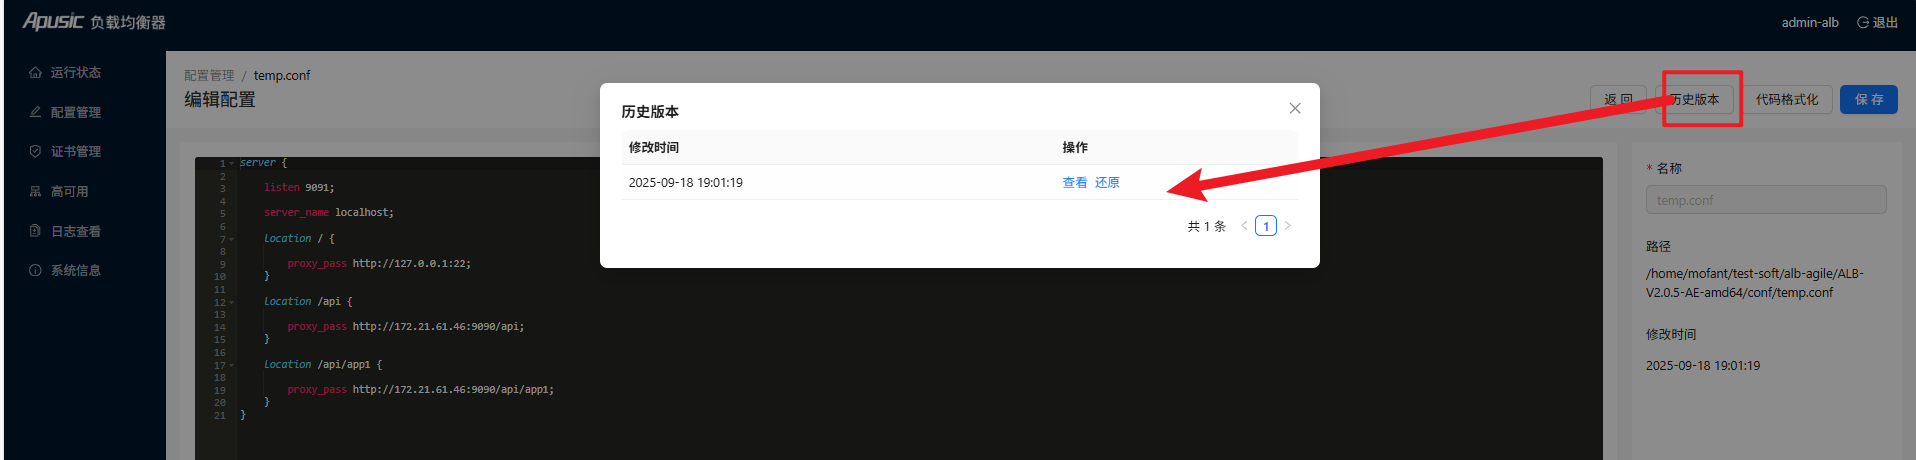
In the history version, you can click the view button to display the previous version's configuration content
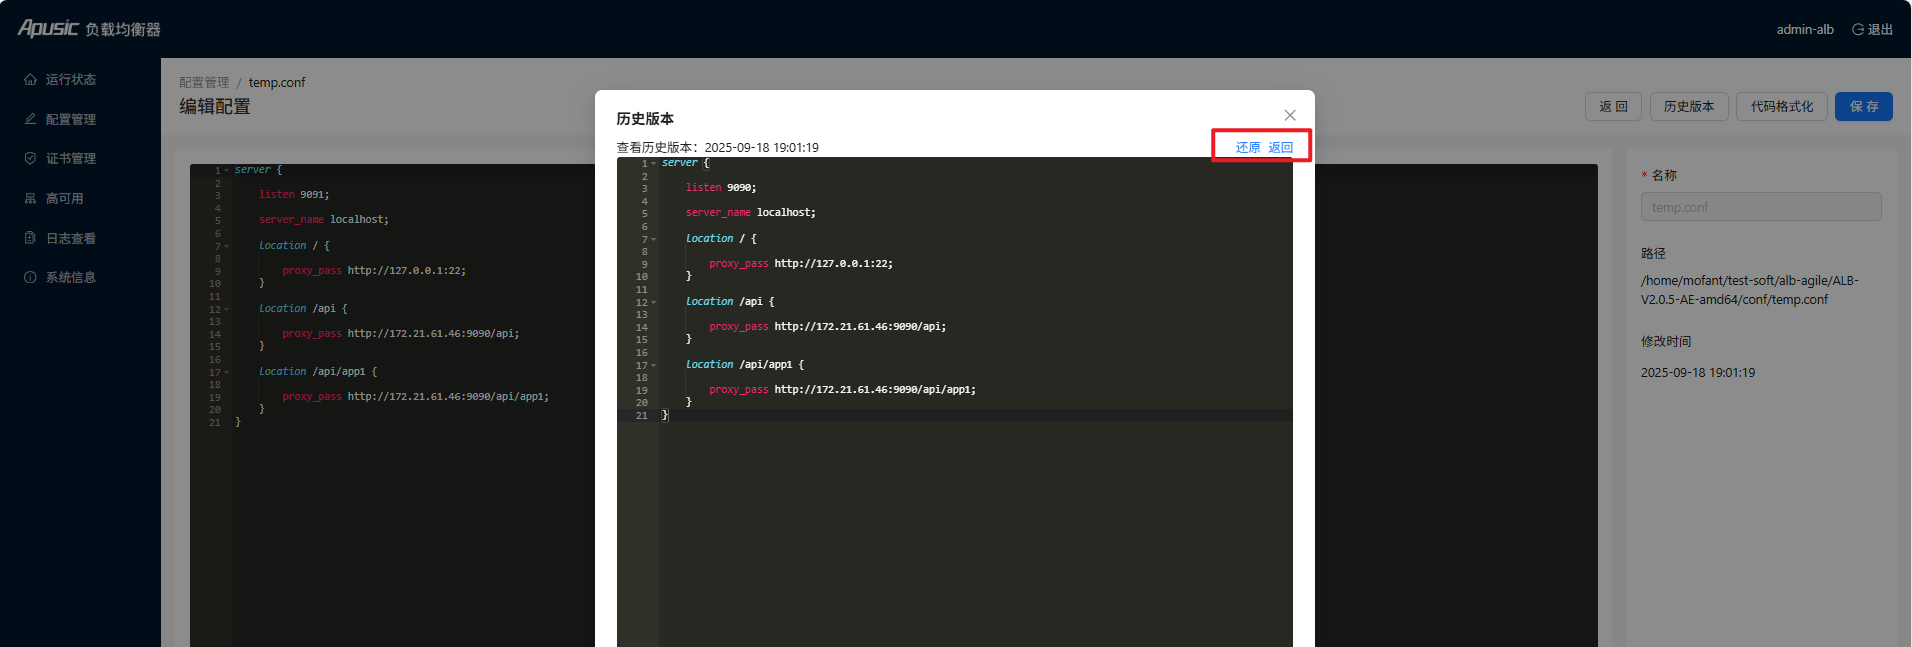
After clicking the restore button, the old version configuration will be reverted to the edit area, after confirming it is correct, click Save button to restore the configuration.
# Certificate Management
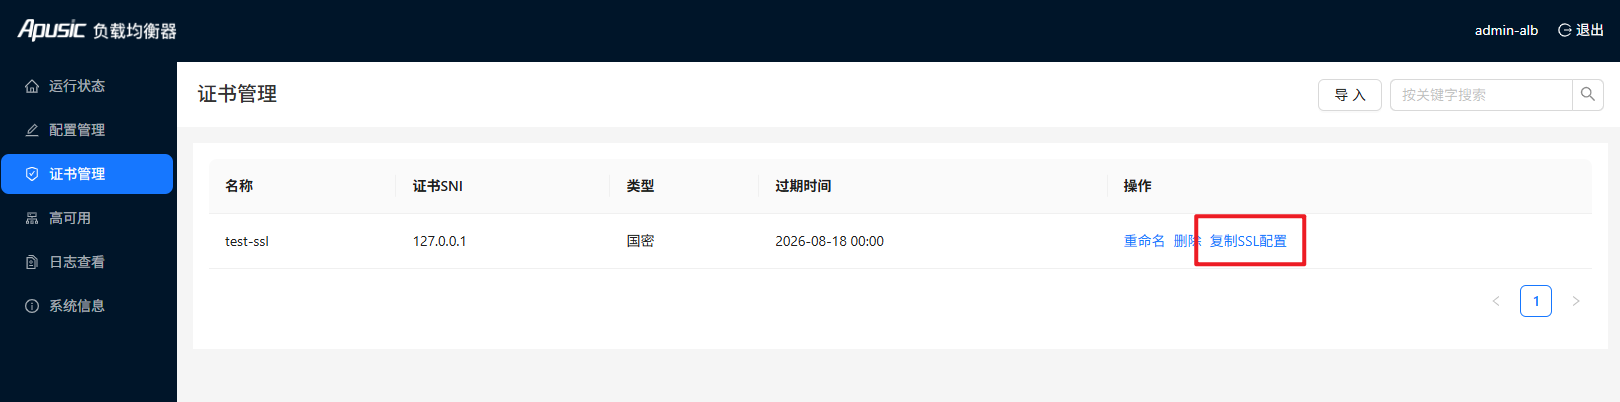
The certificate management page is the entry for ALB to upload and manage SSL certificates, managing SSL certificate files
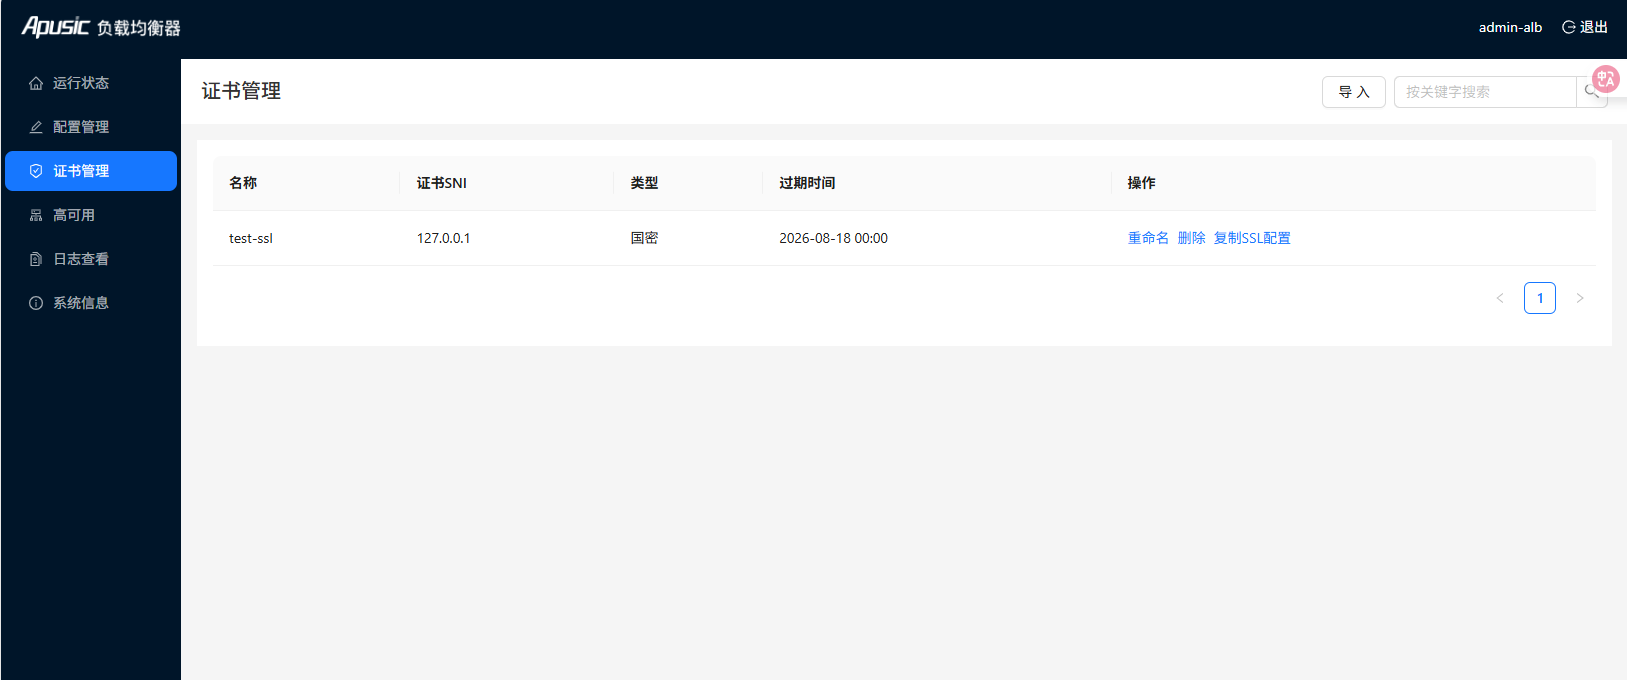
Page information description:
Name: Certificate name, also the unique identifier of the certificate
Certificate SNI: Identifies the server's domain name or IP address
Type: Certificate type, including standard SSL certificate or Chinese national cryptography certificate
Expiration Time: Certificate expiration date
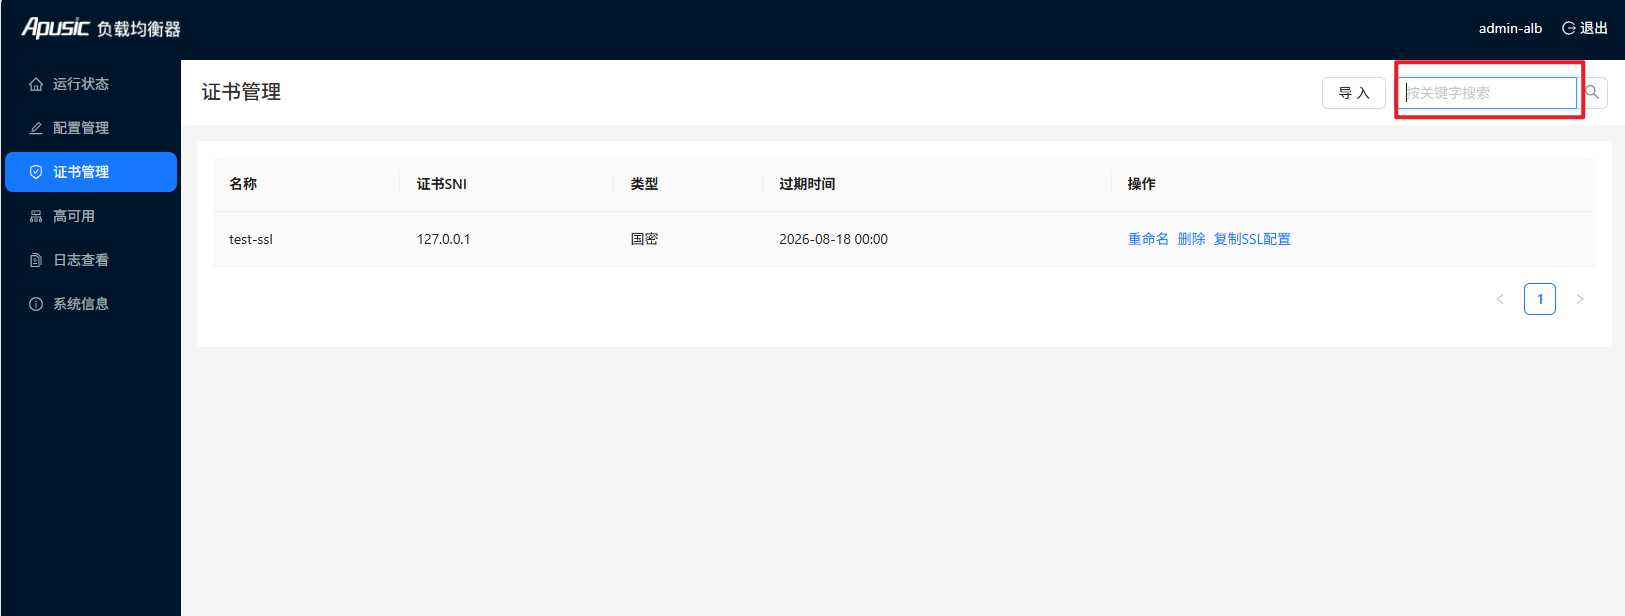
View Certificate List: Supports paginated certificate list retrieval by conditions, can enter certificate name in the search box for filtering, supports fuzzy matching
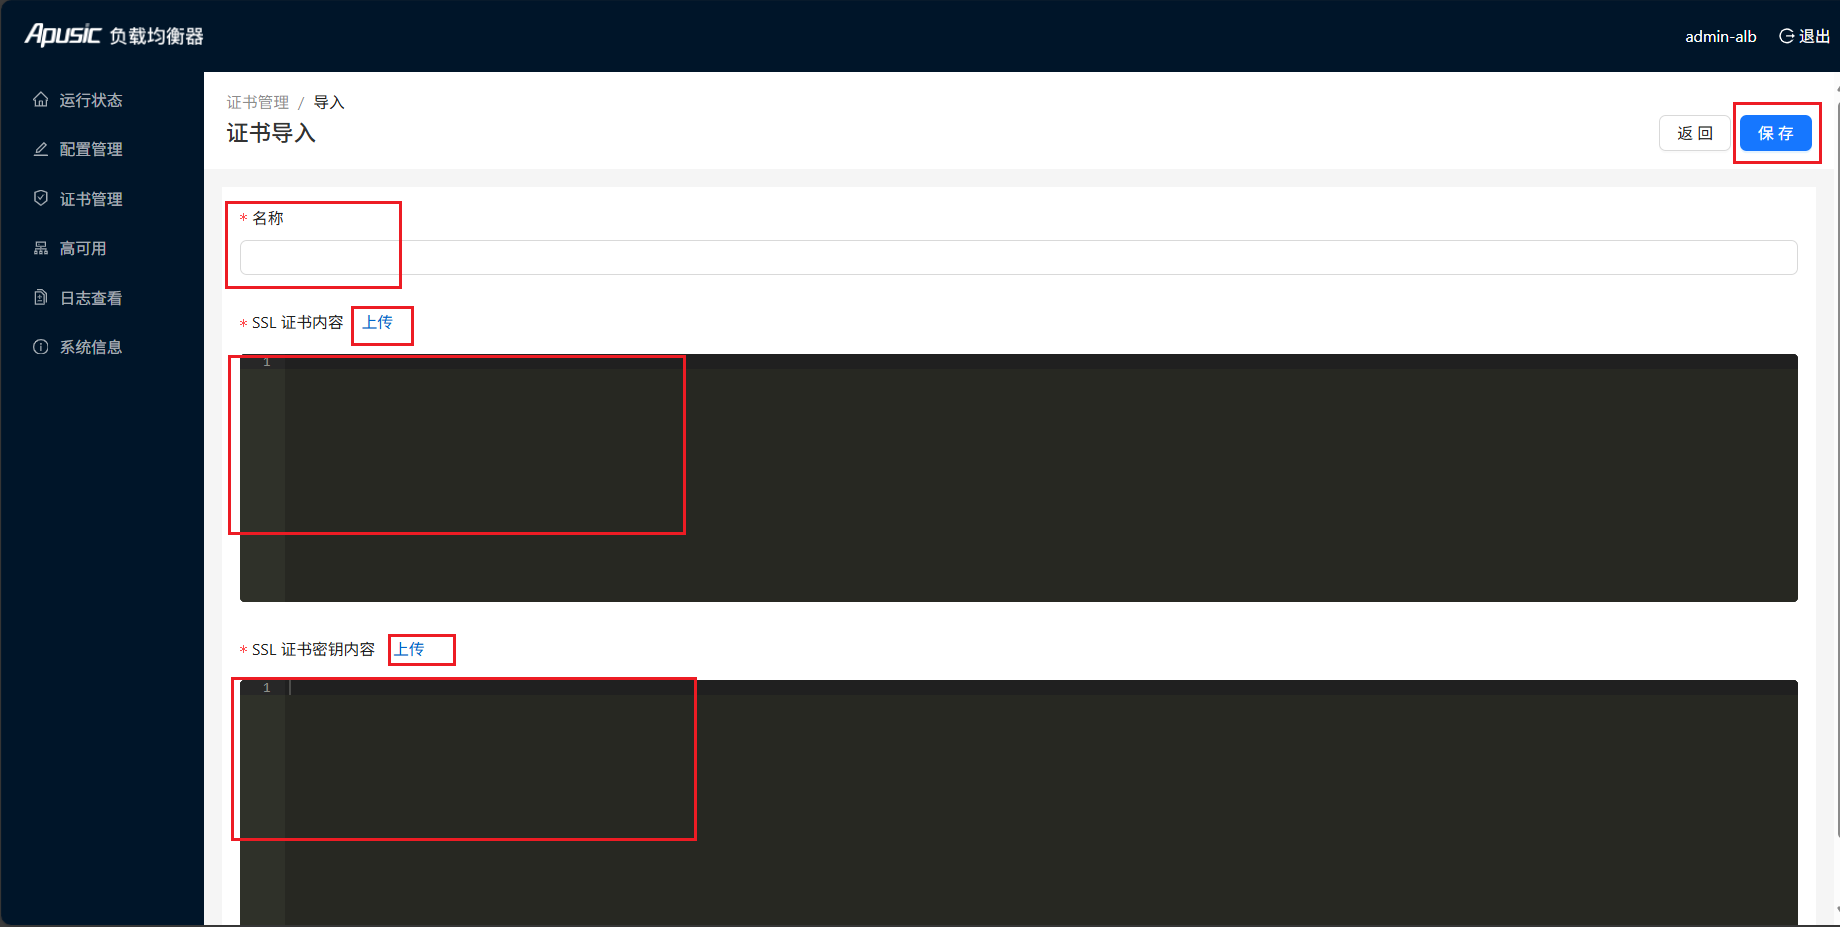
Import: Click "Import" button to enter the following page, you can operate SSL certificate and key files, supports manual editing and local upload
# Certificate Usage
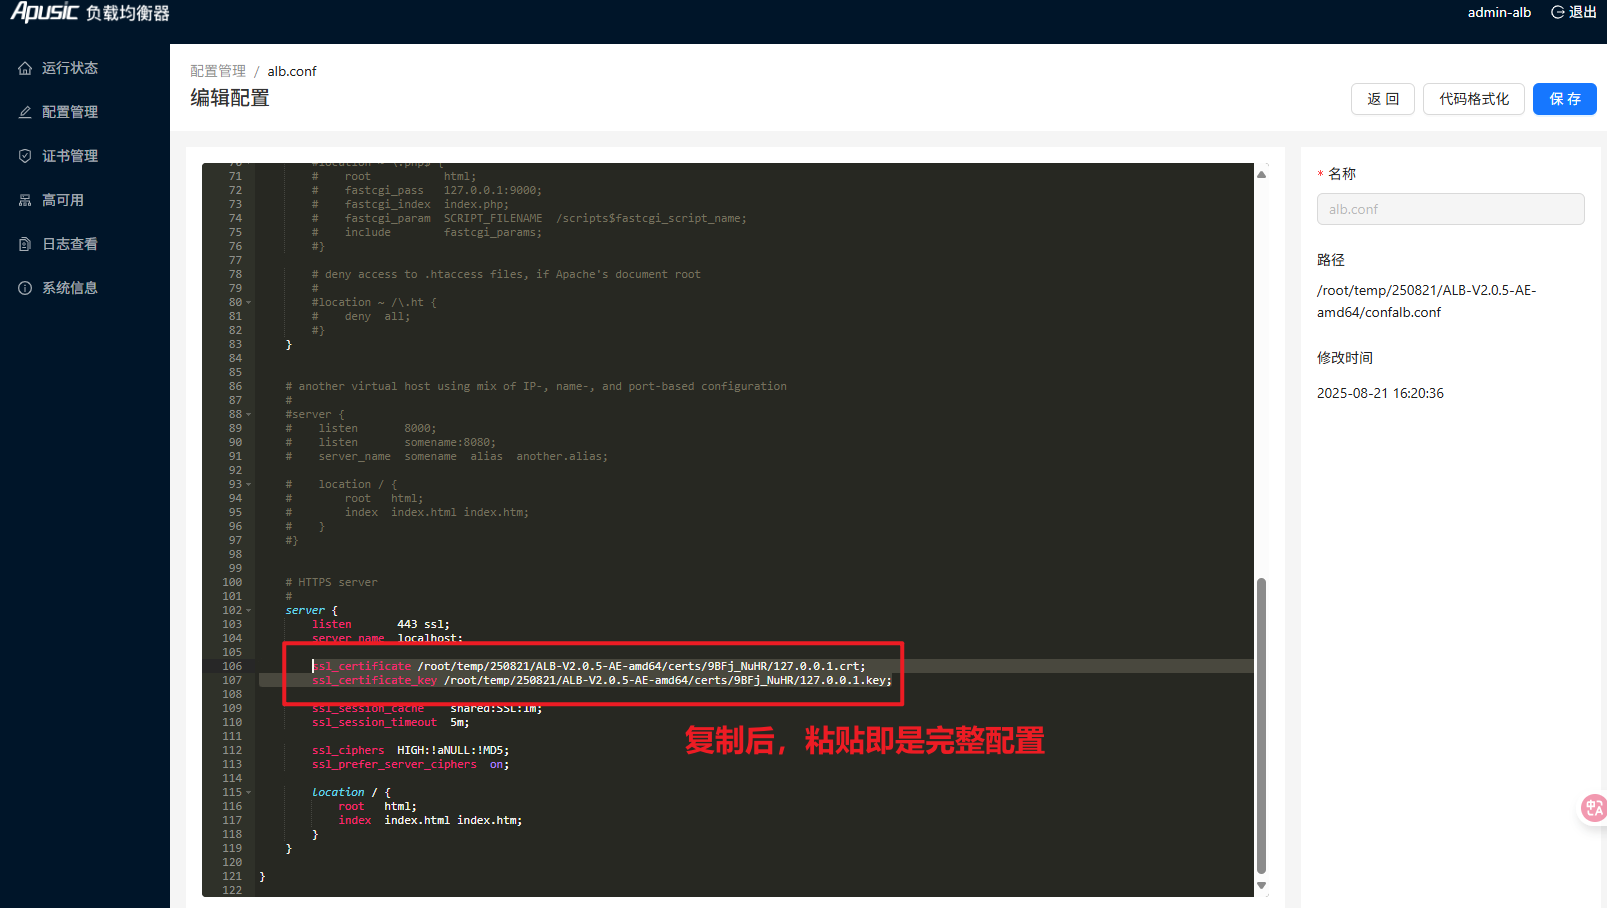
In the uploaded certificates, click copy SSL configuration to directly paste and use in the configuration.
# Chinese National Cryptography Certificate Import
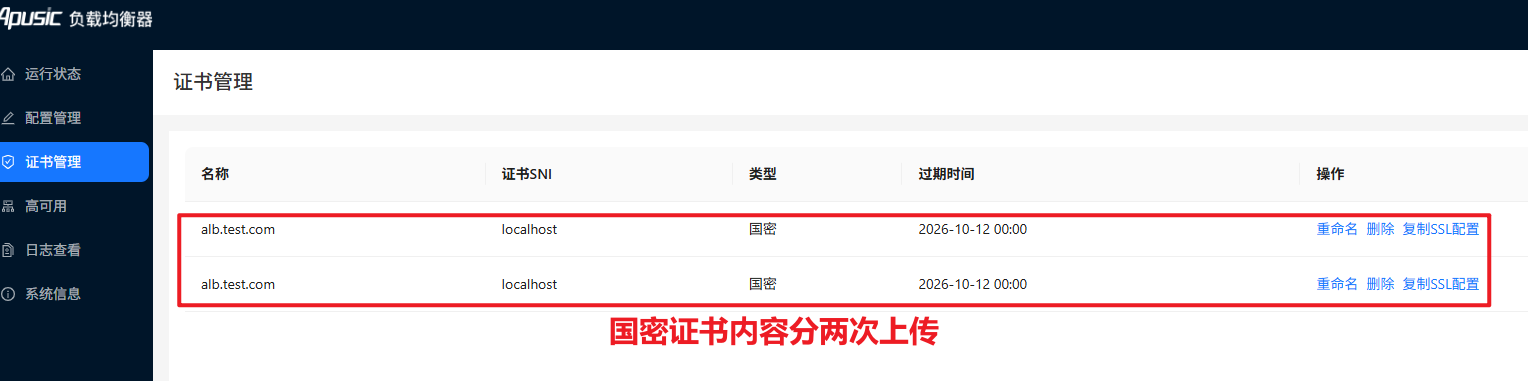
Chinese National Cryptography Certificate needs to be imported twice with the following certificate content:
- Server encryption certificate file and server encryption certificate private key file
- Server signature certificate (required for Chinese national cryptography) and server signature certificate private key file (required for Chinese national cryptography)
That is, upload Chinese national cryptography certificate twice in the console before use, as shown in the figure below:
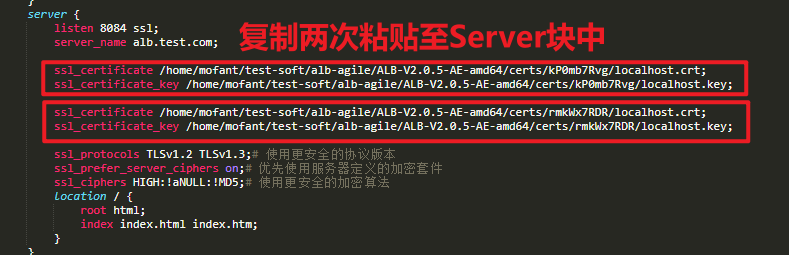
After uploading, in the corresponding server configuration block, you need to copy the SSL configuration twice and paste it into the configuration items, as shown in the figure below:
# High Availability
The high availability page is the entry for viewing and configuring ALB high availability features. Only the master node can configure high availability, the backup node can only view. That is, when you configure high availability on the current node, the master node information in the configuration page can only select the current node IP by default. But if the master node's priority is lower than other backup nodes, when the configuration is complete, the master node will automatically switch, and the node with the highest priority becomes the master node
Note: To use high availability feature, the console must be started with root user.
If high availability is not configured, the page is as shown below:
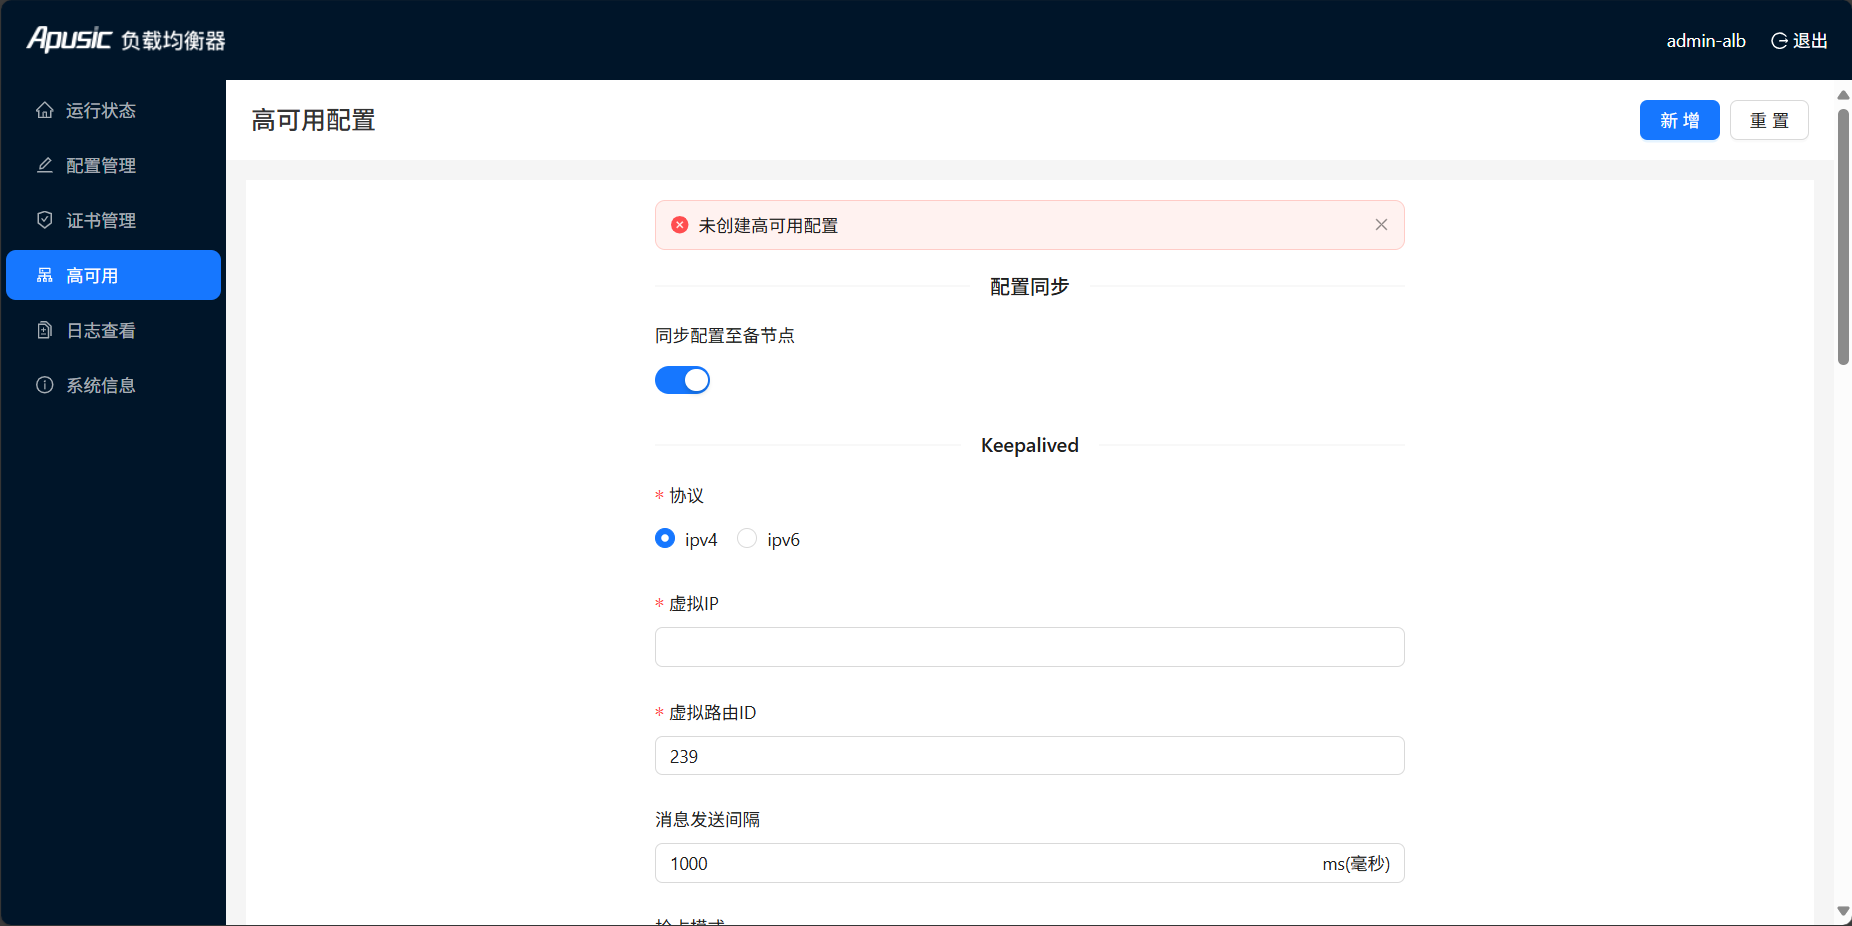
Page information description:
Configuration Sync: Indicates whether ALB configuration file changes are also synced to backup nodes, that is, whether all operations on files in configuration management are synced to backup nodes
Keepalived: Used to implement VIP (Virtual IP) failover and load balancing, the following are the specific meanings of each item:
- Protocol: Indicates whether virtual IP runs in IPv4 or IPv6 network, and also determines the type of virtual IP
- Virtual IP: A dynamic IP, the entry IP of the active-standby node cluster, used to provide services externally, it can dynamically switch between active and backup nodes
- Virtual Router ID: Used to identify active and standby nodes in the high availability cluster, nodes in the same cluster must have the same ID
- Message Send Interval: Indicates the time interval for the master node to send heartbeat messages to backup nodes
- Preemption Mode: Indicates whether to allow high priority nodes to re-take over the virtual IP after recovery
Health Check: Used to check whether the ALB service running status is normal
Check Type: Can select the communication protocol during checking, supports http or https
Check Port: Indicates the port of the node's health check service, value range: 1~65535, default 8080
Check URL: Indicates the URL of the node's health check service, cannot start with /, default node_status, recommended to configure as the business entry URL address.
Health Status Code: Indicates that when the health check returns this status code, it is considered a healthy status, supports manual addition and deletion, value range: 100~599, default 200, 404
Check Interval: Indicates the time interval between two health checks, default is 1 second, supports manual adjustment
Retry Count: Indicates the maximum number of retries allowed when health check fails, default is 3, prevents network jitter from causing misjudgment, improves fault tolerance, supports manual modification
Retry Interval: Indicates the time interval for each retry when health check fails, default is 2 seconds, supports manual modification
Whether to restart alb when alb is detected unhealthy: When a node is marked as unhealthy, whether to restart ALB
Master/Backup Nodes
IP: The IP address of the ALB deployment node, the node deploying high availability configuration is the master node by default (will automatically transfer based on priority after configuration is complete), master node IP defaults to the current node IP, just select directly, backup node needs to be entered manually
Network Interface: The network interface the IP address belongs to, no need to enter manually, will be automatically obtained after entering the IP, then just select, backup node needs to click "Test Connection" to automatically fill in
Console Port: ALB console service port on the ALB deployment node, default 8887
Priority: The priority of master and backup nodes, used to determine which node is promoted to master node, the larger the number, the higher the priority, maximum value is 255
AuthKey: Authentication when master and backup nodes communicate, prevents unauthorized nodes from joining the cluster, and ensures the security of inter-node communication. AuthKey value is in the node configuration file:
ALB installation directory/console/conf/config.yamlalb:aha-auth-keyfield.Test Connection: When the backup node configuration is complete, clicking "Test Connection" will test whether the backup node is reachable, and get the network interface information corresponding to the IP
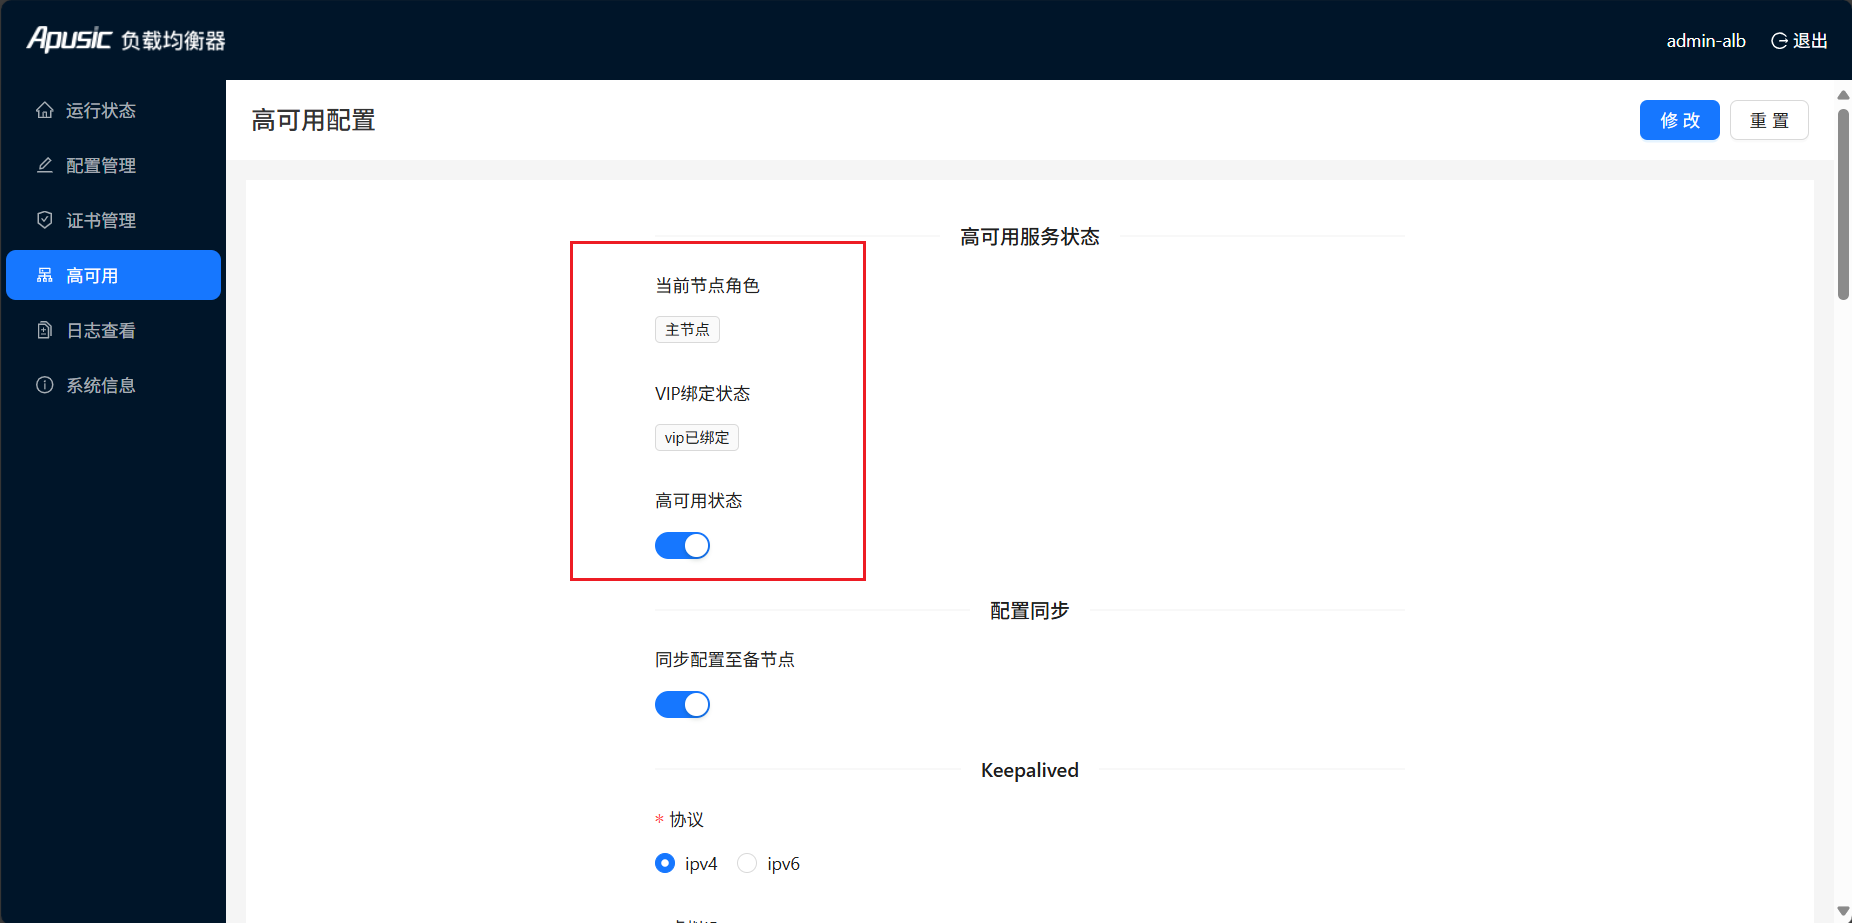
New: After entering relevant configuration information in the page, click "New" button to create high availability configuration (provided that ALB product is in normal startup status), prompting save success means creating high availability configuration successfully. After creating configuration successfully, high availability feature will be enabled by default. After successful configuration, a status information bar will be added at the top of the page, as shown below and information description:
- Current Node Role: Indicates whether the current node is master or backup node
- VIP Binding Status: Indicates whether VIP (Virtual IP) is successfully bound, if high availability service starts normally but VIP binding status shows unbound, please refresh the page a few times
- High Availability Status: Indicates whether high availability is enabled, can manually select to enable or disable
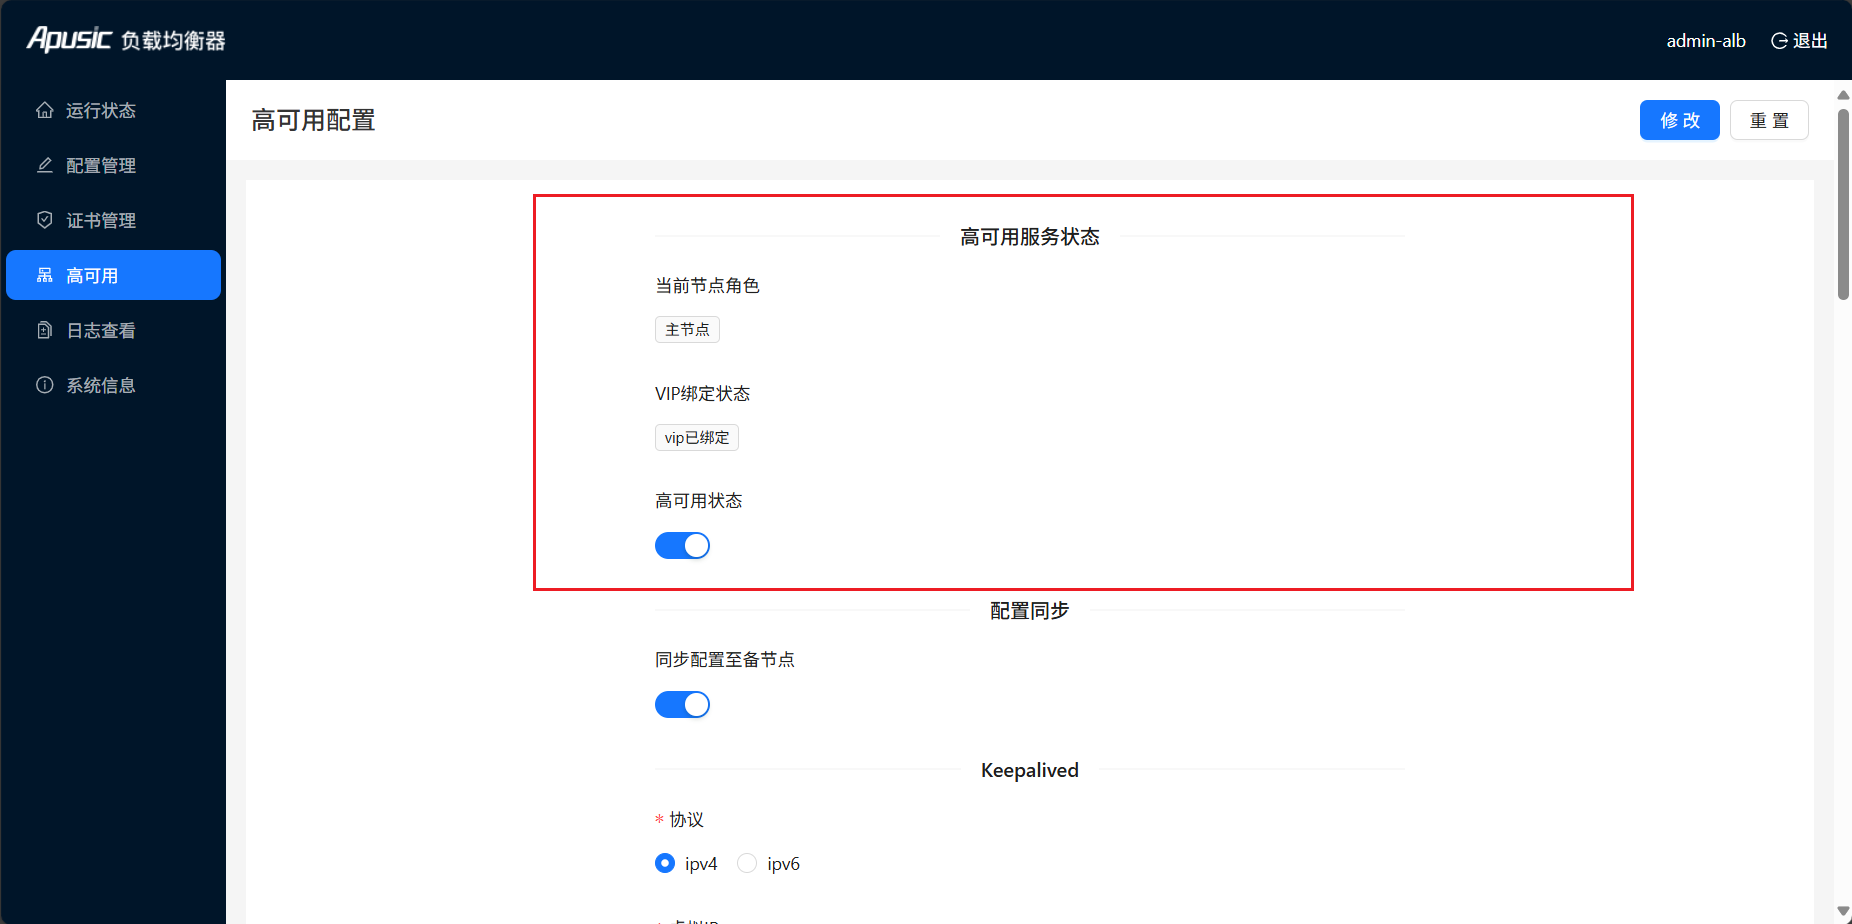
Modify: Click "Modify" button to modify the high availability configuration in the page, "Modify" button will only appear after successfully creating high availability configuration
Reset: Click "Reset" button to reset high availability configuration, equivalent to directly deleting high availability configuration and disabling high availability feature
# Create Active-Standby High Availability
As shown in the figure below, create active-standby ALB high availability environment:
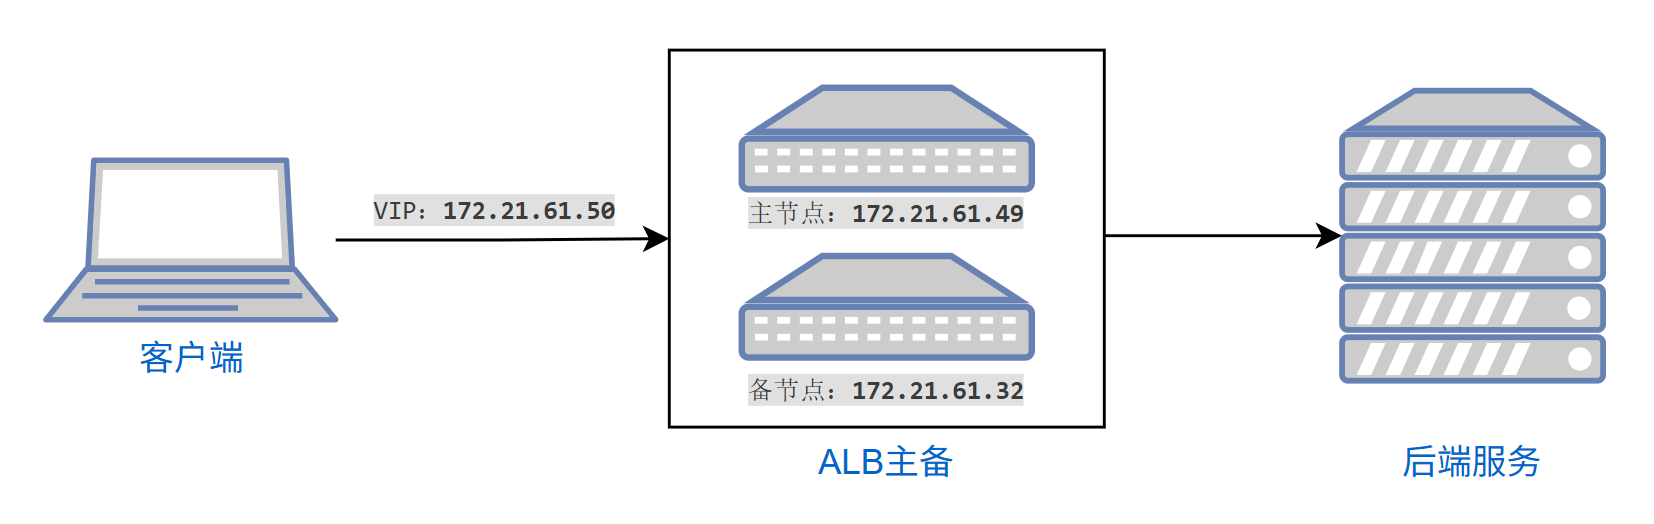
- High Availability Cluster Information
- Master Node: 172.21.61.49
- Backup Node: 172.21.61.32
- Virtual IP: 172.21.61.50
Keepalived Configuration
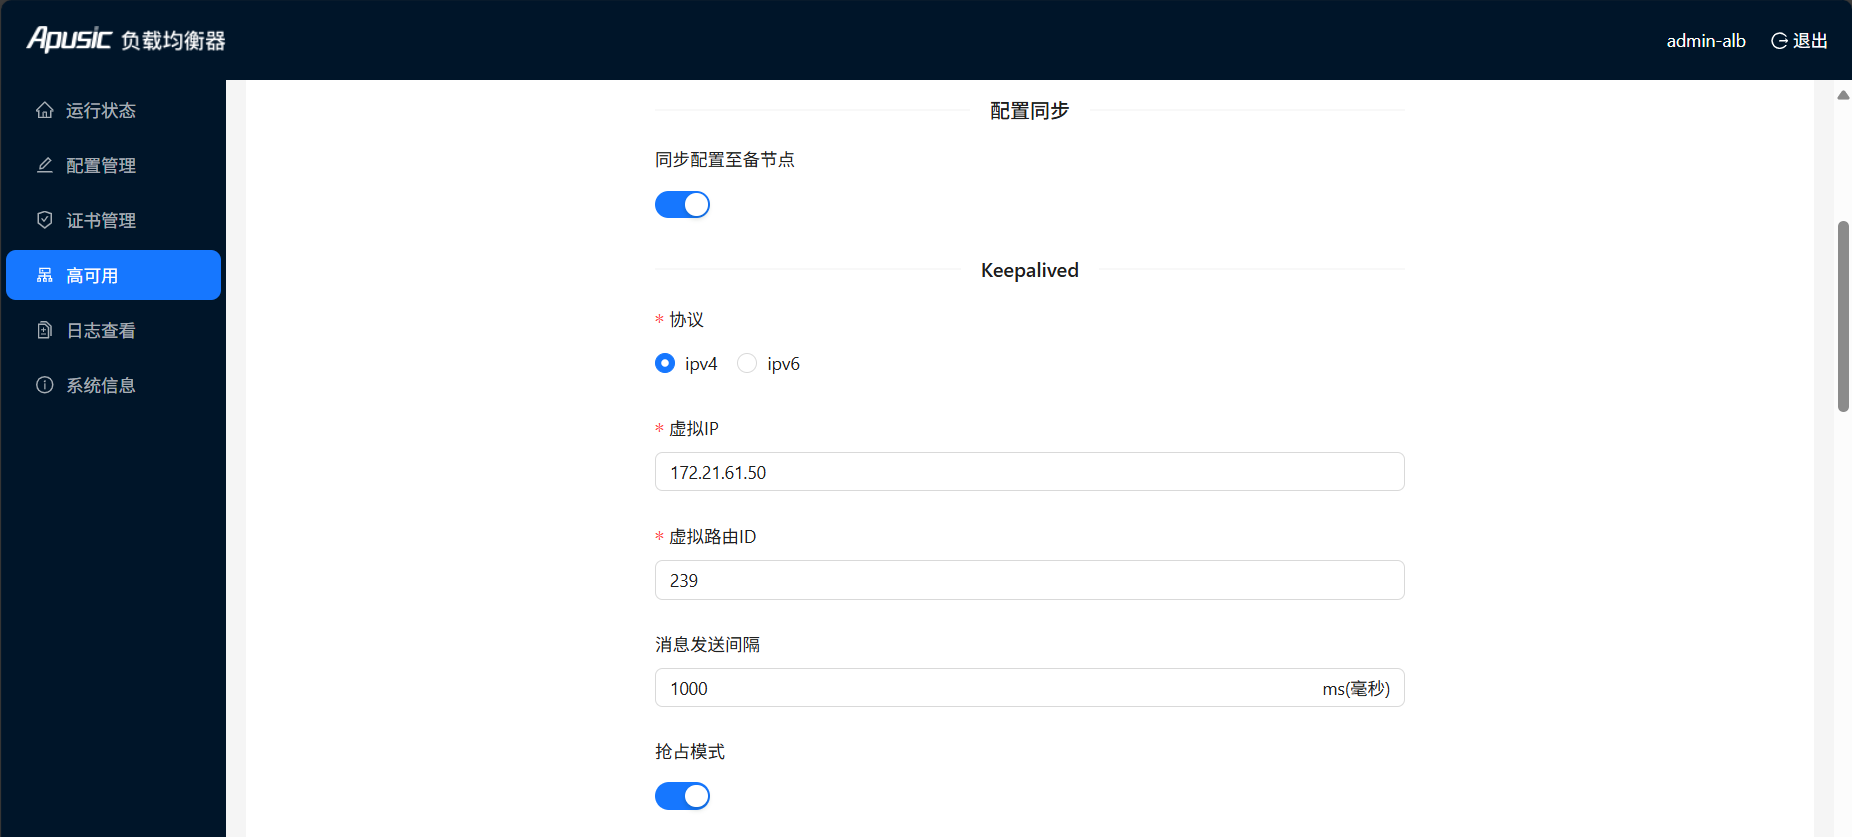
Master Node Configuration
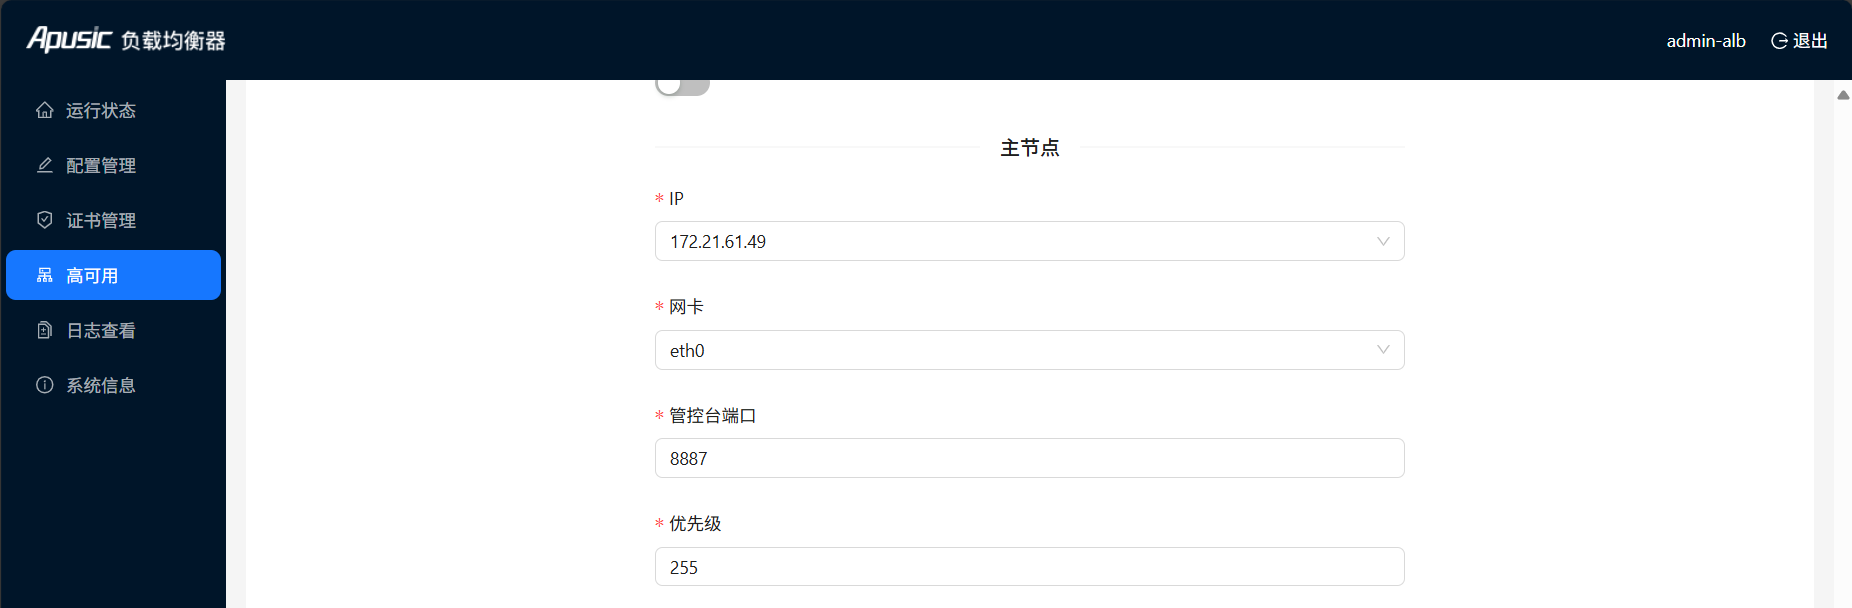
Backup Node Configuration
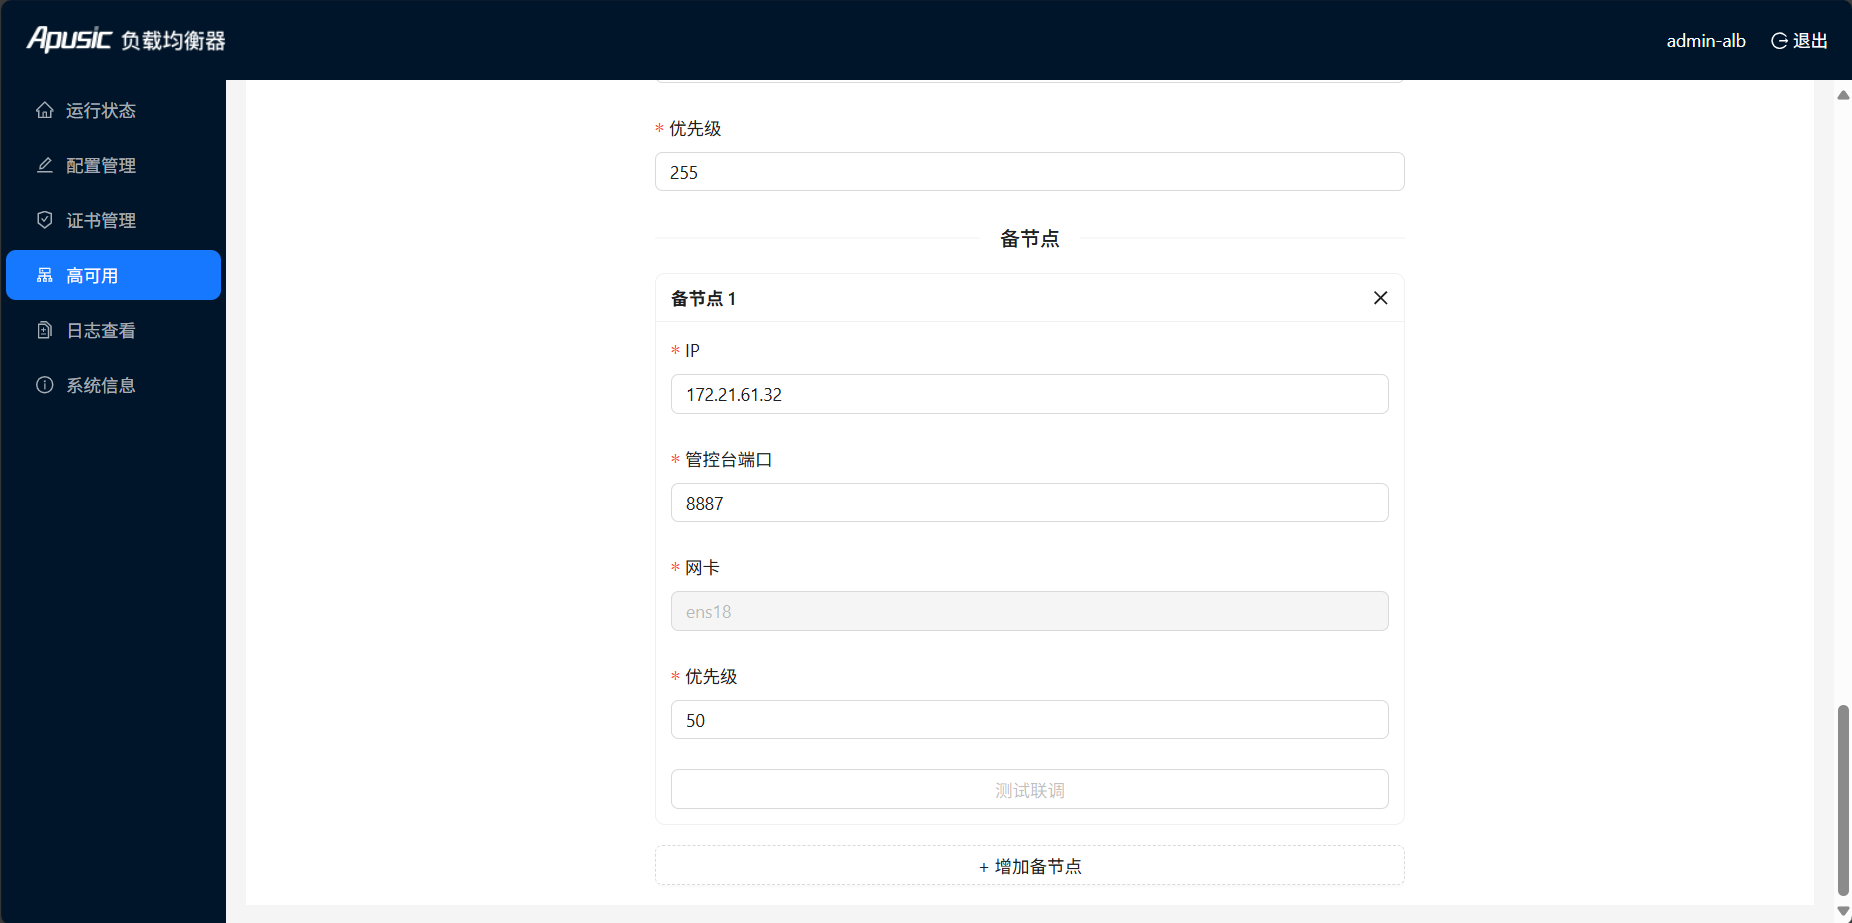
After clicking "Create" button and successful configuration, master and backup nodes display as follows:
Master Node
Backup Node
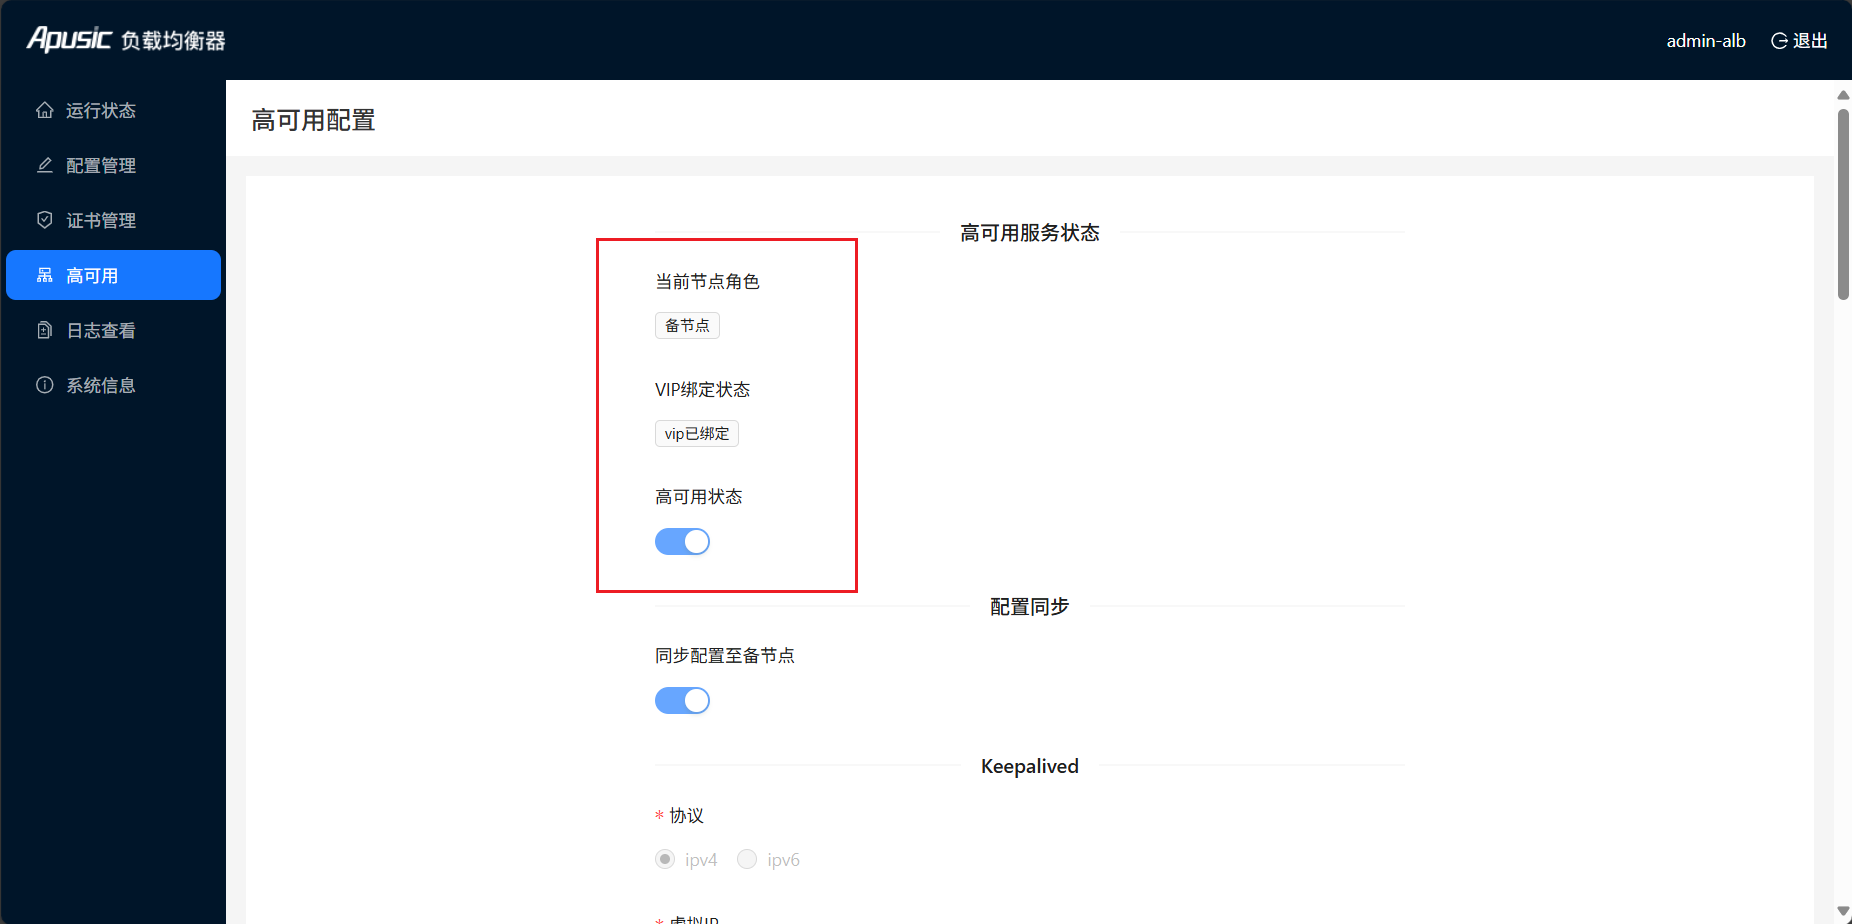
When I adjust the priority of master node 172.21.61.49 to 10 and click "Modify" button, the master node becomes backup node, backup node 172.21.61.32 becomes master node
Adjust master node
172.21.61.49priority to 10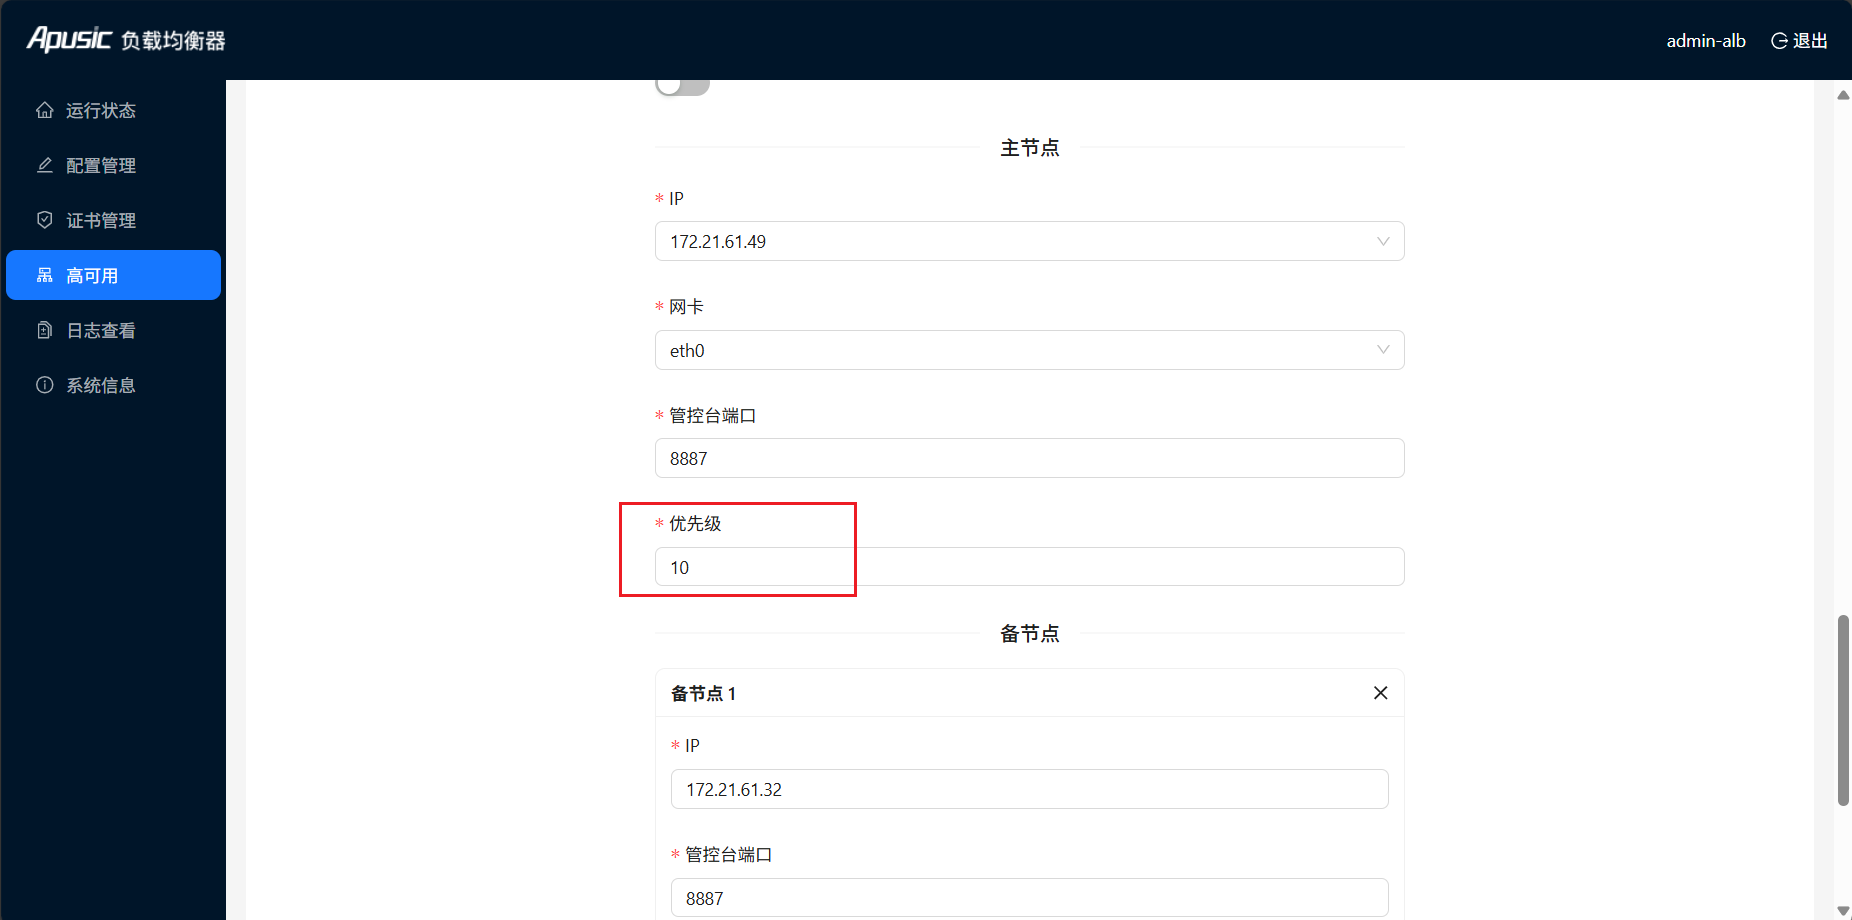
Active-standby switchover
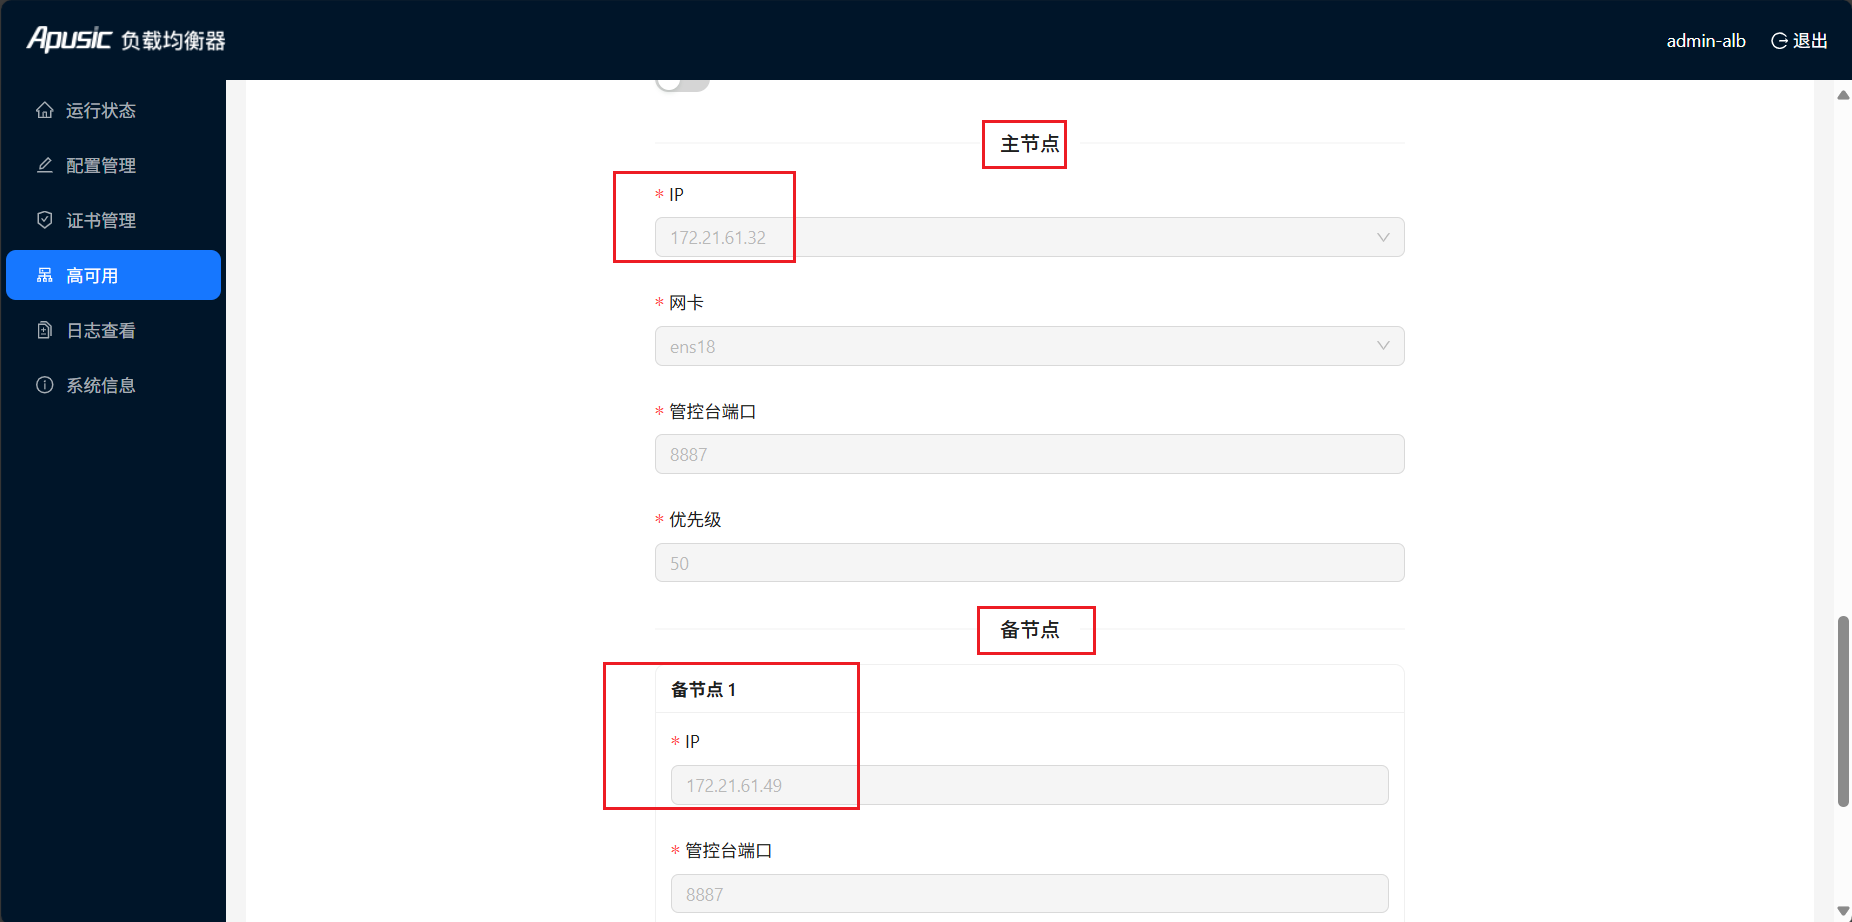
# Log Viewing
The log viewing page is the entry for viewing ALB access logs and error logs
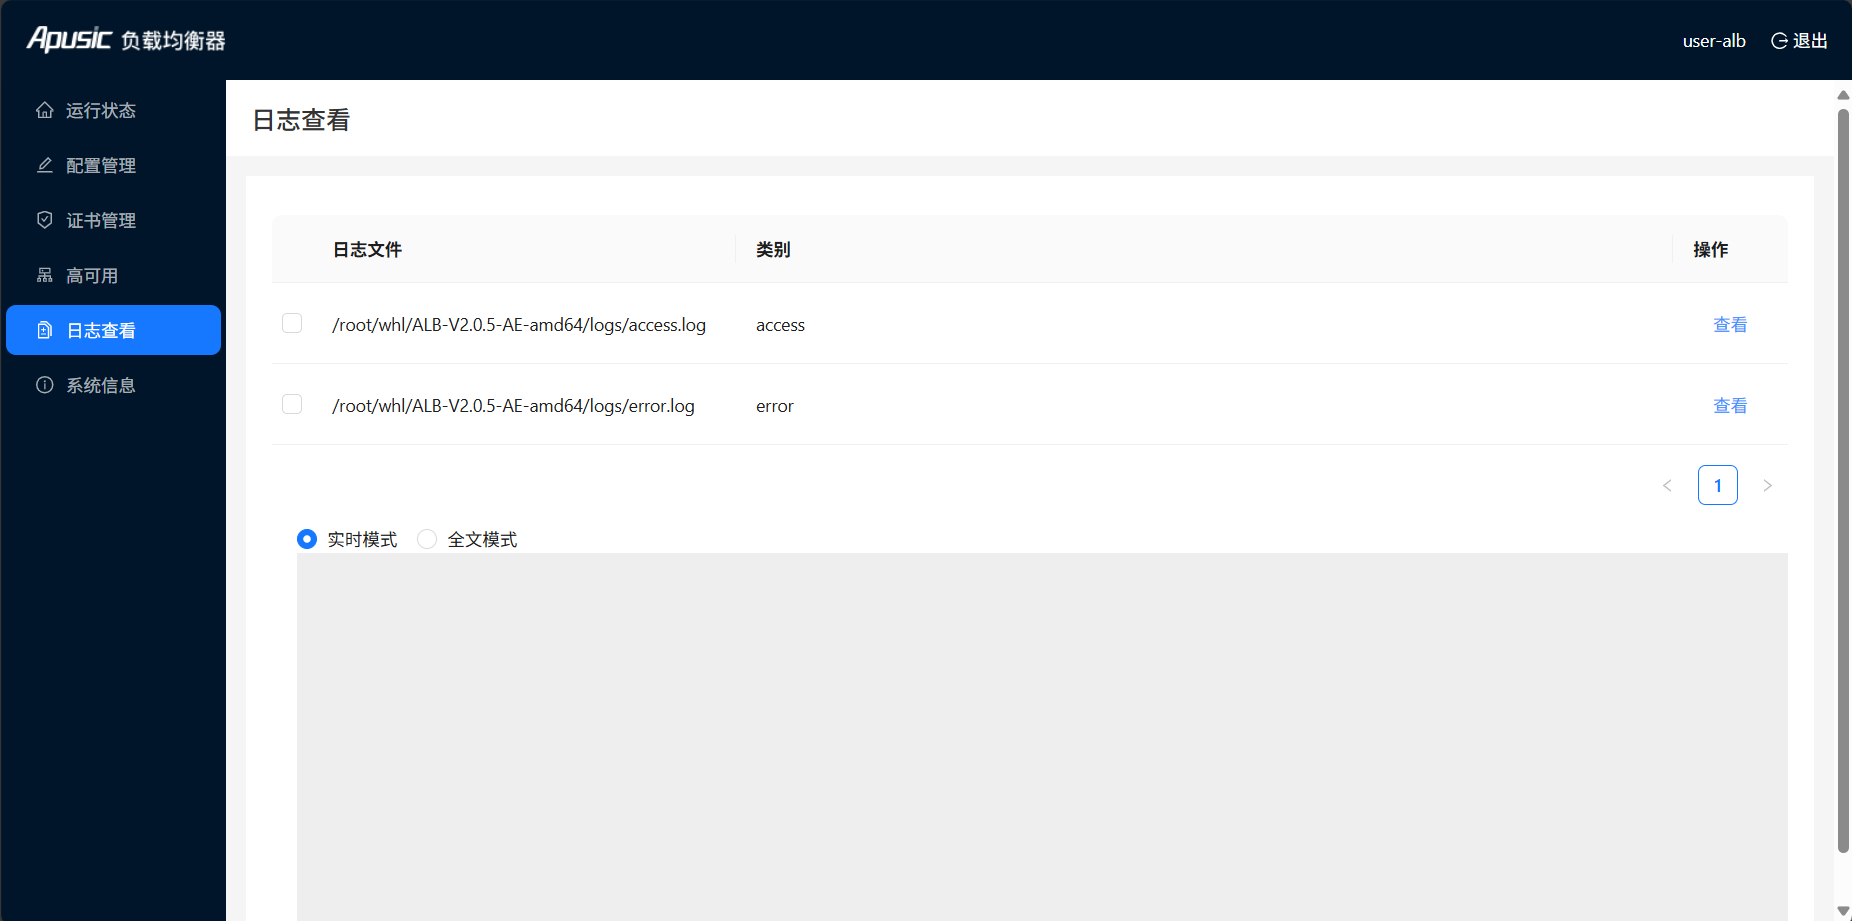
Page information description:
- Log List: Collection of all log files in ALB configuration
- Log File: Name of the log file
- Category: Type of log file, one is access log, one is error log. Access log records detailed information of all client requests, error log records errors or warnings that occur during operation
- View: Click view button to view log file content, default is real-time mode.
- Real-time Mode: Real-time get the latest data of the selected log.
- Full Text Mode: Get the complete data of the selected log, but maximum 10MB log content can be retrieved.
# System Information
The system information page can view ALB running information, version information, and deployed node information
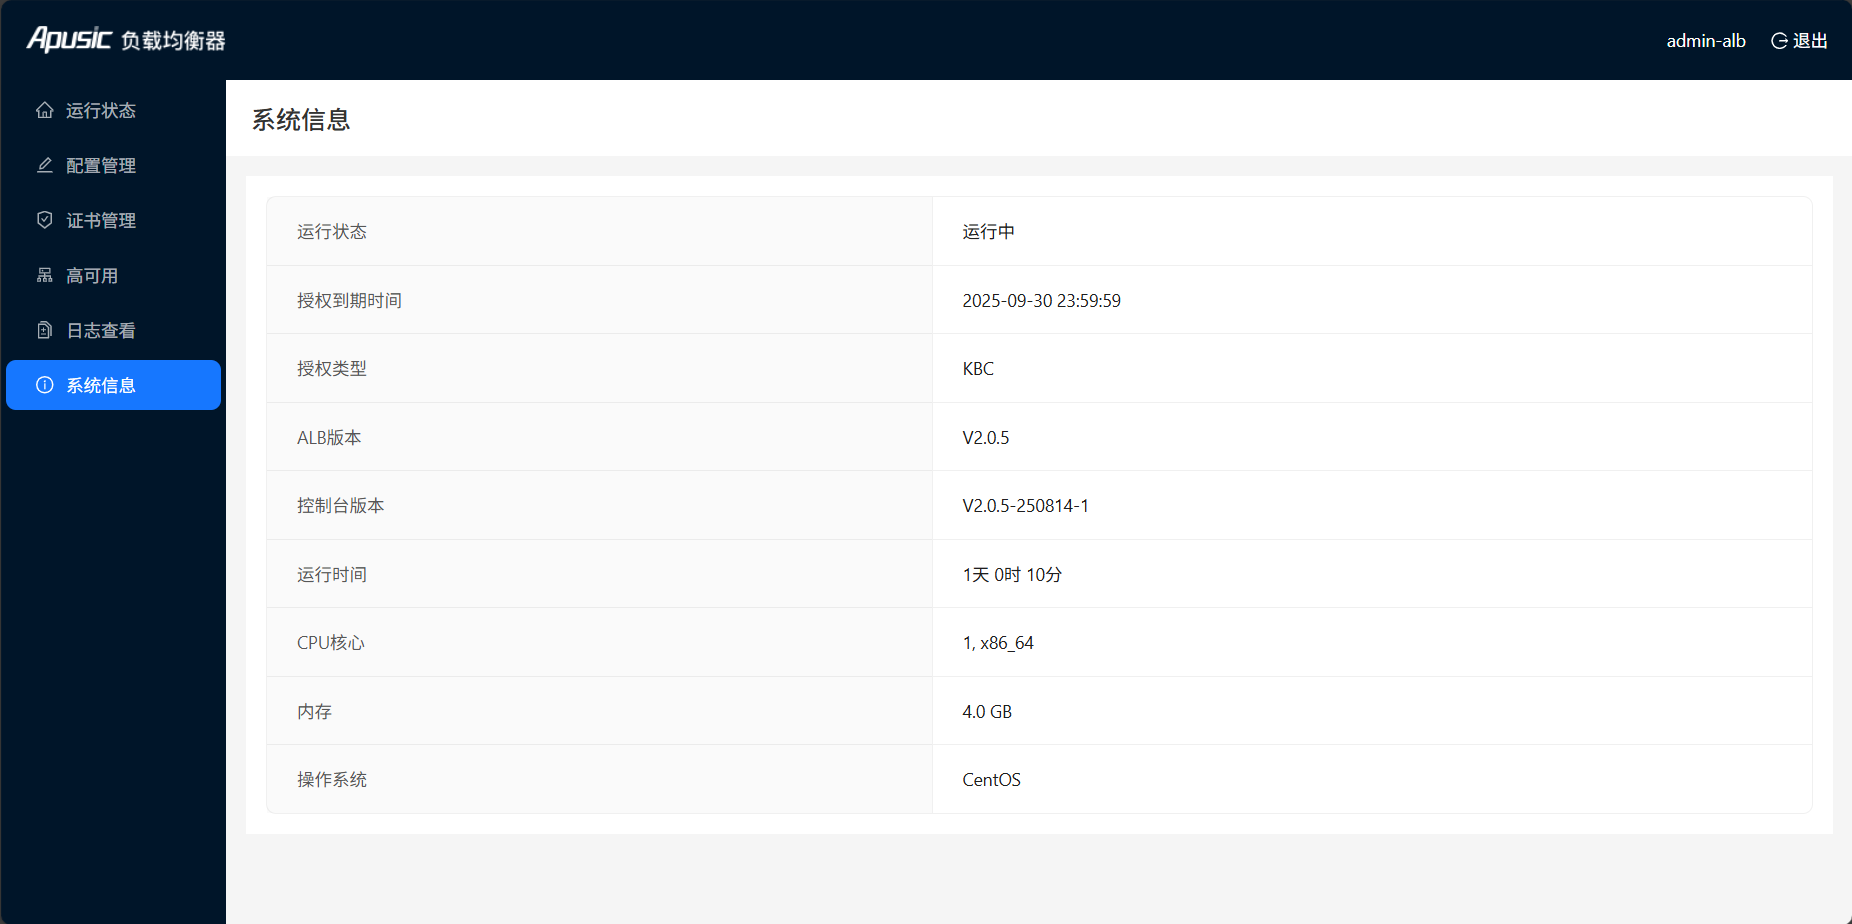
Page information description:
- Running Status: Whether ALB is running
- License: License expiration time
- Type: License type
- ALB Version: ALB version
- Console Version: ALB console version
- Running Time: ALB running time
- CPU Cores: CPU core count and architecture of the node where ALB console service is located
- Memory Size: Memory size of the node where ALB console service is located
- Operating System: Operating system identifier of the node where ALB console service is located
# Regular User Operations
After the Regular User logs in successfully, the default page is as follows:
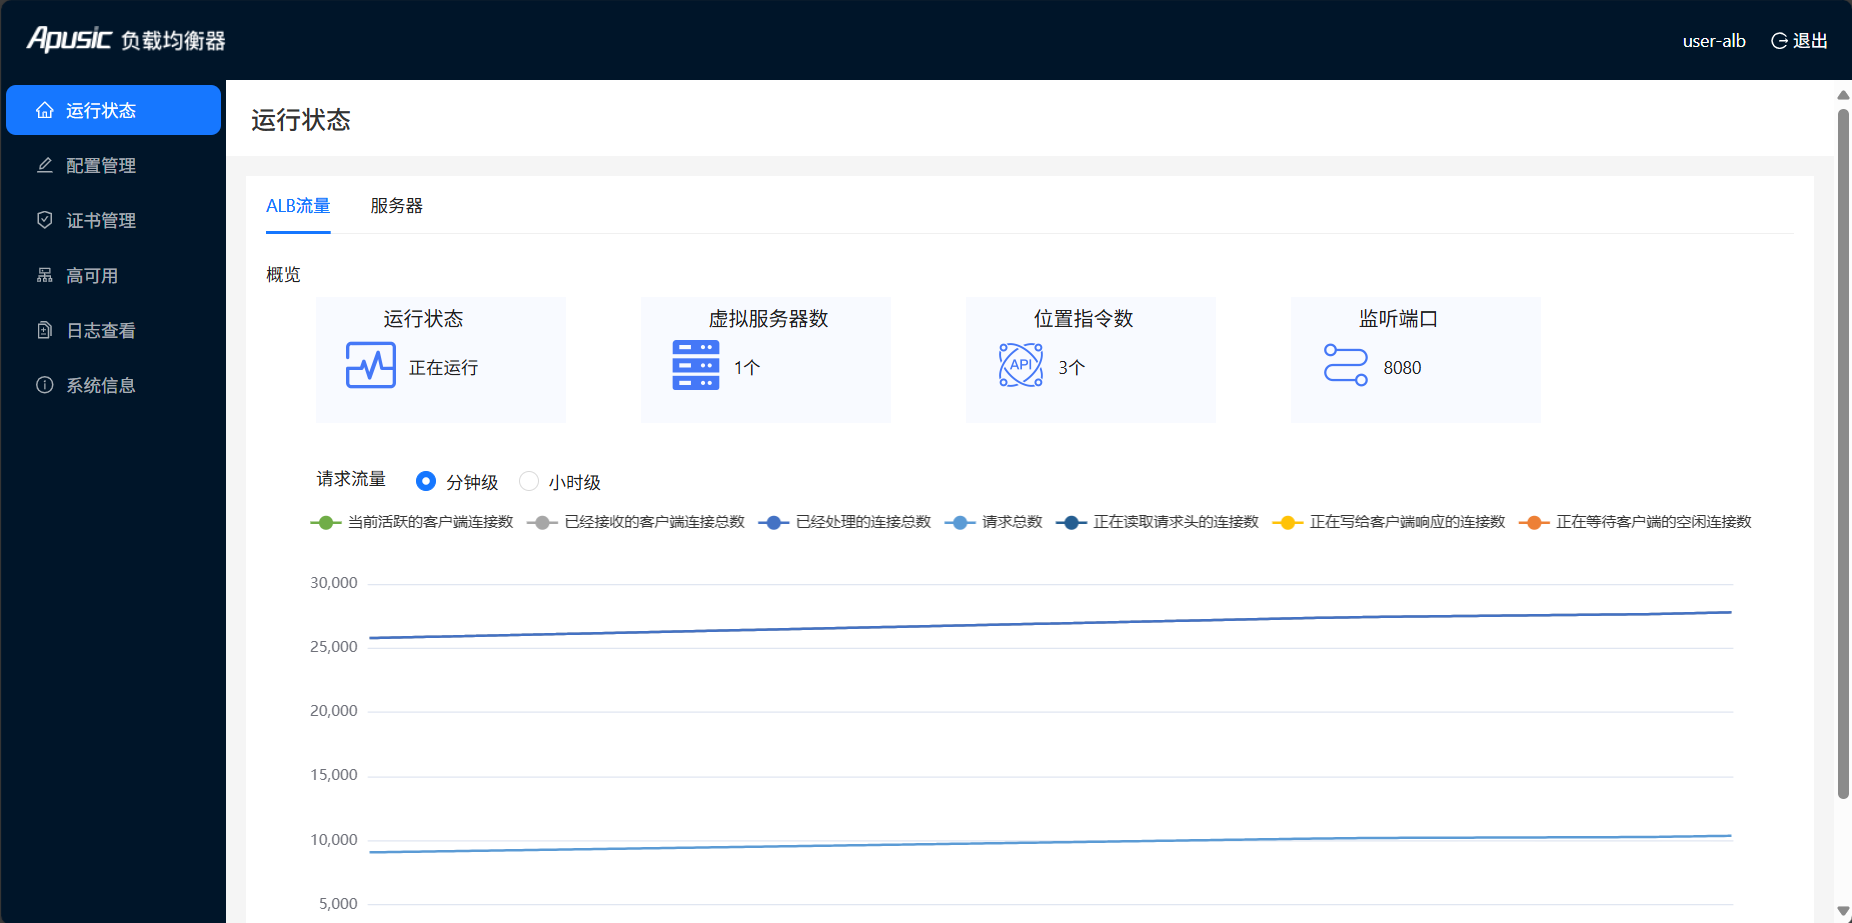
Regular users see the same information as system administrators, the only difference is that administrators have operation permissions, while regular users only have view permissions
# Enable/Disable Forced User Password Modification
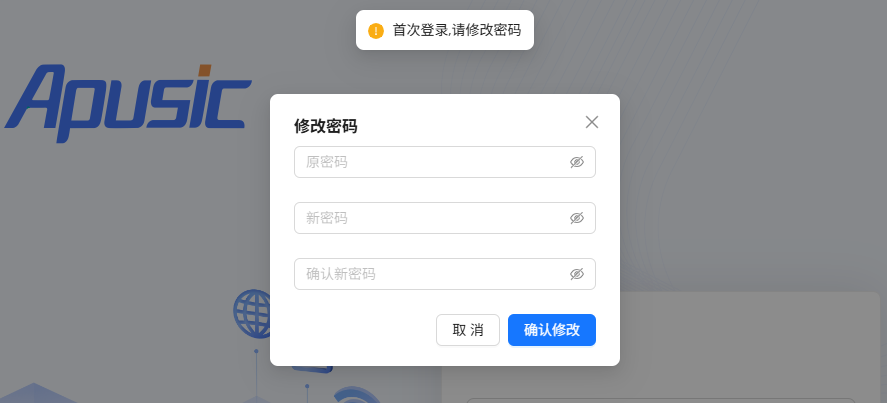
ALB console users must modify password on first login. The way to enable/disable this feature is in ALB installation directory/console/conf/config.yaml file:
system:
  # Whether to force first login password modification, default is forced
  change-pwd-at-first: true
2
3
First login will prompt to modify password, only after modifying password can you log in.
# User Password Modification
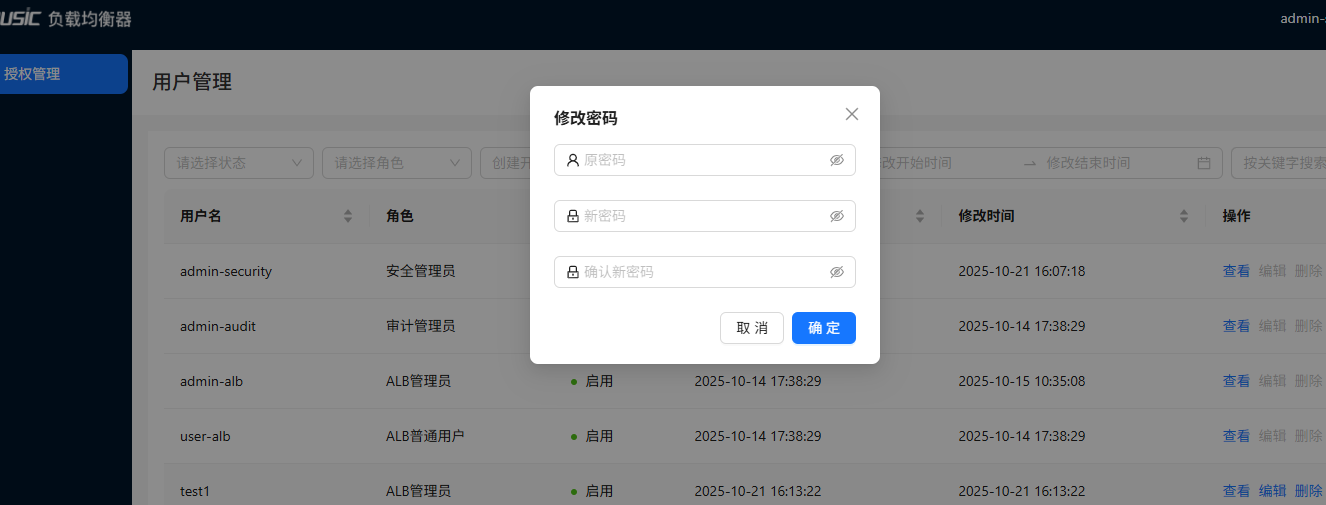
There are two ways to modify user password:
- Security administrator logs in to management backend, edits user information, can directly modify password.
- User logs in to the system, clicks on their username to pop up a dialog to modify.
# User Password Reset
User password reset can be done by logging into the ALB installation directory and executing:
./alb-standard-V2.0.5-console --reinit username
Where username is the default user whose password needs to be reset. The following resets admin-alb user password
cd console
./alb-standard-V2.0.5-console --reinit admin-alb
[alb-standard-console]2025/10/09 - 17:16:20.467    info    /home/mofant/work/alb-agile/alb-lightweight-console-be/initialize/sqlite.go:52  register table success
[alb-standard-console]2025/10/09 - 17:16:20.489    info    /home/mofant/work/alb-agile/alb-lightweight-console-be/initialize/sqlite.go:138 User password reset successful, please login with new password  {"username": "admin-alb"}
2
3
4
# Reset Console
If you need to reset ALB console, you can do the following operations:
- Log in to the system using terminal, switch to alb installation directory
- Stop ALB
- Delete
console/data/alb.dbfile - Start ALB
- Log in again
Note: If you don't want to stop ALB service, you can separately find the process named: alb-standard-V2.0.5-console, and kill -9 process ID, then delete ALB installation directory/console/data/alb.db file, then switch to console directory, then use nohup ./alb-standard-V2.0.5-console > console.log 2>&1 & to start ALB service
# User Scenario Configuration Cases
# Overview
ALB is not only a Web server, but also a "traffic hub" in modern application architecture. It plays a key role in high concurrency, security protection, service governance, etc. This document explains in detail how enterprises can use ALB to solve practical problems at different development stages through multiple scenarios close to real business, with reusable configuration samples and effect analysis.
# Scenario 1: Frontend Single Page Application Hosting and Routing Support/Static Resource Publishing
# 1. Background
A company uses React to develop management backend, outputting static resources after building. Initially, static services were provided through Node.js Express, deployed on a single cloud server.
# 2. Problems Encountered and Problems to be Solved
- When users directly access non-root paths like /settings, they get 404 (because the server has no corresponding physical file);
- Static resources are not cached, downloaded again every refresh, high bandwidth cost, slow loading;
- Express CPU usage spikes when concurrency > 500, response latency exceeds 2 seconds.
Problems to be solved: Implement SPA routing compatibility, efficient static resource distribution, reduce server load.
# 3. ALB Function and Configuration Matching with Problems
try_filesdirective: Implement frontend routing fallback to index.html;expiresandadd_header: Set long-term cache policy;- ALB high-performance event-driven model: Efficiently handle static file requests.
# 4. Configuration and Details Using ALB to Solve This Scenario
server {
    listen 80;
    server_name test.com;

    root /var/www/admin/dist;
    index index.html;

    # SPA routing support: if file doesn't exist, fallback to index.html
    location / {
        try_files $uri $uri/ /index.html;
    }

    # Static resources set 1 year cache (immutable)
    location ~* \.(js|css|png|jpg|svg|woff2)$ {
        expires 1y;
        add_header Cache-Control "public, immutable";
    }
}
2
3
4
5
6
7
8
9
10
11
12
13
14
15
16
17
18
try_files $uri $uri/ /index.html: First look for physical file, if not found, hand over to frontend routing;immutablecache: Browser will never initiate conditional requests during cache validity period, greatly improving revisit speed.
# 5. Effect, Before and After Comparison
| Metric | Before (Express) | After (ALB) |
|---|---|---|
| First screen load time | 2.1s | 0.6s |
| Static resource QPS | 300 | 5000+ |
| CPU usage (500 concurrent) | 85% | 12% |
| Routing 404 errors | Frequent occurrence | Completely eliminated |
# Scenario 2: Microservice API Unified Entry and Load Balancing
# 1. Background
An e-commerce platform completed microservice split, with user, order, payment three core services, deployed on different hosts or containers respectively.
# 2. Problems Encountered and Problems to be Solved
- Clients need to maintain multiple service addresses, complex calls;
- When an instance goes down, it cannot be automatically removed, causing request failures;
- Lack of unified logs, difficult to troubleshoot problems.
Problems to be solved: Unified API entry, automatic load balancing, centralized observability.
# 3. ALB Function and Configuration Matching with Problems
upstream+server: Define backend cluster;proxy_pass: Reverse proxy to corresponding service;max_fails/fail_timeout: Health check mechanism;access_log: Unified request logging.
# 4. Configuration and Details Using ALB to Solve This Scenario
upstream user_backend {
    server 10.0.1.10:8080 max_fails=3 fail_timeout=30s;
    server 10.0.1.11:8080 max_fails=3 fail_timeout=30s;
}

upstream order_backend {
    server 10.0.1.10:8080 max_fails=3 fail_timeout=30s;
    server 10.0.1.11:8080 max_fails=3 fail_timeout=30s;
}

upstream payment_backend {
    server 10.0.1.10:8080 max_fails=3 fail_timeout=30s;
    server 10.0.1.11:8080 max_fails=3 fail_timeout=30s;
}

server {
    listen 80;
    server_name api.shop.com;

    access_log /var/log/alb/api.log combined;

    location /api/users/ {
        proxy_pass http://user_backend/;
        proxy_set_header Host $host;
        proxy_set_header X-Real-IP $remote_addr;
    }

    location /api/orders/ {
        proxy_pass http://order_backend/;
        proxy_set_header Host $host;
        proxy_set_header X-Real-IP $remote_addr;
    }

    location /api/payment/ {
        proxy_pass http://payment_backend/;
        proxy_set_header Host $host;
        proxy_set_header X-Real-IP $remote_addr;
    }
}
2
3
4
5
6
7
8
9
10
11
12
13
14
15
16
17
18
19
20
21
22
23
24
25
26
27
28
29
30
31
32
33
34
35
36
37
38
39
max_fails=3: After 3 consecutive failures, no more requests will be forwarded to that node within 30 seconds;X-Real-IP: Pass through real client IP for backend audit.
# 5. Effect, Before and After Comparison
- Client call addresses reduced from 3 to 1;
- When service instance fails, error rate drops from 15% to 0.2%;
- Operations can track all API call chains through a single log file.
# Scenario 3: Full Site HTTPS Forced Redirect and SSL Termination
# 1. Background
An online education platform must enable HTTPS due to GDPR compliance requirements. Currently both HTTP and HTTPS are open, certificates are managed by Java application.
# 2. Problems Encountered and Problems to be Solved
- Users may access through HTTP, posing data leakage risk;
- Backend application handles SSL encryption/decryption, high CPU overhead;
- Certificate update requires application restart, affecting availability.
Problems to be solved: Force HTTPS, SSL edge termination, zero downtime certificate update.
# 3. ALB Function and Configuration Matching with Problems
- return 301: HTTP forced redirect to HTTPS;
- ssl_certificate: Load TLS certificate;
- Supports hot reload (./bin/reload-alb.sh), no connection interruption needed.
# 4. Configuration and Details Using ALB to Solve This Scenario
server {
    listen 80;
    server_name learn.edu.com;
    return 301 https://$host$request_uri;  # Forced redirect
}

upstream backend {
    server 10.0.1.10:8080 max_fails=3 fail_timeout=30s;
    server 10.0.1.11:8080 max_fails=3 fail_timeout=30s;
}
server {
    listen 443 ssl http2;
    server_name learn.edu.com;

    ssl_certificate /opt/ALB-2.0.2-SE-amd64/conf/learn.edu.com/fullchain.pem;
    ssl_certificate_key /opt/ALB-2.0.2-SE-amd64/conf/learn.edu.com/privkey.pem;

    ssl_protocols TLSv1.2 TLSv1.3;
    ssl_ciphers HIGH:!aNULL:!MD5;  # Use more secure encryption algorithms

    location / {
        proxy_pass http://backend/;
        proxy_set_header X-Forwarded-Proto $scheme;  # Tell backend original protocol
    }
}
2
3
4
5
6
7
8
9
10
11
12
13
14
15
16
17
18
19
20
21
22
23
24
25
# 5. Effect, Before and After Comparison
- HTTP traffic ratio drops from 40% to 0%;
- Backend CPU load drops 18%;
- Certificate update only needs to replace file and reload, zero service interruption.
# Scenario 4: API Interface Anti-Scraping and Rate Limiting
# 1. Background
A social platform opened user information query interface /api/profile/{id}, recently encountered crawler high-frequency requests.
# 2. Problems Encountered and Problems to be Solved
- Database QPS surged from 2000 to 15000, response timeout;
- Normal user requests were blocked;
- Temporary IP blocking affected legitimate developers.
Problems to be solved: Quickly implement rate limiting without modifying business code.
# 3. ALB Function and Configuration Matching with Problems
limit_req_zone: Define rate limit zone based on IP;limit_req: Apply rate limiting policy in location;burst + nodelay: Allow burst traffic smooth processing.
# 4. Configuration and Details Using ALB to Solve This Scenario
http {
    limit_req_zone $binary_remote_addr zone=profile_limit:10m rate=5r/s;

    server {
        location = /api/profile {
            limit_req zone=profile_limit burst=10 nodelay;
            limit_req_status 429;
            proxy_pass http://user_service;
        }
    }
}
2
3
4
5
6
7
8
9
10
11
rate=5r/s: Maximum 5 requests per second;burst=10: Allow instantaneous burst of 10 requests, avoiding normal user false positives;- Returns 429 status code, compliant with RESTful specification.
# 5. Effect, Before and After Comparison
- Malicious request blocking rate 99.6%;
- Database QPS falls back to 2200;
- Normal users unaware, developers can implement retry logic based on 429.
# Scenario 5: Dynamic and Static Separation and Dynamic Content Caching
# 1. Background
Video platform course detail page contains dynamic data (learning progress, comments), but is frequently accessed.
# 2. Problems Encountered and Problems to be Solved
- Every request penetrates to Java backend, even if content hasn't changed;
- Redis caching strategy is complex, low hit rate;
- Peak period database connection pool exhausted.
Problems to be solved: Edge cache for "relatively static" dynamic pages.
# 3. ALB Function and Configuration Matching with Problems
- proxy_cache_path: Define cache storage;
- proxy_cache_valid: Set cache validity period;
- proxy_cache_use_stale: Return expired cache on failure, ensure availability.
# 4. Configuration and Details Using ALB to Solve This Scenario
proxy_cache_path /cache/alb levels=1:2 keys_zone=course_cache:20m inactive=10m;

location = /course/detail {
    proxy_cache course_cache;
    proxy_cache_valid 200 10m;
    proxy_cache_use_stale error timeout updating;
    proxy_pass http://course_service;
    add_header X-Cache $upstream_cache_status;
}
2
3
4
5
6
7
8
9
# 5. Effect, Before and After Comparison
- Course page cache hit rate 72%;
- Backend QPS drops 65%;
- Users can still see "slightly old but usable" pages during failures.
# Scenario 6: WebSocket Long Connection Proxy
# 1. Background
Official website integrated online customer service system, using WebSocket for real-time chat.
# 2. Problems Encountered and Problems to be Solved
- Connection automatically disconnects after 60 seconds of establishment;
- Serious message loss, poor user experience;
- Cannot share port 443 with HTTP.
Problems to be solved: Stable proxy for WebSocket long connections.
# 3. ALB Function and Configuration Matching with Problems
UpgradeandConnectionheader passthrough;proxy_read_timeout: Extend read timeout.
# 4. Configuration and Details Using ALB to Solve This Scenario
location /ws/chat/ {
    proxy_pass http://chat_service;
    proxy_http_version 1.1;
    proxy_set_header Upgrade $http_upgrade;
    proxy_set_header Connection "upgrade";
    proxy_read_timeout 86400s;
}
2
3
4
5
6
7
# 5. Effect, Before and After Comparison
- WebSocket connection can stably maintain 24 hours;
- Message arrival rate increases from 82% to 99.9%;
- Share port 443 with HTTPS, simplify network policy.
# Scenario 7: Prevent Malicious Scanning and Directory Traversal Attacks
# 1. Background
A government information disclosure website is deployed on the public network, recently frequently scanned by automated tools for sensitive paths like /admin/, /.git/, /backup.zip, attempting to obtain internal configuration or source code.
# 2. Problems Encountered and Problems to be Solved
- Attack requests occupy server resources;
- Large number of 404 requests in logs interfere with normal monitoring;
- Risk of data leakage due to accidentally exposed backup files.
Problems to be solved: Block high-risk path access at entry layer without modifying application code.
# 3. ALB Function and Configuration Matching with Problems
locationexact match +deny all: Prohibit access to sensitive directories;- Regex match hidden files (like
.env,.git); - Return 444 (ALB specific status code, directly close connection, no response).
# 4. Configuration and Details Using ALB to Solve This Scenario
server {
    listen 80;
    server_name www.govinfo.gov.cn;

    # Prohibit access to hidden files
    location ~ /\. {
        deny all;
        return 444;
    }

    # Prohibit access to common sensitive directories
    location ~* ^/(admin|phpmyadmin|wp-admin|backup|config)/ {
        deny all;
        return 444;
    }

    # Prohibit downloading specific extension files
    location ~* \.(sql|bak|tar\.gz|zip)$ {
        deny all;
        return 444;
    }

    location / {
        proxy_pass http://backend;
    }
}
2
3
4
5
6
7
8
9
10
11
12
13
14
15
16
17
18
19
20
21
22
23
24
25
26
return 444: No response returned, directly disconnect TCP connection, reducing attacker probing efficiency;- Regex ~* means case-insensitive, covering more variant paths.
# 5. Effect, Before and After Comparison
- Daily malicious requests dropped from 12,000+ to <50;
- "Information leakage risk" item in security audit report cleared;
- Server CPU dropped 30% during scan peak period.
# Scenario 8: Cookie-based Canary Release (A/B Testing)
# 1. Background
E-commerce platform plans to launch new version product detail page, wants to open new version to 10% users first, verify conversion rate before full rollout.
# 2. Problems Encountered and Problems to be Solved
- Backend has no canary capability, needs gateway layer traffic splitting;
- Require same user to always see same version (session consistency);
- Cannot rely on IP (multiple users share exit).
Problems to be solved: Implement stable canary routing based on user identifier (like Cookie).
# 3. ALB Function and Configuration Matching with Problems
- map directive: Determine backend based on $cookie_version value;
- Custom variable controls traffic ratio;
- sticky session persistence (implemented through Cookie).
# 4. Configuration and Details Using ALB to Solve This Scenario
# If user has no version cookie, randomly assign (10% probability set to new)
map $cookie_version $backend_group {
    default "old";
    ""      "auto";  # Go to auto assignment when not set
    "new"   "new";
}

upstream old_backend {
    server 10.0.1.10:8080;
}

upstream new_backend {
    server 10.0.1.20:8080;
}

server {
    listen 80;
    server_name shop.com;

    location /product/ {
        # Unassigned version users: 10% probability tagged as new
        if ($backend_group = "auto") {
            set $rand "";
            set_by_lua_block $rand { return math.random() < 0.1 and "new" or "old" }
            set $backend_group $rand;
            add_header Set-Cookie "version=$rand; Path=/; Max-Age=2592000";
        }

        if ($backend_group = "new") {
            proxy_pass http://new_backend;
        }
        if ($backend_group = "old") {
            proxy_pass http://old_backend;
        }
    }
}
2
3
4
5
6
7
8
9
10
11
12
13
14
15
16
17
18
19
20
21
22
23
24
25
26
27
28
29
30
31
32
33
34
35
36
# 5. Effect, Before and After Comparison
- New and old version user isolation is clear, no cross-contamination;
- A/B testing cycle shortened from 2 weeks to 3 days;
- No need to transform business system, canary strategy completely controlled by ALB.
# Scenario 9: Large File Upload Timeout and Shard Support Optimization
# 1. Background
Online education platform allows teachers to upload courseware (PPT, video), some files exceed 500MB.
# 2. Problems Encountered and Problems to be Solved
- Default 60 second timeout causes large file upload failure;
- Users need to re-upload entire file when network fluctuates;
- Backend Java application out of memory (OOM).
Problems to be solved: Extend upload timeout, support resumable upload, reduce backend pressure.
# 3. ALB Function and Configuration Matching with Problems
- client_max_body_size: Allow large request body;
- client_body_timeout / proxy_send_timeout: Extend timeout;
- (Optional) Combine with alb-upload-module or frontend sharding for resumable upload.
# 4. Configuration and Details Using ALB to Solve This Scenario
server {
    listen 80;
    server_name teach.edu.com;

    # Allow maximum 2GB file
    client_max_body_size 2G;

    # Upload related timeout set to 1 hour
    client_body_timeout 3600s;
    proxy_send_timeout 3600s;
    proxy_read_timeout 3600s;

    location /api/upload {
        proxy_pass http://file_service;
        proxy_set_header X-Real-IP $remote_addr;
        # Temporary file storage path (avoid memory caching large files)
        client_body_temp_path /var/tmp/alb_upload;
    }
}
2
3
4
5
6
7
8
9
10
11
12
13
14
15
16
17
18
19
# 5. Effect, Before and After Comparison
- 500MB+ file upload success rate increased from 40% to 99%;
- Backend OOM errors reduced to zero;
- Users can complete uploads in weak network environment.
# Scenario 10: Static Resource Gzip Compression Acceleration
# 1. Background
Enterprise official website contains many JS/CSS files, overseas users report slow loading.
# 2. Problems Encountered and Problems to be Solved
- Compression not enabled, text resources are large;
- Backend dynamic compression consumes CPU;
- High mobile traffic cost.
Problems to be solved: Efficient Gzip compression for text resources at edge layer.
# 3. ALB Function and Configuration Matching with Problems
gzip on: Enable compression;gzip_types: Specify compression MIME types;gzip_vary on: Notify proxy to cache different versions.
# 4. Configuration and Details Using ALB to Solve This Scenario
http {
    gzip on;
    gzip_vary on;
    gzip_min_length 1024;  # Don't compress if less than 1KB
    gzip_comp_level 6;     # Balance CPU and compression ratio
    gzip_types
        text/plain
        text/css
        application/json
        application/javascript
        text/xml
        application/xml
        image/svg+xml;

    server {
        listen 80;
        server_name www.company.com;
        root /var/www/html;
    }
}
2
3
4
5
6
7
8
9
10
11
12
13
14
15
16
17
18
19
20
# 5. Effect, Before and After Comparison
| Resource Type | Original Size | After Gzip | Compression Rate |
|---|---|---|---|
| main.js | 850 KB | 210 KB | 75% ↓ |
| style.css | 320 KB | 85 KB | 73% ↓ |
- Overall page load time reduced by 40%;
- User bounce rate dropped 18%.
# ALB Function Module Usage Instructions
# License Usage Instructions
ALB Standard Edition supports local license and unified license. Local license is done by copying the license file to the product installation directory, while unified license is done by connecting to the unified authorization center through the connection information specified in the product.
# Local License
- Get the local machine's feature code
# Get the local machine's feature code
./bin/alb-authcode

# Get feature code for specified network interface
./bin/alb-authcode -ac eth0

# Get feature code for specified IP address
./bin/alb-authcode -ac 192.168.1.1
2
3
4
5
6
7
8
Note: -ac parameter only supports ALB Standard Edition build date greater than or equal to 202506
- After obtaining the license code, please contact Kingdee Apusic to send the feature code back to Kingdee Apusic to obtain the license file, or log in to Kingdee Apusic license platform to obtain the license file.
- Rename the obtained license file to license.xml, then place it in the ALB installation directory.
# Unified License
- The unified authorization center must contain valid license information for ALB Standard Edition. (Please log in to the authorization center to check. If there is no valid product license information, please refer to the authorization center manual to import valid product license information.)
- Product configuration connection to the authorization center:
- acls.properties configuration file: acls.properties configuration file is placed in the ALB installation directory.
apusic_acls_enable=true                     # Enable variable unified license
apusic_acls_authUrls=192.168.101.34:6869    # Unified authorization center address
apusic_acls_ns=public                       # Namespace
apusic_acls_tenant=public                   # Tenant name
1
2
3
4 - System environment variable configuration
export apusic_acls_enable=true                 # Enable variable unified license
export apusic_acls_authUrls=172.24.3.116:6869  # Unified authorization center address
export apusic_acls_ns=后付费                    # Namespace
export apusic_acls_tenant=user_env中文          # Tenant name
1
2
3
4
Note: If both license methods are configured, the priority is system environment variable configuration > acls.properties file configuration; if both local license method and unified license method are configured, the unified license method will be used. If license verification fails, subsequent license verification will not be executed.
# ALB Function Module List
| Module | Function Description |
|---|---|
--with-http_stub_status_module | Enable stub_status interface, provide running status statistics. |
--with-http_ssl_module | Enable HTTPS/SSL support. |
--with-ipv6 | Enable IPv6 listening support. |
--with-http_mp4_module | Support MP4 streaming pseudo-streaming. |
--with-http_auth_request_module | Implement sub-request authentication (auth_request), convenient for integration with external authentication services. |
--with-http_gzip_static_module | Support directly sending .gz pre-compressed files, saving CPU. |
--with-http_realip_module | Get real client IP from X-Forwarded-For/X-Real-IP and other headers. |
--with-http_gunzip_module | Automatically decompress response content for clients that don't support gzip. |
--with-http_sub_module | Response body string replacement (sub_filter). |
--with-stream | Enable Layer 4 TCP/UDP proxy (stream subsystem). |
--with-stream_ssl_module | Provide SSL/TLS support for stream subsystem. |
--with-threads | Enable thread pool support, improve file I/O performance. |
--with-file-aio | Enable asynchronous file I/O (Linux AIO). |
--with-http_v2_module | Enable HTTP/2 support. |
--with-http_v3_module | Enable HTTP/3 (QUIC) support. |
--with-http_addition_module | Append content before and after response (add_before_body / add_after_body). |
--with-http_dav_module | Support WebDAV protocol (PUT, DELETE, MKCOL, etc.). |
--with-http_random_index_module | Randomly select default file when directory indexing. |
--with-http_secure_link_module | Generate and verify time-limited, tamper-proof "secure links". |
--with-mail | Enable mail proxy (IMAP/POP3/SMTP) subsystem. |
--with-mail_ssl_module | Provide SSL/TLS support for mail proxy. |
--with-http_slice_module | Support large file slice download (Range Slice). |
--with-stream_ssl_preread_module | Pre-read SNI/ALPN in Layer 4 proxy, implement domain-based routing. |
alb_healthcheck_module | ALB active health check module, supports Layer 4 and Layer 7 proxy node active health check. |
alb-sticky-module-ng | Implement session persistence (sticky cookie/route). |
alb-module-vts | Provide detailed traffic/status statistics interface (/status). |
alb-module-stream-sts | Provide real-time status statistics for stream subsystem. |
alb-module-sts | Provide real-time status statistics for http subsystem. |
alb_http_proxy_connect_module | Support HTTP CONNECT method, forward proxy HTTPS traffic. |
alb-rtmp-module | Introduce RTMP/HLS/DASH live streaming and media functionality. |
alb_brotli | Support Brotli compression algorithm, reduce transmission size. |
alb-module-lua | Introduce Lua script functionality, can extend ALB functionality. |
alb-headers-more | Set and clear request and response headers. |
# Product Port Description
ALB default ports are as follows:
- 8080: http service port.
- 8887: ALB console port
If you need to modify the default http proxy port, you can edit the listen 8080 line in ALB installation directory/conf/alb.conf file.
If you need to modify the console port, you can edit the addr field port in the system section of ALB installation directory/console/conf/config.yaml file.
# Boot Startup Item | System Service
ALB does not enable automatic boot startup by default. If you need boot startup, switch to the installation directory and execute:
cd /opt/ALB-V2.0.5-SE-amd64           # Enter installation directory
./utils/systemd/enable_startup.sh     # Automatically set boot startup item.
systemctl start alb                   # Start ALB
2
3
# Remove System Startup Item
cd /opt/ALB-V2.0.5-SE-amd64           # Enter installation directory
./utils/systemd/remove_startup.sh     # Remove boot startup item
2
# Start ALB as Regular User and Enable Port 80 Listening
ALB supports modifying program permissions to allow listening on port 80 as a regular user. The specific operations are as follows:
- Switch to root user and switch to the ALB installation directory.
- Authorize listening on port 80:
setcaps cap_net_bind_service=+eip ./sbin/alb - Switch back to regular user
# Load Balancing Algorithms
# Round Robin
Round Robin is ALB's default load balancing algorithm, assigning requests to backend servers in turn according to time order. If a server goes down, ALB will automatically remove it.
After configuring multiple backend servers as follows, the round robin load balancing algorithm is used by default.
upstream backend {
    server backend1.example.com;
    server backend2.example.com;
}
2
3
4
# Weighted Round Robin
On the basis of round robin, requests are allocated according to the specified weight. Servers with higher weights handle more requests, suitable for situations where server performance is uneven.
After configuring multiple backend servers as follows, use the weight parameter to specify the weight.
upstream backend {
    server backend1.example.com weight=10;  # Set weight through weight parameter
    server backend2.example.com weight=20;
}
2
3
4
# IP Hash
Based on the client's IP address hash calculation, requests are allocated to backend servers. It can ensure that requests from the same IP address are always allocated to the same backend server.
After configuring multiple backend servers as follows, enable IP Hash load balancing algorithm by using the ip_hash directive.
upstream backend {
    ip_hash;  # Enable IP hash load balancing
    server backend1.example.com;
    server backend2.example.com;
}
2
3
4
5
# Least Connections
Allocate based on the current active connection count of backend servers, assigning requests to the backend server with the fewest active connections. Suitable for scenarios where request processing time varies greatly.
After configuring multiple backend servers as follows, enable least connections load balancing algorithm by using the least_conn directive.
upstream backend {
    least_conn;  # Enable least connections load balancing
    server backend1.example.com;
    server backend2.example.com;
}
2
3
4
5
# Health Check
ALB supports health checks for backend servers. When a backend server's response does not meet expectations, ALB will remove it.
# Passive Health Check
Passive health check is executed automatically by ALB, judging whether it is healthy based on the backend server's response status code and timeout.
ALB's passive health check is configured through fail_timeout and max_fails parameters.
fail_timeout: Specifies the time period after consecutive failures when ALB will mark the backend server as unhealthy. Default value is 10 seconds.max_fails: Specifies the number of consecutive failures within thefail_timeouttime period. Default value is 3.
For example, if you want to mark a backend server as unavailable after 3 consecutive failures and not send requests to it for the next 30 seconds, you can configure as follows:
upstream backend {
    server 192.168.0.1:80 fail_timeout=30s max_fails=3;
    server 192.168.0.2:80 fail_timeout=30s max_fails=3;
}
2
3
4
Note:
- If the backend server is still unavailable after the time set by fail_timeout ends, ALB will try to send requests to that server again.
- When the backend server returns to normal, ALB will automatically add it back to the round robin queue.
- Using these directives can help reduce the impact of brief failures caused by network fluctuations on user experience.
# Active Health Check
Active health check is executed periodically by ALB, judging whether it is healthy by sending specific requests to the backend server. If the request returns successfully, the backend server is considered healthy; otherwise, it is marked as unhealthy.
# Layer 7 HTTP Proxy Health Check
ALB's active health check is configured through the check directive.
upstream backend {
    server 192.168.0.1:80;
    server 192.168.0.2:80;

    # Enable health check
    check interval=3000 rise=2 fall=3 timeout=2000 type=http;

    # Define health check URL
    check_http_send "GET /healthcheck HTTP/1.0\r\nHost: www.example.com\r\n\r\n";
    check_http_expect_alive http_2xx http_3xx;
}
2
3
4
5
6
7
8
9
10
11
Configuration directive explanation:
- check: Enable health check, configure basic parameters for health check.
- interval: Define the interval between two checks (unit: milliseconds).
- rise: Define how many consecutive successful responses before the backend server is considered healthy.
- fall: Define how many consecutive failed responses before the backend server is considered unhealthy.
- timeout: Define the timeout for a single health check request (unit: milliseconds).
- type: Define the type of health check request, such as http or tcp.
- check_http_send: Define the HTTP request sent to the backend server.
- Here a GET request is used to check the /healthcheck path.
- check_http_expect_alive: Define the expected successful response status code range from the backend server.
- http_2xx and http_3xx indicate expecting to receive 2xx and 3xx status codes.
# Layer 4 TCP Proxy Health Check
ALB active health check supports TCP proxy, the following is an example:
stream {
    upstream tcp-cluster {
        server 127.0.0.1:22;
        server 192.168.0.2:22;
        check interval=3000 rise=2 fall=5 timeout=5000 default_down=true type=tcp;
    }
    server {
        listen 522;
        proxy_pass tcp-cluster;
    }

    upstream udp-cluster {
        server 127.0.0.1:53;
        server 8.8.8.8:53;
        check interval=3000 rise=2 fall=5 timeout=5000 default_down=true type=udp;
    }
    server {
        listen 53 udp;
        proxy_pass udp-cluster;
    }
}
2
3
4
5
6
7
8
9
10
11
12
13
14
15
16
17
18
19
20
21
# Different Type Descriptions
- TCP Health Check (type=tcp), Supports Layer 7 and Layer 4 Proxy
TCP health check is one of the simplest types, it only needs to establish a TCP connection to the backend server and read one byte to determine if the server is reachable. Here is an example configuration:
http {
    upstream backend {
        server 192.168.0.1:80;
        server 192.168.0.2:80;

        check interval=3000 rise=2 fall=3 timeout=2000 type=tcp;

    }

    server {
        listen 80;
        server_name example.com;

        location / {
            proxy_pass http://backend;
        }
    }
}
2
3
4
5
6
7
8
9
10
11
12
13
14
15
16
17
18
- HTTP Health Check (type=http), Supports Layer 7 and Layer 4 Proxy
HTTP health check judges the server's status by sending an HTTP request to the backend server. Here is an example configuration:
http {
    upstream backend {
        server 192.168.0.1:80;
        server 192.168.0.2:80;

        check interval=3000 rise=2 fall=3 timeout=2000 type=http;

        # Send a GET request to /healthcheck path
        check_http_send "GET /healthcheck HTTP/1.0\r\nHost: www.example.com\r\n\r\n";

        # Expect server to return 2xx or 3xx status codes to indicate healthy
        check_http_expect_alive http_2xx http_3xx;
    }

    server {
        listen 80;
        server_name example.com;

        location / {
            proxy_pass http://backend;
        }
    }
}
2
3
4
5
6
7
8
9
10
11
12
13
14
15
16
17
18
19
20
21
22
23
- SSL Hello Health Check (type=ssl_hello)
SSL Hello health check judges whether the server is healthy by sending an SSL client Hello packet and receiving the server's SSL Hello packet. Here is an example configuration:
http {
    upstream backend {
        server 192.168.0.1:443;
        server 192.168.0.2:443;

        check interval=3000 rise=2 fall=3 timeout=2000 type=ssl_hello;
    }

    server {
        listen 443 ssl;
        server_name example.com;

        location / {
            proxy_pass https://backend;
        }
    }
}
2
3
4
5
6
7
8
9
10
11
12
13
14
15
16
17
- MySQL Health Check (type=mysql)
MySQL health check judges whether the database server is healthy by establishing a MySQL connection and receiving a greeting response.
http {
    upstream backend {
        server 192.168.0.1:3306;
        server 192.168.0.2:3306;

        check interval=3000 rise=2 fall=3 timeout=2000 type=mysql;
    }

    server {
        listen 80;
        server_name example.com;

        location / {
            proxy_pass http://backend;
        }
    }
}
2
3
4
5
6
7
8
9
10
11
12
13
14
15
16
17
- FastCGI Health Check (type=fastcgi)
FastCGI health check judges whether the server is healthy by sending a FastCGI request and receiving a response.
http {
    upstream backend {
        server 192.168.0.1:9000;
        server 192.168.0.2:9000;

        check interval=3000 rise=2 fall=3 timeout=2000 type=fastcgi;
    }

    server {
        listen 80;
        server_name example.com;

        location / {
            proxy_pass fastcgi://backend;
        }
    }
}
2
3
4
5
6
7
8
9
10
11
12
13
14
15
16
17
- UDP Health Check (type=udp), Supports Layer 7 and Layer 4 Proxy
UDP health check judges whether the server is healthy by sending a UDP request and receiving a response.
stream {
    upstream udp-cluster {
        server 127.0.0.1:53;
        server 8.8.8.8:53;
        check interval=3000 rise=2 fall=5 timeout=5000 default_down=true type=udp;
    }
    server {
        listen 53 udp;
        proxy_pass udp-cluster;
    }
}
2
3
4
5
6
7
8
9
10
11
# Active Health Check Status Retrieval
ALB supports obtaining active health check status through a specified interface, as follows:
- Enable active health check status retrieval
# Omit other configurations

http {
    server {
        listen 8080;

        # Get active health check status URL
        # Get health status data page through ALB's 8080 port /status interface
        location /status {
            healthcheck_status html;
        }
    }
    # Omit other configurations
}
2
3
4
5
6
7
8
9
10
11
12
13
14
15
Access the 8080 port /status interface to get the health status data page:
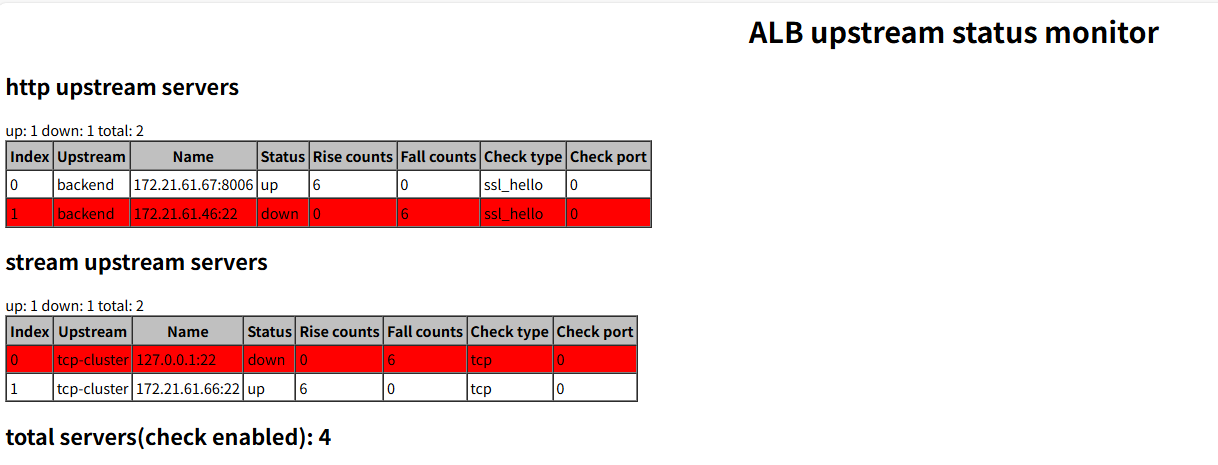
- Supported types
- html: Return HTML page
- json: Return JSON data
- csv: Return CSV data
- prometheus: Return Prometheus format data
# Monitoring
ALB provides rich monitoring indicators, including:
- Simple traffic statistics data, does not support Prometheus collection.
- Prometheus-exporter, supports simple traffic data collection, supports Prometheus.
- VTS monitoring data, ALB fine-grained monitoring data, supports HTML page display, JSON data and Prometheus collection.
Note: You can choose one of the three methods above as needed.
# Simple Traffic Statistics Data
ALB provides simple traffic statistics information, its monitoring data includes:
- Active connections: Current active connection count.
- Server accepts, handled, requests: Connections accepted and processed since ALB started, and requests received.
- Reading: Number of client requests currently being read.
- Writing: Number of responses currently being written to clients.
- Waiting: Number of connections currently in waiting state. These connections have completed reading operations and are waiting for the next write operation.
# Configure Simple Traffic Statistics Data and Retrieval
In the ALB configuration file, add the following content:
server {
    listen 8080;            # node_status port

    location /node_status {
        stub_status on;     # Enable node_status function
    }
}
2
3
4
5
6
7
After starting ALB, visit http://alb_ip:8080/node_status to view.
# Prometheus-exporter (Prometheus Monitoring Data)
ALB provides Prometheus monitoring functionality, not enabled by default. To enable, switch to the utils/exporter directory,
Execute: ./start-exporter.sh to start ALB's exporter.
# Startup Instructions
To start ALB's exporter, you must enable the stub_status function in the configuration file, as follows:
server {
  listen 8080;            # node_status port
  location /node_status { # Must use node_status
        stub_status on;   # Enable stub_status
        access_log off;
        allow 127.0.0.1;
    }
}
2
3
4
5
6
7
8
After executing the start-exporter script, you need to input:
- The server listening port corresponding to node_status, default is 8080.
- The exporter listening port, default is 9113
The following is the input process:
root@root:/opt/ALB-V2.0.5-SE-amd64/utils/expoter$ ./start-exporter.sh
input alb server listening port(Please enter node_status listening port):
alb server listening port(ALB node_status port): 8080
input exporter listening port(Please enter listening port):
exporter listening port is 9113
exporter are running now!(Exporter started successfully)
2
3
4
5
6
# Prometheus Monitoring Data Retrieval
After successful start-exporter, you can access through browser or prometheus:
http://IP:9113/metrics to get monitoring data.
Note: If you modified the exporter's listening port above, the 9113 in the above URL should also be modified.
# VTS Monitoring Data
The vts module provides more detailed monitoring information, including connection count, status codes, etc. Compared with the above two monitoring methods, the vts module can provide more comprehensive and rich monitoring data. Through the vts module, you can gain a deeper understanding of ALB's running status.
# Monitoring Indicator Description
| Monitoring Category | Indicator Name | Description |
|---|---|---|
| 1. Basic Information | Host Information | Host name or IP address where the proxy server is located |
| Version Number | ALB or monitoring module version | |
| Server Running Time | Time the ALB process has been running (usually in seconds) | |
| 2. Connection Information | Current Client Connections | Number of currently active client connections |
| Total Client Connections Read | Cumulative connections reading requests from clients | |
| Total Client Connections Written | Cumulative connections writing responses to clients | |
| Total Client Connections Processed | Cumulative total client connections processed | |
| 3. HTTP Virtual Host Monitoring | Total Requests | Total requests received by this virtual host |
| Requests Per Second (RPS) | Current requests processed per second | |
| 1xx Status Code Statistics | Cumulative count of all 1xx status codes (like 100, 101) | |
| 2xx Status Code Statistics | Cumulative count of all 2xx successful responses (like 200, 201) | |
| 3xx Status Code Statistics | Cumulative count of all redirect responses (like 301, 302) | |
| 4xx Status Code Statistics | Cumulative count of client errors (like 404, 403) | |
| 5xx Status Code Statistics | Cumulative count of server errors (like 500, 502) | |
| All Status Code Statistics | Sum of all non-2xx responses (or summary of all status code classifications) | |
| Total Traffic Sent | Total bytes sent by this virtual host to clients | |
| Total Traffic Received | Total bytes received by this virtual host from clients | |
| Traffic Send Rate | Current bytes sent per second (B/s) | |
| Traffic Receive Rate | Current bytes received per second (B/s) | |
| 4. HTTP Cache Monitoring | Cache Hits | Number of requests that hit cache |
| Cache Misses | Number of requests that missed cache | |
| Cache Bypasses | Request count bypassing cache due to bypass configuration | |
| Cache Expired | Count of cache items expired and discarded | |
| Cache Invalidated | Cache removal count due to active invalidation (like purge) | |
| Cache Updated | Count of cache updates (like stale-while-revalidate) | |
| Cache Revalidated | Cache request count needing revalidation from origin | |
| Total Cache | Sum of cache hits + misses + bypasses (or current total cache items) | |
| 5. HTTP Upstream Server Monitoring | Service Status | Current upstream server status (up/down/checking) |
| Service Weight | Configured weight value | |
| Max Failures | max_fails configuration value | |
| Failure Downtime | fail_timeout configuration value (unit: seconds) | |
| Total Requests | Total requests sent to this upstream | |
| Requests Per Second | Current requests per second sent to this upstream | |
| 1xx-5xx Status Code Statistics | Cumulative counts for each status code category |
# VTS Module Configuration and Viewing
The following is an example configuration for enabling vts:
http {
    vhost_traffic_status_zone;             # Enable vts module

    ...

    server {

        ...

        location /status {                  # Configure uri address for vts viewing
            vhost_traffic_status_display;   # Current /status uri displays vts monitoring indicators
            vhost_traffic_status_display_format html;  # Set default format as html page
        }
    }
}
2
3
4
5
6
7
8
9
10
11
12
13
14
15
- HTML Monitoring Data Viewing
View the monitoring page through browser: http://IP:Port/status 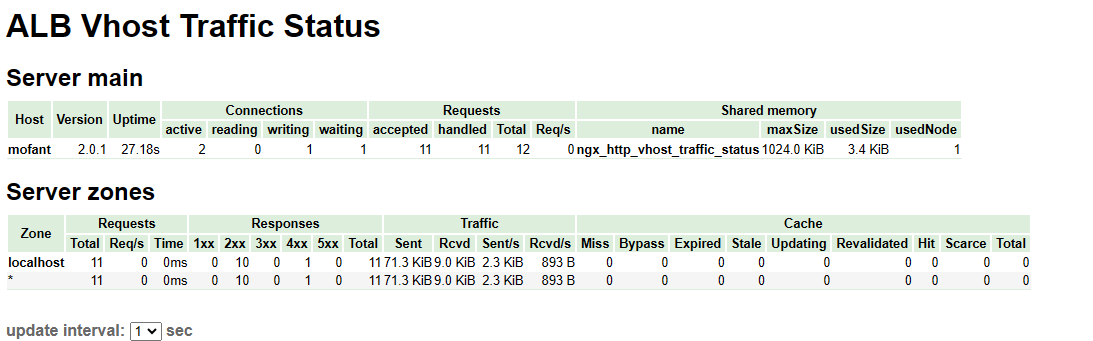
- JSON Data Format Viewing
Get JSON data through browser or curl: http://IP:Port/status/format/json
- Prometheus Monitoring Indicator Data Interface
Can integrate directly with Prometheus: http://IP:Port/status/format/prometheus
# Custom Monitoring Indicators
The vhost_traffic_status_filter_by_set_key directive allows you to specify a key name. VTS will filter traffic statistics based on this key name. Usually, this key name corresponds to a variable defined in the set directive.
vhost_traffic_status_filter_by_set_key key_name;
# Configuration areas: http, server, location
2
Description: Enable key through user-defined variable. Key is a string used to calculate traffic. Name is a string used to calculate traffic group. Key and name can contain variables, such as $host, $server_name. If specified, name belongs to that group. If the second parameter name is not specified, key belongs to the group.
Example:
http {
    vhost_traffic_status_zone;             # Enable vts module

    ...

    server {

        ...
        vhost_traffic_status_filter_by_set_key  $uri uri::*;  # Filter uri, count traffic for different uris
        location /status {                  # Configure uri address for vts viewing
            vhost_traffic_status_display;   # Current /status uri displays vts monitoring indicators
            vhost_traffic_status_display_format html;  # Set default format as html page
        }
    }
}
2
3
4
5
6
7
8
9
10
11
12
13
14
15
After configuration, you can view traffic for different uris:
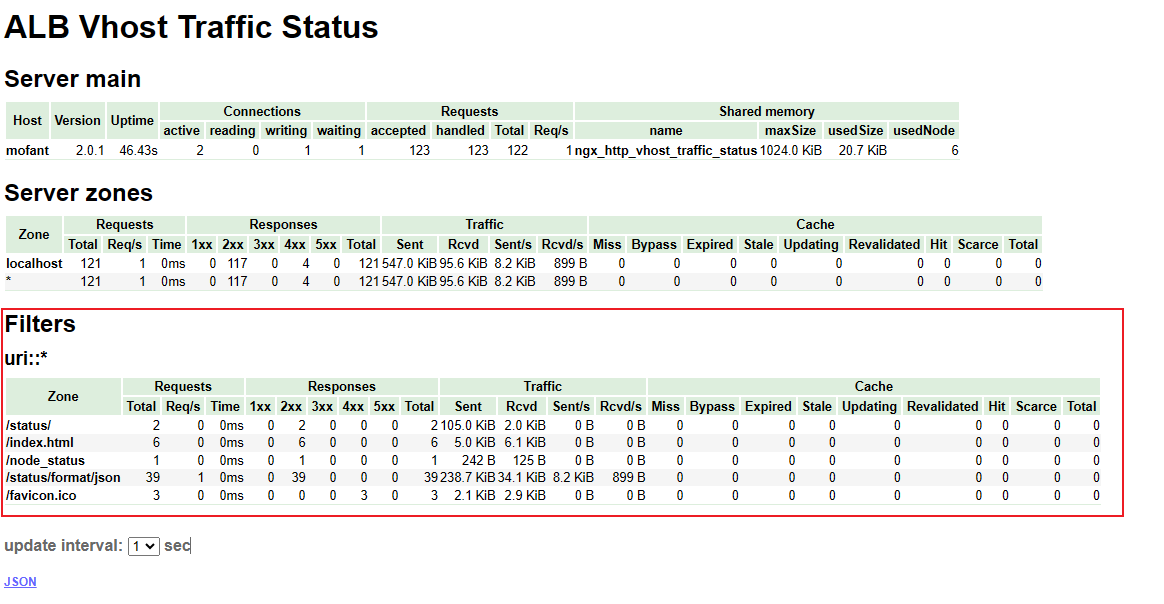
# Stream Monitoring
ALB-VTS module supports stream module monitoring. By default, the module does not enable stream module support. Its usage is as follows:
http {
    stream_server_traffic_status_zone;  # Enable stream vts module

    ...

    server {

        ...

        location /stream/status {     # Monitoring indicator exposed uri
            stream_server_traffic_status_display;
            stream_server_traffic_status_display_format html;
        }
    }
}

stream {
    server_traffic_status_zone;  # Monitored stream

    ...

    server {
        ...
    }
}
2
3
4
5
6
7
8
9
10
11
12
13
14
15
16
17
18
19
20
21
22
23
24
25
- HTML Monitoring Data Viewing
View the monitoring page through browser: http://IP:Port/stream/status 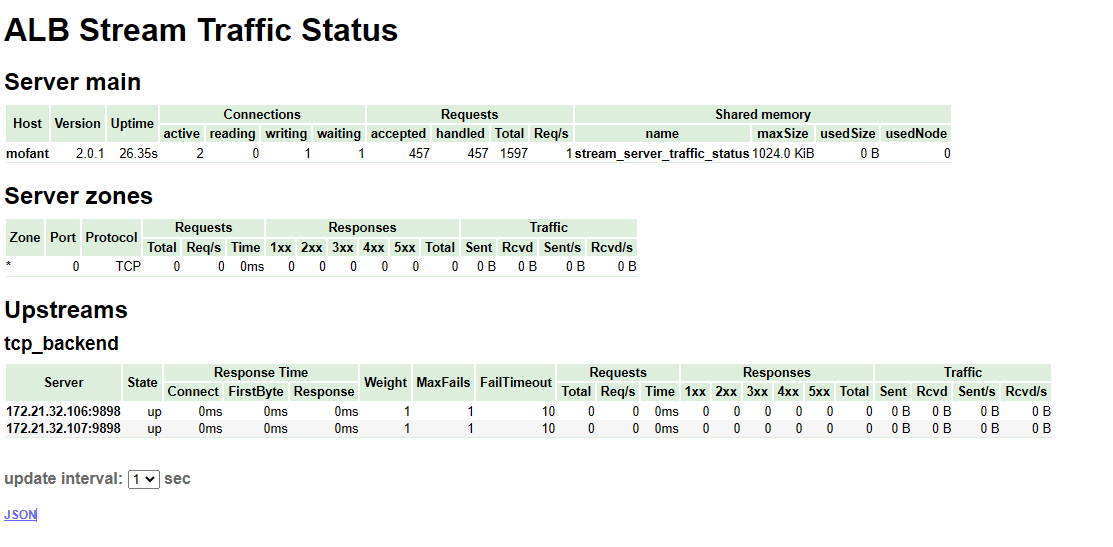
- JSON Data Format Viewing
Get JSON data through browser or curl: http://IP:Port/stream/status/format/json
- Prometheus Monitoring Indicator Data Interface
Can integrate directly with Prometheus: http://IP:Port/stream/status/format/prometheus
# VTS Monitoring Indicator Grafana Integration
The above VTS monitoring indicators provide prometheus collection format. In prometheus, you can configure the following collection:
scrape_configs:
- job_name: 'alb-vts-status'
  honor_timestamps: true
  scrape_interval: 1m
  scrape_timeout: 10s
  metrics_path: /status/format/prometheus # ALB vts monitoring indicator collection url
  scheme: http
  enable_compression: true
  follow_redirects: true
  enable_http2: true
  static_configs:
  - targets:
      - 172.21.61.66:8080                 # ALB VTS monitoring indicator collection address
    labels:
      group: 'alb'
      instance: 'alb'
2
3
4
5
6
7
8
9
10
11
12
13
14
15
16
Among them, the grafana Dashboard example configuration file path:
ALB installation directory/utils/grafana/alb-grafana.json
The display effect of the example configuration file is as follows:
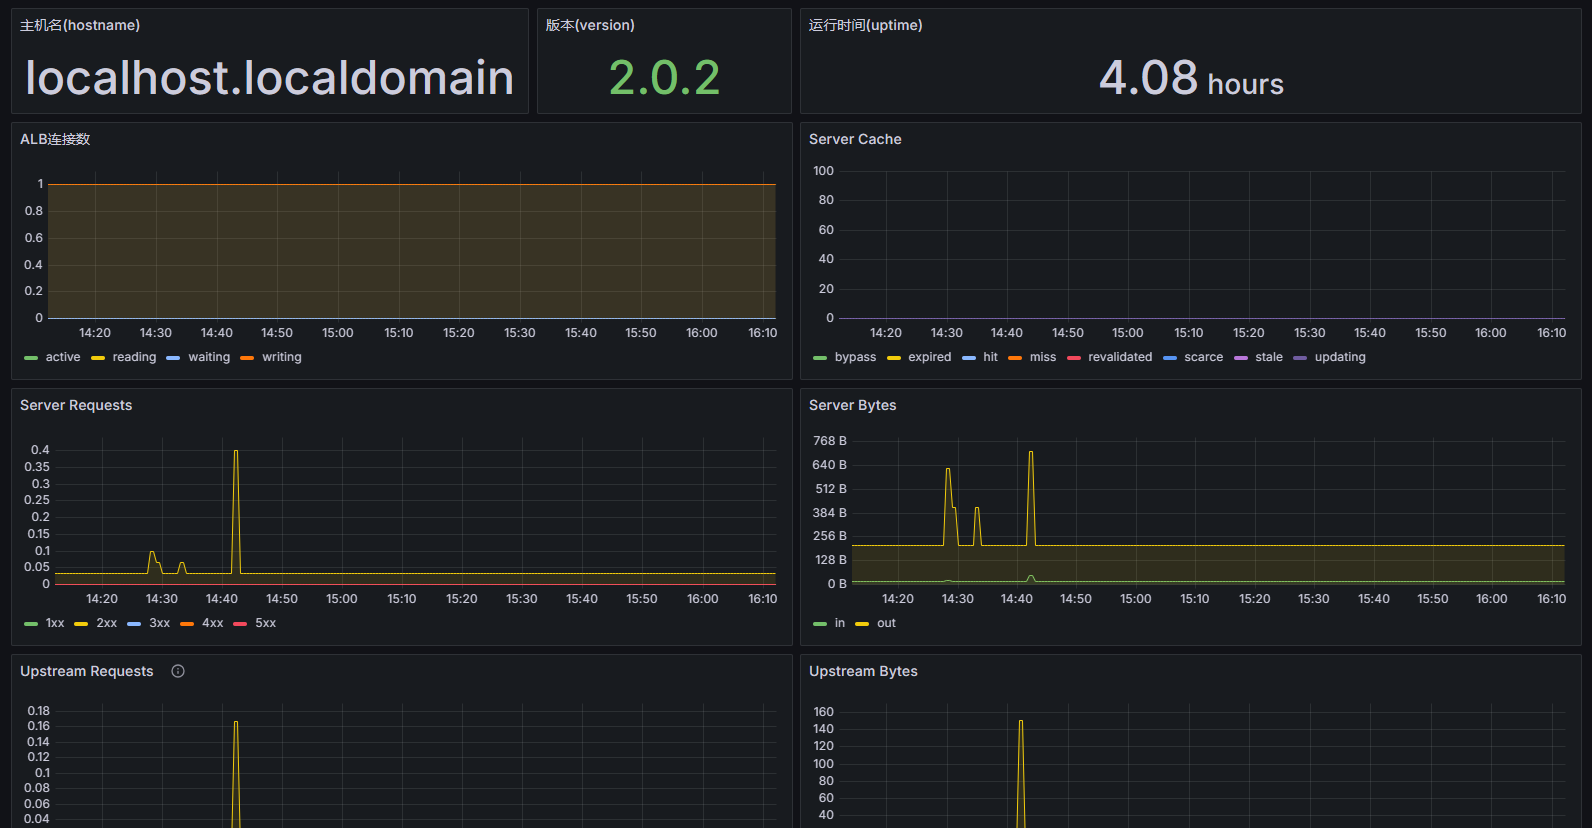
You can import this configuration file in the deployed grafana to implement the above monitoring dashboard.
# TCP Proxy
ALB's stream module can be used for TCP proxy. Configure the stream module in the alb configuration file to implement tcp proxy.
The following is a tcp proxy example:
# TCP proxy
stream {
    upstream backend {
        server 127.0.0.1:8080;
    }

    server {
        listen 443;   # Listening port

        proxy_pass backend;  # Forward to backend
    }
}

# The following is HTTP configuration content
http {
  # Omitted
}
2
3
4
5
6
7
8
9
10
11
12
13
14
15
16
17
Note: TCP proxy configuration can only be written in the outermost configuration, cannot be written in http block or imported through include in http block.
# TCP Proxy Acceleration
ALB TCP proxy acceleration is based on the kernel eBPF function, implementing efficient packet processing and forwarding mechanisms in the data plane, significantly improving TCP proxy performance.
# Kernel eBPF Accelerated TCP Forwarding Advantages
- Zero-copy forwarding: Through eBPF program directly processing network packets in kernel mode, avoiding frequent data copies between user mode and kernel mode in traditional methods.
- Intelligent routing decisions: Utilizing eBPF's efficient matching capability, quickly determine the forwarding path for data packets to enable TCP proxy.
# Configuration Requirements
User permissions:
- user directive must use a privileged user (like root, admin)
- Or if the kernel supports it, set /proc/sys/kernel/unprivileged_bpf_disabled to 0 to use unprivileged users
Connection count limit:
- Total connections not exceeding 1000000 (1 million)
Hardware configuration:
- Memory: >= 16G
Kernel version:
kernelversion >= 5.15
ALB product package requirement:
- Like
ALB-V2.0.5-SE-20251127-amd64-ebpf.tar.gz, suffix carries ebpf feature.
- Like
# Usage Example
user root;


stream {
    upstream backend_servers {
        server 127.0.0.1:20001;
    }

    # Global configuration
    ebpf_proxy_timeout 600;  # Idle timeout when no data forwarding between upstream and downstream (seconds)
    ebpf_enable on;          # Globally enable eBPF acceleration

    server {
        listen 10000;
        ebpf_enable on;           # Enable eBPF in specific server (can override global settings)
        proxy_pass backend_servers;
    }

    server {
        listen 10001;
        ebpf_enable off;          # Disable eBPF acceleration
        proxy_pass backend_servers;
    }
}
2
3
4
5
6
7
8
9
10
11
12
13
14
15
16
17
18
19
20
21
22
23
24
# Configuration Parameter Description
# ebpf_status_return
- Syntax:
ebpf_status_return; - Context: server
- Function: Return simple status information for debugging purposes
- Example:
server {
    listen 30001;
    ebpf_status_return;
}
1
2
3
4
# ebpf_enable
- Syntax:
ebpf_enable on | off; - Default: off
- Context: main, server
- Function: Enable or disable eBPF acceleration function
- Example:
# Globally enable
ebpf_enable on;

server {
    listen 10000;
    # Enable in specific server
    ebpf_enable on;
    proxy_pass backend;
}
1
2
3
4
5
6
7
8
9
# ebpf_proxy_timeout
- Syntax:
ebpf_proxy_timeout milliseconds; - Default: 600000 (unit milliseconds, = 600 seconds)
- Context: main, server
- Function: eBPF connection disconnect time, if long connection, please set to 0
- Example:
# Global setting
ebpf_proxy_timeout 300000;

server {
    listen 10000;
    # Override at server level
    ebpf_proxy_timeout 60000;
    proxy_pass backend;
}
1
2
3
4
5
6
7
8
9
# ebpf_proxy_buffer_size
- Syntax:
ebpf_proxy_buffer_size size; - Default: 16384 (16KB)
- Context: main, server
- Function: Set buffer size for storing data received from upstream
- Example:
# Global setting
ebpf_proxy_buffer_size 32k;

server {
    listen 10000;
    # Set at server level
    ebpf_proxy_buffer_size 64k;
    proxy_pass backend;
}
1
2
3
4
5
6
7
8
9
# ebpf_timer_period
- Syntax:
ebpf_timer_period milliseconds; - Default: 2000 (2 seconds)
- Context: main, server
- Function: Set timer period for updating traffic statistics
- Example:
# Global setting
ebpf_timer_period 1000;

server {
    listen 10000;
    # Set at server level
    ebpf_timer_period 5000;
    proxy_pass backend;
}
1
2
3
4
5
6
7
8
9
# TCP Proxy ADMQ
ALB supports using TCP protocol to proxy ADMQ services. Below is an example of using ALB Standard Edition to proxy ADMQ services.
# Configuration Process
- ADMQ deployed (omitted)
- ALB deployed (omitted)
- Modify ALB configuration to support ADMQ proxy
- Verify ADMQ service proxy
# ADMQ Environment and Proxy Requirements
Assume the target ADMQ cluster has three service nodes: 172.253.168.90, 172.253.168.91, 172.253.168.92, MQTT service port is 5682.
Assume ALB also opens port 5682 to provide ADMQ services externally.
# Modify ALB Configuration to Support TCP Proxy ADMQ
Edit ALB installation directory/conf/alb.conf file, add the following configuration in the outermost layer above the http configuration:
stream {
    upstream mq_server {
        server 172.253.168.90:5682 max_fails=3 fail_timeout=10s;
        server 172.253.168.91:5682 max_fails=3 fail_timeout=10s;
        server 172.253.168.92:5682 max_fails=3 fail_timeout=10s;
    }
    server {
        listen 5682 so_keepalive=on;   # ALB listens on port 5682
        proxy_connect_timeout 15s;    # Connection timeout
        proxy_timeout 300s;
        proxy_pass mq_server;          # ALB reverse proxy to three mq nodes
    }
}


# The following is http configuration content, no need to modify
http {
    .... # Omitted
}
2
3
4
5
6
7
8
9
10
11
12
13
14
15
16
17
18
19
20
# Verify ALB Proxy ADMQ Service
- Check if ALB listening port 5682 exists.
- If the corresponding port exists, use MQ client to verify through ALB's IP and port 5682.
# Streaming Response Proxy
ALB supports streaming response proxy, meaning ALB does not cache responses but directly forwards them to clients. This is commonly used in various AI/ChatGPT and chatbot scenarios. Below is a configuration example:
location /streaming {
    proxy_pass http://backend_server;

    proxy_cache off; # Disable cache
    proxy_buffering off; # Disable proxy buffering
    chunked_transfer_encoding on; # Enable chunked transfer encoding
    tcp_nopush off; # Disable TCP NOPUSH option, allow fast sending of small packets to reduce latency
    tcp_nodelay on; # Enable TCP NODELAY option, disable delayed ACK algorithm
    keepalive_timeout 300; # Set keep-alive timeout to 300 seconds
}
2
3
4
5
6
7
8
9
10
# Configuration Details
proxy_cache off
Disable cache function, prevent proxy server from caching streaming response content, ensure clients can receive real-time, complete responses.
proxy_buffering off
Disable proxy server response buffering, prevent it from buffering the entire response before sending to client, thus achieving true streaming transmission effect.
chunked_transfer_encoding on
Enable chunked transfer encoding, allowing responses to be transmitted in multiple chunks. This is key to implementing streaming transmission.
tcp_nopush off
Disable TCP NOPUSH option, allow fast sending of small packets.
tcp_nodelay on
Enable TCP NODELAY option, disable delayed ACK algorithm. This helps reduce ACK packet delay, ensure data is sent timely.
keepalive_timeout 300
Increase keepalive timeout, prevent connection between proxy and source server from being closed before streaming response completes. Here set to 300 seconds, can be adjusted according to actual needs.
# Log Configuration
ALB supports two types of logs: access logs and error logs. Below is a detailed introduction to the configuration methods for these two types of logs.
# Access Logs
Access logs record information for each HTTP request, including request method, request URI, response status code, response size, client IP address, etc.
# Access Log Configuration
Access logs can be configured through the access_log directive. This directive can appear in http, server or location blocks.
# Basic Configuration Example
http {
    log_format main '$remote_addr - $remote_user [$time_local] "$request" '
                    '$status $body_bytes_sent "$http_referer" '
                    '"$http_user_agent" "$http_x_forwarded_for"';

    server {
        listen 80;
        server_name example.com;

        access_log /var/log/alb/example.access.log main;
    }
}
2
3
4
5
6
7
8
9
10
11
12
- log_format: Define the format of log entries. The above example defines a format named main
- access_log: Specify the location of the log file and the format used. In this example, the log file is saved at /var/log/alb/example.access.log and uses the main format.
# Log Format Details
- $remote_addr: Client IP address.
- $remote_user: Authenticated username.
- $time_local: Local timestamp.
- $request: Complete request line.
- $status: HTTP status code.
- $body_bytes_sent: Response body size sent to client.
- $http_referer: Request's Referer header.
- $http_user_agent: Client's User-Agent header.
- $http_x_forwarded_for: X-Forwarded-For header, commonly used in reverse proxy environments.
# Disable Access Logs
If you don't want to record access logs, you can set access_log to off:
access_log off;
# Error Logs
Error logs record error information encountered during ALB operation, which is very important for debugging and maintenance.
# Configure Error Logs
Error logs are configured through the error_log directive. This directive can appear in http, server or location blocks.
# Basic Configuration
http {
    error_log /var/log/alb/error.log warn;

    server {
        listen 80;
        server_name example.com;
    }
}
2
3
4
5
6
7
8
- error_log: Specify the location of the error log file and the minimum recording level. In this example, the error log is saved at /var/log/alb/error.log and only records warn level and above errors.
# Log Levels
Error log levels include:
- debug: Debug information.
- info: General information.
- notice: Important information.
- warn: Warning information.
- error: Error information.
- crit: Critical error information.
- alert: Alert information.
- emerg: Emergency information.
# Log Rotation
Since log files will continue to grow, regularly cleaning and splitting log files is very important. ALB provides a default log rotation tool that automatically generates log rotation scripts (Shell scripts or logrotate configurations) based on JSON configuration files, and automatically registers them to system crontab to achieve automated log rotation.
Supports the following logs:
- ✅ Single log file (like /var/log/app.log)
- ✅ Wildcard log paths (like /var/log/alb/*.log)
- ✅ Two log rotation modes: shell or logrotate
- ✅ Automatic compression, retention days control, process signal notification (USR1)
- ✅ Install/list/uninstall task full lifecycle management
- ✅ Secure crontab automatic registration and cleanup
# Tool Structure Description
Tool directory: ALB installation directory/utils/logrotate
.
├── logrotate-config.json        ← Configuration file (default name)
├── shell_scripts/               ← Generated Shell scripts directory
│   └── <task-name>.sh
├── logrotate_configs/           ← Generated logrotate configuration directory
│   └── <task-name>
├── installed_tasks.json         ← Installed tasks metadata (for list/remove)
2
3
4
5
6
7
| Field | Type | Required | Description |
|---|---|---|---|
| name | string | ✅ | Task name (used for filename and comments) |
| log_file | string | ✅ | Log path, supports wildcards (like *.log); if relative path, will automatically append to albBaseDir |
| mode | string | ✅ | "shell" or "logrotate" |
| retain_days | int | ❌ | Retention days, default 7 days |
| compress | bool | ❌ | Whether to compress old logs, default false |
| cron_schedule | string | ❌ | cron expression (like "0 2 * * *"), default "0 1 * * *" (daily at 1 AM) |
# Example Configuration
[
  {
    "name": "alb-access",
    "log_file": "logs/access.log",
    "mode": "shell",
    "retain_days": 14,
    "compress": true,
    "cron_schedule": "0 2 * * *"
  },
  {
    "name": "alb-error",
    "log_file": "logs/error.log",
    "mode": "logrotate",
    "retain_days": 30,
    "compress": true
  },
  {
    "name": "all-app-logs",
    "log_file": "logs/app/*.log",
    "mode": "logrotate",
    "retain_days": 7,
    "compress": false
  }
]
2
3
4
5
6
7
8
9
10
11
12
13
14
15
16
17
18
19
20
21
22
23
24
✅ Relative path logs/access.log will be automatically converted to absolute path: /path/to/alb/logs/access.log ✅ Wildcard logs/app/*.log can be correctly handled in both logrotate and shell modes
# Usage
- Permission Requirements
- Need read/write permissions for the log directory
- Need to be able to execute
crontab -l / crontab -(usually regular user is sufficient) - If logs are written by root, it's recommended to run this tool with the same user identity
- If executable is guaranteed, switch to root user to run this tool
- Switch to utils/logrotate directory to execute
- Install Task (Generate script + Register crontab)
# Switch to utils/logrotate directory (required)
cd utils/logrotate
# Install log rotation task using default configuration file
./logrotate-gen -install
2
3
4
5
After execution:
- Generate Shell scripts to ./shell_scripts/
- Generate logrotate configurations to ./logrotate_configs/
- Automatically add tasks to current user's crontab
- Save installation record to installed_tasks.json
- Preview Generated Content (No file write)
# Preview all generated content
./logrotate-gen -dry-run

# Preview specified configuration, provided test.json configuration file is in current directory
./logrotate-gen -dry-run -config ./test.json
2
3
4
5
Example output
=== SHELL SCRIPT: ./shell_scripts/alb-access.sh ===
#!/bin/bash
set -euo pipefail
shopt -s nullglob
...

=== LOGROTATE CONFIG: ./logrotate_configs/alb-error ===
# Auto-generated for task: alb-error
/path/to/alb/logs/error.log {
    daily
    rotate 30
    compress
    ...
}
2
3
4
5
6
7
8
9
10
11
12
13
14
- List Installed Tasks
./logrotate-gen -list
Output example:
📅 Installed tasks (installed at: Mon Oct 27 10:00:00 CST 2025):
1. Name: alb-access
   Mode: shell
   Log File: /path/to/alb/logs/access.log
   Schedule: 0 2 * * *
   Retain Days: 14
   Compress: true

2. Name: alb-error
   Mode: logrotate
   Log File: /path/to/alb/logs/error.log
   Schedule: 0 1 * * * (default)
   Retain Days: 30
   Compress: true

📋 Current crontab entries for logrotate:
0 2 * * * /path/to/tool/shell_scripts/alb-access.sh # alb-access
0 1 * * * logrotate /path/to/tool/logrotate_configs/alb-error # alb-error
2
3
4
5
6
7
8
9
10
11
12
13
14
15
16
17
18
- Uninstall All Tasks
./logrotate-gen -remove-all
After execution:
- Remove all entries added by this tool from crontab
- Delete shell_scripts/ and logrotate_configs/ directories
- Delete installed_tasks.json
⚠️ This operation is irreversible, please use with caution!
# Traffic Control
ALB provides multiple ways to implement traffic control, including rate limiting, speed limiting, and connection limiting.
# Use limit_req Module for Rate Limiting
The limit_req module allows you to limit client requests based on request frequency.
- Directive name:
limit_req_zone
- Syntax: limit_req_zone key zone=name:size rate= number r/s
- Default: no
- Area: http
- Usage example: limit_req_zone $binary_remote_addr zone=addr:10m rate=1r/s
- Description: Define a rate limiting zone, where $binary_remote_addr is the requesting client's IP address, zone=addr:10m indicates the memory size for this zone is 10MB, rate=1r/s indicates limiting each IP address to only one request per second.
- Directive name:
limit_req
- Syntax: limit_req zone=name [burst=number] [nodelay]
- Default: no
- Area: http, server, location
- Usage example: limit_req zone=mylimit burst=5 nodelay
- Description: Limit request rate in the specified zone, where burst=5 indicates the allowed burst request count is 5, nodelay indicates not delaying processing of requests exceeding burst.
# Example Configuration
Suppose you want to limit each IP address to only 1 request per second:
http {
    limit_req_zone $binary_remote_addr zone=mylimit:10m rate=1r/s;

    server {
        listen 80;
        server_name example.com;

        location / {
            limit_req zone=mylimit burst=5 nodelay;
            proxy_pass http://backend;
        }
    }
}
2
3
4
5
6
7
8
9
10
11
12
13
- limit_req_zone: Define a rate limiting zone, where $binary_remote_addr is the client IP address, mylimit is the zone name, 10m is the memory size (used to store rate limiting information), rate=1r/s indicates at most 1 request per second.
- limit_req: Apply rate limiting rules in the location block. zone=mylimit specifies using the previously defined rate limiting zone, burst=5 allows burst requests, meaning more than 1 request can be sent in a short time, but cannot exceed the burst value; nodelay indicates not allowing delayed requests.
# Use limit_conn Module for Connection Count Limiting
The limit_conn module can limit the number of connections per client.
- Directive name:
limit_conn_zone
- Syntax: limit_conn_zone key zone=name:size;
- Default: no
- Area: http
- Usage example: limit_conn_zone $binary_remote_addr zone=addr:10m;
- Description: Define a rate limiting zone, where key is the key used to identify the client (e.g., IP address), zone=name is the zone name, size is the memory size (used to store connection information).
- Directive name:
limit_conn
- Syntax: limit_conn zone number;
- Default: no
- Area: http, server, location
- Usage example: limit_conn addr 10;
- Description: Limit request rate in the specified zone, where zone is the previously defined zone name, number is the allowed maximum connection count.
# Example Configuration
Suppose you want to limit each IP address to a maximum of 10 concurrent connections:
http {
    limit_conn_zone $binary_remote_addr zone=myconn:10m;

    server {
        listen 80;
        server_name example.com;

        location / {
            limit_conn myconn 10;
            proxy_pass http://backend;
        }
    }
}
2
3
4
5
6
7
8
9
10
11
12
13
- limit_conn_zone: Define a connection count limiting zone, where $binary_remote_addr is the client IP address, myconn is the zone name, 10m is the memory size (used to store connection information).
- limit_conn: Apply connection count limiting rules in the location block. zone=myconn specifies using the previously defined connection count limiting zone, 10 indicates a maximum of 10 concurrent connections allowed.
# Use limit_rate Directive for Speed Limiting
The limit_rate directive can limit client download speed.
- Directive name:
limit_rate
- Syntax: limit_rate rate;
- Default: no limit
- Area: http, server, location
- Usage example: limit_rate 100k;
- Description: Set download speed limit for each connection, where rate is the speed (e.g., 100k indicates transmitting 100KB of data per second).
# Example Configuration
Suppose you want to limit each client's download speed to 100k/s:
server {
    listen 80;
    server_name example.com;

    location / {
        limit_rate 100k;
        proxy_pass http://backend;
    }
}
2
3
4
5
6
7
8
9
- limit_rate: Apply speed limiting rules in the location block. 100k indicates a maximum transmission of 100KB of data per second.
# Canary Release and Canary Testing
ALB supports canary release and canary testing functions, making it easy to test new versions and smoothly upgrade to production environments.
# Scenario Introduction
| Scenario | Requirement | Typical Example |
|---|---|---|
| New Feature Canary | Only let internal/whitelist users experience | New order interface only allows users with uid=1000~2000 to access |
| A/B Testing | Compare two backend sets by traffic ratio | 50% users go to v1 service, 50% go to v2 service |
| Region/Channel Canary | Route by request characteristics | Guangdong users go to new datacenter, others go to old datacenter |
| Canary Release | First release 5% traffic, error rate >1% auto rollback | Monitor 5xx ratio, exceed threshold one-click switch back |
| UI/UX Redesign Testing | A/B groups see different interfaces, evaluate click rate etc. | |
| Failure Rollback Drill | Quick switch back to old version, ensure system availability |
# ALB Key Directive Quick Reference
ALB itself does not directly provide "canary" functionality, but can be implemented by combining the following modules and directives:
mapdirective: Generate variables based on request characteristics (like Cookie, Header, IP)split_clientsdirective: Split traffic by ratio based on hash valueupstream + server: Define multiple backend service groups
| Directive/Variable | Function | Example |
|---|---|---|
split_clients | Consistent hash split by variable | split_clients "${remote_addr}AAA" $group { 5% canary; 95% stable; } |
map | Read header, cookie, arg for conditional mapping | map $cookie_ab_version $backend { default v1; canary v2; } |
set $var / rewrite | Modify variables at runtime | set $backend ''; rewrite ^/api/(.*) /$1 break; |
proxy_pass | Forward traffic to corresponding upstream | proxy_pass http://$backend; |
access_log | Log for easy rollback | access_log /var/log/alb/canary.log main if=$log_canary; |
# Key Directive Details
# 1. split_clients —— Split by Ratio (Recommended)
split_clients ${variable} $backend {
    10%     backend_v2;
    *       backend_v1;
}
2
3
4
${variable}: Variable used for hashing, like $request_id, $remote_addr, $http_user_agent$backend: Output variable, used for proxy_pass10%: Traffic ratio, supports decimals (like 0.5%)*: Fallback, matches remaining traffic
✅ Pros: Simple, efficient, stateless
❌ Cons: Cannot precisely control based on user identity (unless variable is user ID)
# 2. map —— Route Based on Rules
map $http_x_version_flag $target_backend {
    default          backend_v1;
    "v2"             backend_v2;
    ~*beta           backend_v2;
}
2
3
4
5
- Route to v2 based on request header
X-Version-Flag: v2 - Supports regex matching (
~*means case-insensitive)
✅ Pros: Flexible, can combine with Cookie, Header, IP, etc.
❌ Cons: Requires client cooperation to pass identifier
- upstream —— Define Backend Service Groups
upstream backend_v1 {
    server 192.168.1.10:8080;
}

upstream backend_v2 {
    server 192.168.1.11:8081;
}
2
3
4
5
6
7
Each upstream can contain multiple servers, supports load balancing Can work with weight, backup and other parameters
# Configuration Example: Canary Release by IP Address and Ratio
Hash calculation based on client IP ($remote_addr), and assign approximately 5% of IPs to the canary group.
http {
    # 1. Define upstreams
    upstream stable { server 10.0.0.1:8080; }
    upstream canary { server 10.0.0.2:8080; }

    # 2. 5% canary by IP
    split_clients "${remote_addr}AAA" $is_canary {
        5%      1;      # Variable value 1 means go to canary
        *       0;
    }

    # 3. Select backend
    map $is_canary $backend {
        1       canary;
        0       stable;
    }

    server {
        listen 80;
        server_name api.example.com;

        location / {
            proxy_set_header Host $host;
            proxy_pass http://$backend;
            # Log for easy rollback
            access_log /var/log/alb/canary.log combined if=$is_canary;
        }
    }
}
2
3
4
5
6
7
8
9
10
11
12
13
14
15
16
17
18
19
20
21
22
23
24
25
26
27
28
29
# Cookie-based Canary
When users visit with Cookie: gray=true, they enter the canary environment.
# If Cookie has gray=true, go to new version
map $http_cookie $backend {
    default          old_app;
    ~*gray=true      new_app;
}

upstream old_app { server 10.0.0.10:8000; }
upstream new_app { server 10.0.0.11:8001; }

server {
    listen 80;
    location / {
        proxy_pass http://$backend;
    }
}
2
3
4
5
6
7
8
9
10
11
12
13
14
15
# IP Whitelist Forced Canary (Internal Testing Solution)
upstream old_app { server 10.0.0.10:8000; }
upstream new_app { server 10.0.0.11:8001; }

map $remote_addr $backend {
    default          old_app;
    192.168.1.100    new_app;  # Internal testing IP
    10.10.0.0/16     new_app;  # Entire internal network segment
}
2
3
4
5
6
7
8
9
# Dynamic Control of Canary Ratio or Database User Tag-based Routing
- Read user ID from request parameters (like ?user_id=123) or request headers (like X-User-ID: 123);
- Call Lua script to determine if the user belongs to canary users (e.g., users with even user IDs go to new version);
- Based on the determination result, proxy the request to old_app or new_app backend service;
- Support logging canary routing results for monitoring and troubleshooting.
http {

  log_format gray_log '$remote_addr - [$time_local] '
                      '"$request" $status $body_bytes_sent '
                      '"$http_referer" "$http_user_agent" '
                      'user_id=$user_id backend=$backend_used';


  upstream old_app { server 10.0.0.10:8000; }
  upstream new_app { server 10.0.0.11:8001; }

  server {
    listen 80;
    server_name localhost;

    # Custom variables for passing user ID and backend selection
    set $user_id "";
    set $backend_used "";

    location / {
      # 1. Get user_id from query string or header
      set_by_lua_block $user_id {
          local user_id = ngx.var.arg_user_id
          if not user_id or user_id == "" then
            user_id = ngx.var.http_x_user_id
          end
          return user_id or ""
      }
      # 2. Determine if canary user (user_id is even), no user ID defaults to old version
      set_by_lua_block $target_backend {
          local user_id = ngx.var.user_id
          if user_id == "" then
            return "old_app"
          end

          local num = tonumber(user_id)
          if num and num % 2 == 0 then
            ngx.var.backend_used = "new_app"

            return "new_app"
          else
            ngx.var.backend_used = "old_app"

            return "old_app"
          end
      }
      # 3. Proxy to corresponding backend
      proxy_pass http://$target_backend;
      proxy_set_header Host $host;
      proxy_set_header X-Real-IP $remote_addr;
      proxy_set_header X-Forwarded-For $proxy_add_x_forwarded_for;
    }

    # Access log includes canary information
    access_log logs/access.log gray_log;
  }
}
2
3
4
5
6
7
8
9
10
11
12
13
14
15
16
17
18
19
20
21
22
23
24
25
26
27
28
29
30
31
32
33
34
35
36
37
38
39
40
41
42
43
44
45
46
47
48
49
50
51
52
53
54
55
56
57
58
# Dynamic DNS Resolution
ALB supports dynamic DNS resolution, enabling real-time resolution of domain names. The core of this feature is accomplished through the resolver directive combined with variables, as shown in the following example:
http {
    server {
        listen 80;
        # Declare DNS server address and validity period of resolution results
        resolver 8.8.8.8 valid=10s;
        # Define variable for dynamic DNS resolution
        set  $test private.server1.com.cn;
        location / {
            # Use variable to implement dynamic DNS resolution
            proxy_pass http://$test;
        }
    }
}
2
3
4
5
6
7
8
9
10
11
12
13
In the above configuration, when accessing the server's root path /, the request will be forwarded to the backend address http://private.server1.com.cn defined by the $test variable. Since the variable $test is used, ALB will re-resolve the domain name through the DNS server specified by resolver (like 8.8.8.8) on each request (or after cache expires).
The validity period of the resolution result is specified by valid=10s, meaning cache for 10 seconds. After exceeding the validity period, the next access will trigger a new DNS query.
Important Note: If proxy_pass is followed directly by a domain name (not a variable), for example proxy_pass http://private.server1.com.cn;, then ALB only resolves the domain name once during startup or configuration reload, unable to achieve dynamic updates, thus cannot achieve dynamic DNS resolution effect.
# resolver Configuration Details
Dynamic domain resolution relies on the combination of resolver directive and variables. resolver can be configured separately in http, server, or location blocks, with different scopes accordingly.
http {
    server {
            listen 80;
            set   $test  private.server1.com.cn;
            location / {
                    resolver 8.8.8.8 valid=10s;
                    proxy_pass http://$test;
            }
            location /duplicate/ {
                resolver 114.114.114.114 valid=10s;
                proxy_pass http://$test;
            }
    }
}
2
3
4
5
6
7
8
9
10
11
12
13
14
In this configuration, when accessing / and /duplicate/ paths, although the proxied target domain is the same (both private.server1.com.cn), they use different DNS servers for resolution:
/uses8.8.8.8/duplicate/uses114.114.114.114
And, the DNS resolution results for these two paths are independent and do not share cache.
Parameter description:
valid=10s: Specify cache validity period for DNS resolution results;ipv6=on|off: Control whether to accept IPv6 addresses. Default is on, meaning when a domain resolves to both IPv4 and IPv6 addresses, both will be used. Can disable IPv6 resolution by setting ipv6=off.
# HTTPS and Chinese National Cryptography
ALB implements secure HTTP communication by setting SSL certificates and private keys.
# Prerequisites
- Obtain SSL certificate and private key, supports Chinese National Cryptography SSL certificates.
- Server encryption certificate file
- Server encryption certificate private key file
- Server signature certificate (Required for Chinese National Cryptography)
- Server signature certificate private key file (Required for Chinese National Cryptography)
# Edit ALB Configuration File to Enable SSL
- Configuration instructions:
conf/alb.conffile's server block content. - Core configuration:
listen,server_name,ssl_certificate,ssl_certificate_key - Example configuration:
server {
    listen 443 ssl;   # Use SSL flag to enable https on current port
    server_name your_domain.com;   # Domain corresponding to SSL certificate

    ssl_certificate /path/to/your_domain_name.enc.crt.pem;      # Server encryption certificate file
    ssl_certificate_key /path/to/your_domain_name.enc.key.pem;  # Server encryption certificate private key file

    ssl_protocols TLSv1.2 TLSv1.3; # Use more secure protocol versions
    ssl_prefer_server_ciphers on;  # Prefer server-defined cipher suites
    ssl_ciphers HIGH:!aNULL:!MD5;  # Use more secure encryption algorithms

    location / {
        root /var/www/html;
        index index.html index.htm;
    }
}
2
3
4
5
6
7
8
9
10
11
12
13
14
15
16
- listen: Specify the listening port, here set to 443, indicating HTTPS protocol is used.
- server_name: Specify the server name, here set to your_domain.com, indicating the domain this server corresponds to.
- ssl_certificate: Specify the SSL certificate path, here set to /path/to/your_domain_name.crt, indicating the certificate file.
- ssl_certificate_key: Specify the SSL private key path, here set to /path/to/your_domain_name.key, indicating the private key file.
- ssl_protocols: Specify supported SSL protocol versions, here set to TLSv1.2 and TLSv1.3, indicating using more secure protocol versions.
- ssl_prefer_server_ciphers: Specify using stronger ciphers, indicating using more secure encryption algorithms.
- ssl_ciphers: Specify supported encryption algorithms, here set to HIGH:!aNULL:!MD5, indicating using more secure encryption algorithms.
# Configuration Instruction Description
# listen
- Description: Specify the port and protocol the server listens on.
- Example: listen 443 ssl;
# ssl_certificate and ssl_certificate_key
- Description: Specify the SSL certificate path and private key path.
- Example: ssl_certificate /path/to/your_domain_name.crt;
# ssl_protocols
- Description: Specify supported SSL protocol versions.
- Example: ssl_protocols TLSv1.2 TLSv1.3; (Recommended to use TLS1.2 and TLS1.3)
# ssl_ciphers
- Description: Specify stronger ciphers and supported encryption algorithms.
- Example: ssl_ciphers HIGH:!aNULL:!MD5; (Recommended to use stronger ciphers)
# ssl_prefer_server_ciphers
- Description: Prefer server-defined cipher suites.
- Example: ssl_prefer_server_ciphers on;
# ssl_session_cache
- Description: Enable SSL session caching to reduce SSL connection handshake count.
- Example: ssl_session_cache shared:SSL:10m;
# ssl_session_timeout
- Description: Set SSL session cache expiration time.
- Example: ssl_session_timeout 10m;
# Chinese National Cryptography Configuration Example
Note: Chinese National Cryptography certificate and key file naming must contain signature certificate (sig) and server certificate (enc), otherwise they cannot be recognized. Also, sig certificate must be configured first, as shown in the configuration below:
server {
    listen 443 ssl;   # Use SSL flag to enable https on current port
    server_name your_domain.com;   # Domain corresponding to SSL certificate

    # Chinese National Cryptography server signature certificate and key, usually name contains sig (sig certificate must be configured first)
    ssl_certificate /path/to/your_domain_name.sig.crt.pem;      # Server signature certificate file
    ssl_certificate_key /path/to/your_domain_name.sig.key.pem;  # Server encryption certificate private key file

    # Chinese National Cryptography server certificate and key, usually name contains enc (enc certificate goes after sig certificate)
    ssl_certificate /path/to/your_domain_name.enc.crt.pem;      # Server encryption certificate file
    ssl_certificate_key /path/to/your_domain_name.enc.key.pem;  # Server encryption certificate private key file

    ssl_protocols TLSv1.2 TLSv1.3; # Use more secure protocol versions
    ssl_prefer_server_ciphers on;  # Prefer server-defined cipher suites
    ssl_ciphers HIGH:!aNULL:!MD5;  # Use more secure encryption algorithms

    location / {
        root /var/www/html;
        index index.html index.htm;
    }
}
2
3
4
5
6
7
8
9
10
11
12
13
14
15
16
17
18
19
20
21
Access using Chinese National Cryptography browser, the address bar shows 国密.
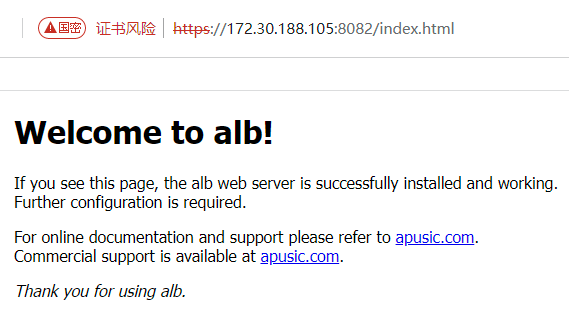
# HTTP3
ALB V2.0.5 and above versions support HTTP3 protocol. When using HTTP3 protocol, please ensure the client (browser) supports HTTP3 protocol.
To ensure compatibility with existing protocols, refer to the following HTTP3 configuration:
server {
    listen 443 ssl;   # Use SSL flag to enable https on current port
    listen 443 quic reuseport;   # Use quic flag to enable http3 on current port

    server_name your_domain.com;   # Domain corresponding to SSL certificate

    ssl_certificate /path/to/your_domain_name.crt;      # Certificate file
    ssl_certificate_key /path/to/your_domain_name.key;  # Private key file

    ssl_protocols TLSv1.3; # Use more secure protocol version, HTTP3 requires TLSv1.3
    ssl_prefer_server_ciphers on;  # Prefer server-defined cipher suites
    ssl_ciphers HIGH:!aNULL:!MD5;  # Use more secure encryption algorithms

    # Tell browser: same port supports HTTP/3, if not port 443, request modification matching listening port.
    add_header Alt-Svc 'h3=":443"; ma=86400';

    location / {
        root /var/www/html;
        index index.html index.htm;
    }
}
2
3
4
5
6
7
8
9
10
11
12
13
14
15
16
17
18
19
20
21
Test using curl tool that supports http3:
 root@root:~$ /snap/bin/curl --http3-only -I  https://localhost:443/index.html -v -k
* Host localhost:443 was resolved.
* IPv6: ::1
* IPv4: 127.0.0.1
*   Trying [::1]:443...
* error:8000006F:system library::Connection refused
* QUIC connect to ::1 port 443 failed: Could not connect to server
*   Trying 127.0.0.1:443...
* Server certificate:
*  subject: CN=localhost
*  start date: Aug 25 10:23:08 2025 GMT
*  expire date: Aug 25 10:23:08 2026 GMT
*  issuer: CN=localhost
*  SSL certificate verify result: self-signed certificate (18), continuing anyway.
*   Certificate level 0: Public key type RSA (2048/112 Bits/secBits), signed using sha256WithRSAEncryption
* Connected to localhost (127.0.0.1) port 443
* using HTTP/3
* [HTTP/3] [0] OPENED stream for https://localhost:443/index.html
* [HTTP/3] [0] [:method: HEAD]
* [HTTP/3] [0] [:scheme: https]
* [HTTP/3] [0] [:authority: localhost:443]
* [HTTP/3] [0] [:path: /index.html]
* [HTTP/3] [0] [user-agent: curl/8.15.0]
* [HTTP/3] [0] [accept: */*]
> HEAD /index.html HTTP/3
> Host: localhost:443
> User-Agent: curl/8.15.0
> Accept: */*
>
* Request completely sent off
< HTTP/3 200
HTTP/3 200
< server: alb/2.0.5
server: alb/2.0.5
< date: Tue, 26 Aug 2025 08:37:04 GMT
date: Tue, 26 Aug 2025 08:37:04 GMT
< content-type: text/html
content-type: text/html
< content-length: 617
content-length: 617
< last-modified: Fri, 22 Aug 2025 08:05:21 GMT
last-modified: Fri, 22 Aug 2025 08:05:21 GMT
< etag: "68a824c1-269"
etag: "68a824c1-269"
< alt-svc: h3=":443"; ma=86400
alt-svc: h3=":443"; ma=86400
< accept-ranges: bytes
accept-ranges: bytes
<

* Connection #0 to host localhost left intact
2
3
4
5
6
7
8
9
10
11
12
13
14
15
16
17
18
19
20
21
22
23
24
25
26
27
28
29
30
31
32
33
34
35
36
37
38
39
40
41
42
43
44
45
46
47
48
49
50
51
# Forward Proxy
ALB can be used as a forward proxy server, it can help clients access other servers or services while hiding the client's real IP address. The main purposes of forward proxy include caching, load balancing, security filtering, etc.
# Example Configuration
Below is a simple ALB configuration example supporting http and https forward proxy, used to forward requests to another server:
server {
    listen                           8080;
    server_name                      localhost;
    resolver                         114.114.114.114 ipv6=off;
    proxy_connect;
    proxy_connect_allow              443 80;
    proxy_connect_connect_timeout    10s;
    proxy_connect_read_timeout       10s;
    proxy_coneect_send_timeout       10s;
    location / {
        proxy_pass $scheme://$http_host$request_uri;
    }
}
2
3
4
5
6
7
8
9
10
11
12
13
- resolver: Set DNS resolution server, here using 114.114.114.114.
- proxy_connect: Enable proxy connection function.
- proxy_connect_allow: Allowed port numbers, here 443 and 80.
- proxy_connect_connect_timeout: Connection timeout, here 10 seconds.
- proxy_connect_read_timeout: Read timeout, here 10 seconds.
- proxy_coneect_send_timeout: Send timeout, here 10 seconds.
In the location block, use $scheme, $http_host and $request_uri variables to construct the target server address.
- location /: Configure the path to handle all requests, forwarding requests to the target server.
- $scheme: Indicates the protocol used for the request (http or https).
- $http_host: Indicates the hostname and port number of the request.
- $request_uri: Indicates the request URI.
# High Availability Cluster Setup
ALB supports two high availability methods: native high availability and keepalived. Set up a high availability cluster, when a cluster node fails, traffic automatically switches to the backup node.
In ALB console, one-click configure and start high availability. Below introduces the installation and configuration methods on the command line.
# Prerequisites
- Two servers, one as Master node, one as Backup node.
- Deploy ALB service on both servers. (Installation process omitted)
- In the LAN of both servers, prepare an unused IP address as virtual IP (VIP).
- Ensure normal network communication between the two servers.
- Ensure firewalls on both servers allow keepalived and ALB service communication.
- Install and configure keepalived.
- Verify VIP drift.
Below is an example with two servers (172.18.100.218 and 172.18.100.237), selecting VIP as 172.18.100.250.
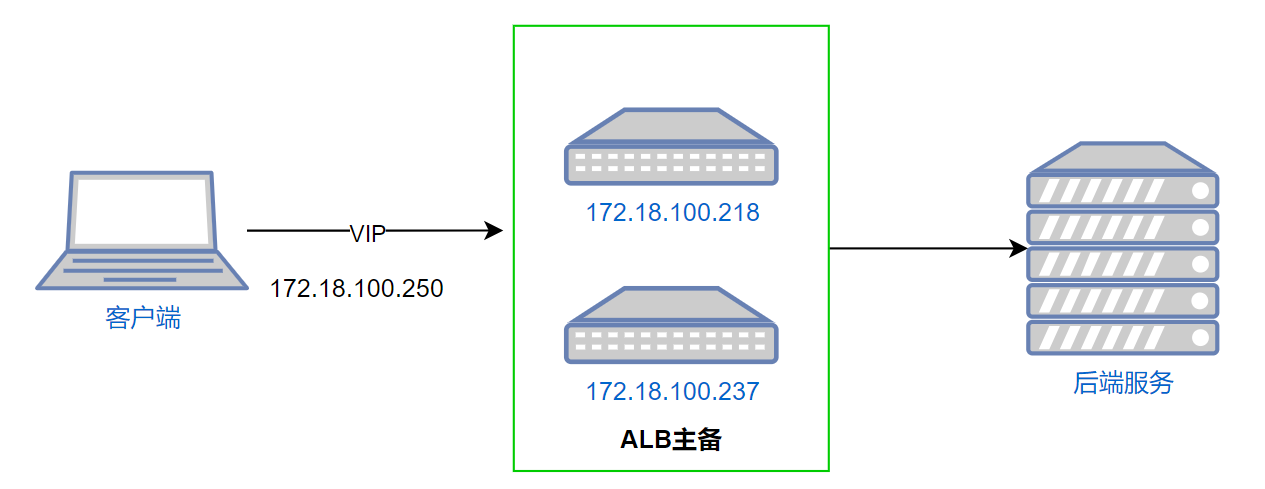 As shown above, by setting up two ALBs and configuring VIP, clients access ALB through VIP. When the ALB node pointed to by VIP goes down, VIP automatically switches to the backup node.
# Native High Availability
ALB comes with high availability components, can one-click deploy and start ALB. In ALB console high availability configuration, native high availability components are used by default.
# View Physical Network Interface Name
- Execute the following command on both master and backup nodes to view the physical network interface name of the current machine's IP:
ip addr show
- Record the physical network interface name, for example: eth0.
# Configure aha
Master node
- Role configuration: master
- Modify VIP address
- Modify network interface name
Backup node
- Role configuration: backup
- Modify VIP address
- Modify network interface name
# Master Node
- Switch to utils/aha directory, edit config.yaml file, as shown in the example below:
keepalived:
  # Virtual router ID
  vroute_id: 239

  # Virtual IP binding network interface name
  interface: eth0

  # Virtual IP address
  vip: 172.18.100.250

  # Protocol type, options are ipv4 and ipv6
  protocol: ipv4

  # Whether preemptive mode
  #If preemptive mode is enabled (Preempt Mode), when a higher priority router joins the VRRP group, it can replace the current active router to become the new active router.
  #If preemptive mode is not enabled, even if a higher priority router joins, the current active router will not be replaced
  preempt: true

  # Message sending interval (milliseconds)
  msg-send-interval: 800

  # Priority, 0-255
  priority: 100

  # Role, options are master and backup
  role: master

checker:

  # Service status check time interval (milliseconds)
  check-interval: 1000

  # Retry count
  retry-count: 3

  # Retry interval (milliseconds)
  retry-interval: 2000

  # Health check method, can be url or shell, url is http or https, shell is shell command
  health-type: url

  # Current target service status check url, used to check if target service is healthy
  health-url: http://localhost:8080/node_status

  # Custom health check returned url status codes
  health-codes:
    - 200
    - 404

  # Shell health check command, shell command execution returns 0 means healthy, other values mean abnormal
  health-cmd:

  # Whether to attempt to restart target service when node fails (default is false)
  restart-on-failure: false
  # Restart target service command
  restart-cmd:

aha:
  # Log file path
  log-file: aha.log

  # Log level, options are debug, info, warn, error
  log-level: info
2
3
4
5
6
7
8
9
10
11
12
13
14
15
16
17
18
19
20
21
22
23
24
25
26
27
28
29
30
31
32
33
34
35
36
37
38
39
40
41
42
43
44
45
46
47
48
49
50
51
52
53
54
55
56
57
58
59
60
61
62
63
# Backup Node
keepalived:
  # Virtual router ID
  vroute_id: 239

  # Virtual IP binding network interface name
  interface: eth0

  # Virtual IP address
  vip: 172.18.100.250

  # Protocol type, options are ipv4 and ipv6
  protocol: ipv4

  # Whether preemptive mode
  #If preemptive mode is enabled (Preempt Mode), when a higher priority router joins the VRRP group, it can replace the current active router to become the new active router.
  #If preemptive mode is not enabled, even if a higher priority router joins, the current active router will not be replaced
  preempt: true

  # Message sending interval (milliseconds)
  msg-send-interval: 800

  # Priority, 0-255
  priority: 100

  # Role, options are master and backup
  role: backup

checker:

  # Service status check time interval (milliseconds)
  check-interval: 1000

  # Retry count
  retry-count: 3

  # Retry interval (milliseconds)
  retry-interval: 2000

  # Health check method, can be url or shell, url is http or https, shell is shell command
  health-type: url

  # Current target service status check url, used to check if target service is healthy
  health-url: http://localhost:8080/node_status

  # Custom health check returned url status codes
  health-codes:
    - 200
    - 404

  # Shell health check command, shell command execution returns 0 means healthy, other values mean abnormal
  health-cmd:

  # Whether to attempt to restart target service when node fails (default is false)
  restart-on-failure: false
  # Restart target service command
  restart-cmd:

aha:
  # Log file path
  log-file: aha.log

  # Log level, options are debug, info, warn, error
  log-level: info
2
3
4
5
6
7
8
9
10
11
12
13
14
15
16
17
18
19
20
21
22
23
24
25
26
27
28
29
30
31
32
33
34
35
36
37
38
39
40
41
42
43
44
45
46
47
48
49
50
51
52
53
54
55
56
57
58
59
60
61
62
63
# Register System Service and Start System Service
Both master and backup nodes need to execute the following operations:
- Switch to sys-service directory
- Switch to root user, or use sudo to execute the following command
- Execute:
./setup-aha-service.shto automatically register system service - Start:
systemctl start aha.service
# Verify VIP Automatic Drift Test Steps
- Use VIP 172.18.100.250 to access ALB normally.
- Stop ALB on the master node, continue using VIP to access ALB, verify if it works normally.
# Other Configuration Notes:
- Custom health check URL: Modify health-url: http://localhost:8080/node_status in the configuration file
- Custom URL health HTTP status codes: Modify health-codes: 200, 404 in configuration
- Configure aha.log log file path: Modify log-file: aha.log in configuration file
- Implement health check through custom shell command or script, requiring return 0 means healthy, other values mark as unhealthy in ALB, as shown in the example:
# Use shell command for health check
health-type: shell
# Use shell command to check if alb process exists then healthy
health-cmd: ps aux | grep alb | grep -v grep
2
3
4
# Use keepalived to Implement High Availability
# Install keepalived
# kylin, opensuler, centos operating systems
yum install -y keepalived

# uos, ubuntu operating systems
apt-get install -y keepalived
2
3
4
5
# View Physical Network Interface Name
- Execute the following command on both master and backup nodes to view the physical network interface name:
ip addr show
- Record the physical network interface name, for example: eth0.
# Configure keepalived
- Edit the master node (Master) keepalived.conf file:
vi /etc/keepalived/keepalived.conf
Add the following content to the master node's /keepalived.conf file:
Note:
- Replace
interface eth0with the master node's physical network interface name. - Replace
172.18.100.250with the prepared virtual IP address.
! Configuration File for keepalived

global_defs {
   router_id alb
}

vrrp_script chk_http_port {
   script "/etc/keepalived/checkalb.sh"
   interval 2 #(Detection script execution interval)
   weight 2
}

vrrp_instance VI_1 {
    state MASTER
    interface eth0
    virtual_router_id 51
    # Master and backup must have the same virtual_router_id
    priority 100
    # Master and backup have different priorities, master has higher value, backup has lower value
    advert_int 1
    authentication {
        auth_type PASS
        auth_pass 1111
    }
    virtual_ipaddress {
        # Please modify this virtual IP address as needed
        172.18.100.250
    }
    track_script {
        chk_http_port
    }
}
2
3
4
5
6
7
8
9
10
11
12
13
14
15
16
17
18
19
20
21
22
23
24
25
26
27
28
29
30
31
32
- Edit the backup node (Backup) keepalived.conf file:
vi /etc/keepalived/keepalived.conf
Add the following content to the backup node's keepalibed.conf file:
Note:
- Replace
interface eth0with the backup node's physical network interface name. - Replace
172.18.100.250with the prepared virtual IP address.
! Configuration File for keepalived
global_defs {
    router_id alb
}
vrrp_script chk_http_port {
    script "/etc/keepalived/checkalb.sh"
    interval 2 #(Detection script execution interval)
    weight 2
}
vrrp_instance VI_1 {
    state BACKUP
    # state MASTER
    # Change MASTER to BACKUP on backup server
    interface eth0
    virtual_router_id 51
    # Master and backup must have the same virtual_router_id
    priority 90
    # Master and backup have different priorities, master has higher value, backup has lower value
    advert_int 1
    authentication {
        auth_type PASS
        auth_pass 1111
    }
    virtual_ipaddress {
        172.18.100.250 # Please modify this virtual IP address as needed
    }
    track_script {
        chk_http_port
    }
}
2
3
4
5
6
7
8
9
10
11
12
13
14
15
16
17
18
19
20
21
22
23
24
25
26
27
28
29
30
- Create detection script checkalb.sh on both nodes:
vi /etc/keepalived/checkalb.sh
Add the following content to checkalb.sh file:
#!/bin/bash
alb_count=$(ps -ef|grep "alb: main process" | grep -v grep |wc -l)
#1. Determine if ALB is alive, if not alive stop keepalived
if [ $alb_count -eq 0 ];then
    sleep 3
    #2. Wait 3 seconds then get alb status again
    alb_count=$(ps -ef|grep "alb: main process" | grep -v grep |wc -l)
    #3. Judge again, if alb still not alive then stop Keepalived to let address drift, and exit script
    if [ $alb_count -eq 0 ];then
        echo "alb is down"
        exit 1
    fi
fi
2
3
4
5
6
7
8
9
10
11
12
13
After creating the detection script, add execute permission to checkalb.sh:
chmod +x /etc/keepalived/checkalb.sh
# Start keepalived service on both master and backup nodes
systemctl start keepalived.service
# Verify VIP points to master node
On the master node, view the virtual IP address (change eth0 to master node's network interface name):
ip addr show eth0 |grep inet|grep -v inet6|awk '{print $2}'
# Stop master node alb, verify if VIP drifts to backup node
# Switch to alb installation directory
./bin/stop-alb.sh
2
On the backup node, view the virtual IP address (change eth0 to backup node's network interface name):
ip addr show eth0 |grep inet|grep -v inet6|awk '{print $2}'
If VIP points to the master node, it means keepalived configuration is successful.
# ALB Proxy Security Configuration
# General Security Configuration
# Hide ALB Version Information
http{
    more_clear_headers 'Server';  # Add this line in http block
}
2
3
# Restrict Request Methods
Only allow necessary HTTP methods (like GET, POST, HEAD, PUT):
http {
    server {
        if ($request_method !~ ^(GET|HEAD|POST|PUT)$) {
            return 405;
        }
    }
}
2
3
4
5
6
7
8
# Limit Client Request Size
Prevent DoS attacks (like large file uploads, extra long URLs):
http{
    client_max_body_size 1M;       # Limit request body
    client_header_buffer_size 1k;  # Request header buffer
    large_client_header_buffers 2 1k;
}
2
3
4
5
# Set Reasonable Timeout
Prevent slow attacks (Slowloris etc.)
http{
    client_body_timeout 10s;
    client_header_timeout 10s;
    keepalive_timeout 5s;
    send_timeout 10s;
}
2
3
4
5
6
# Enable HTTPS and Force Redirect
server {
    listen 80;
    server_name example.com;
    return 301 https://$host$request_uri;
}

server {
    listen 443 ssl http2;
    ssl_certificate /path/to/cert.pem;
    ssl_certificate_key /path/to/privkey.pem;

    ssl_protocols TLSv1.2 TLSv1.3;
    ssl_ciphers ECDHE+AESGCM:DHE+AESGCM:AES256+EECDH:AES256+EDH:!aNULL:!MD5:!DSS;
    ssl_prefer_server_ciphers off;
    ssl_session_cache shared:SSL:10m;
    ssl_session_timeout 10m;
}
2
3
4
5
6
7
8
9
10
11
12
13
14
15
16
17
# Reverse Proxy Security Configuration
# Clean/Rewrite Request Headers
Prevent header injection or information leakage:
http{
    server {
        proxy_set_header Host $host;
        proxy_set_header X-Real-IP $remote_addr;
        proxy_set_header X-Forwarded-For $proxy_add_x_forwarded_for;
        proxy_set_header X-Forwarded-Proto $scheme;

        # Clear headers client might forge
        proxy_set_header X-Original-URI "";
        proxy_set_header X-Internal-Secret "";
    }
}
2
3
4
5
6
7
8
9
10
11
12
13
# Limit Backend Response Headers
Avoid backend leaking sensitive information (like Server, X-Powered-By): Can hide through proxy_hide_header:
http {
    server {
        proxy_hide_header Server;
        proxy_hide_header X-Powered-By;
        proxy_hide_header X-AspNet-Version;
    }
}
2
3
4
5
6
7
# Limit Proxy Request Rate
Prevent CC attacks
http {
    server {
        limit_req_zone $binary_remote_addr zone=api:10m rate=10r/s;
        location /api/ {
            limit_req zone=api burst=20 nodelay;
            proxy_pass http://backend;
        }
    }
}
2
3
4
5
6
7
8
9
# Static Resource Service Specific Security Configuration
# Disable Directory Listing
Ensure autoindex on; is not configured, default is off.
# Restrict Accessible File Types
Set according to static resource type, only allow specific extensions (like .html, .css, .js, .png):
location ~ \.(php|pl|py|jsp|asp|sh|cgi)$ {
    return 403;
}
2
3
# Prevent Sensitive File Leakage
http{
    server {
        location ~ /\.(env|git|ht|svn|well-known/acme-challenge) {
            deny all;
        }
    }
}
2
3
4
5
6
7
8
# Set Secure Content Security Policy (CSP) and Other Security Headers
add_header X-Content-Type-Options "nosniff" always;
add_header X-Frame-Options "DENY" always;
add_header X-XSS-Protection "1; mode=block" always;
add_header Referrer-Policy "strict-origin-when-cross-origin" always;
add_header Permissions-Policy "geolocation=(), microphone=(), camera=()" always;

# CSP example (adjust according to actual)
add_header Content-Security-Policy "default-src 'self'; script-src 'self' 'unsafe-inline' https://trusted.cdn.com; style-src 'self' 'unsafe-inline'; img-src 'self' data:; font-src 'self'; object-src 'none'; base-uri 'self'; form-action 'self';" always;
2
3
4
5
6
7
8
# Product Common Issues
Note: Performance related errors refer to [Performance Optimization] manual.
# Console Enable Running Traffic Monitoring
After starting ALB Standard Edition and logging into the console, the following prompt appears:
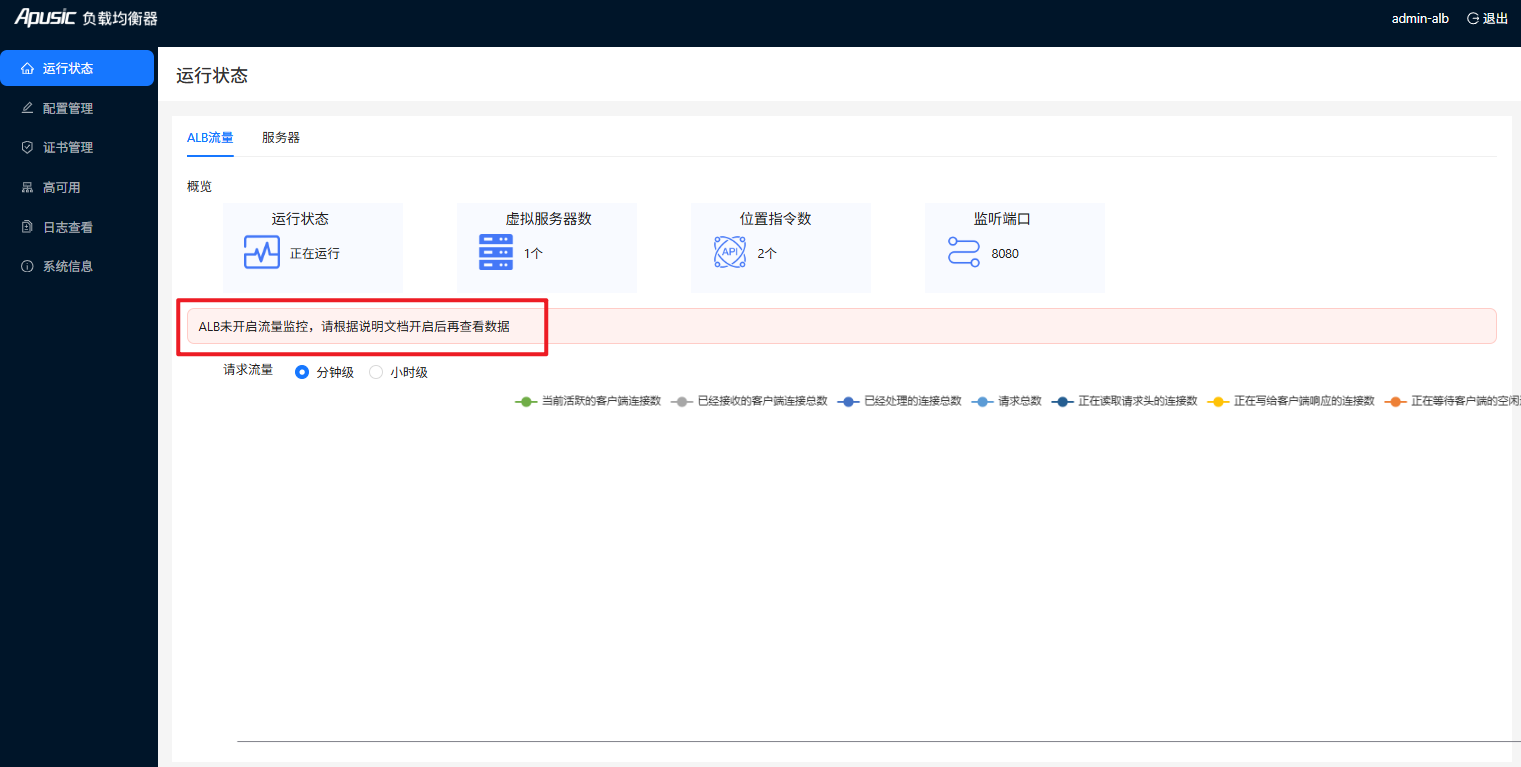
Then you need to manually modify conf/alb.conf file, add the following content in any server block
server {

  # Add the following content
  location /node_status {
      stub_status on;
      access_log off;
      allow 127.0.0.1;
  }
}
2
3
4
5
6
7
8
9
- Add the above location block in any server block.
- After adding the location block, save and exit.
- Reload alb:
./bin/reload_alb.sh. - Refresh the page.
# Startup Failure: getgrnam("nobody") failed
The following error appears during startup:

Fix method:
Modify the first line comment in conf/alb.conf file, change #user nobody; to user root;
user root;
# Docker Container Startup Failure
After startup fails, you can use docker logs <container_id> to view container logs.
- Get ALB container ID
docker ps -a
CONTAINER ID        IMAGE               COMMAND                  CREATED             STATUS
     PORTS               NAMES
c9fcace189a3        alb-agile:V2.0.5    "bash /opt/ALB-V2...."   17 seconds ago      Exited (1) 16 seconds ago                       alb-v202-se-docker-amd64-alb-1
2
3
4
As shown above, the ALB container ID is c9fcace189a3
- View container logs
Use docker logs <container_id> to view logs, as shown in the example:
#docker logs 48c60b6fced6
Starting ALB...
alb: [emerg] : open() "/opt/ALB-V2.0.5-SE/conf/alb.conf" failed (13: Permission denied)
Start ALB failed, please check logs/error.log
2
3
4
- docker startup Permission denied error
Error cause: The process inside the container does not have sufficient permissions to access files and directories in the mounted volumes.
Solution:
- Modify
alb-standard-dockercompose.yaml, mark mounted paths with:zflag
version: '3'
services:
  alb:
    image: alb-agile:V2.0.5
    ports:
      - 8080:8080
      - 8887:8887
    volumes:
      - ./alb/alb.conf:/opt/ALB-V2.0.5-SE/conf/alb.conf:z
      - ./alb/license.xml:/opt/ALB-V2.0.5-SE/license.xml:z
      - ./alb/logs:/opt/ALB-V2.0.5-SE/logs:z
    command: bash /opt/ALB-V2.0.5-SE/bin/start-alb-and-console.sh
2
3
4
5
6
7
8
9
10
11
12
As shown above, add :z flag at the end of each mounted path.
- Restart container
docker-compose -f alb-standard-dockercompose.yaml up -d
# When Starting ALB, It Stops After Displaying License Information
After executing ALB startup, the terminal displays license information and then stops, does not automatically exit the startup script, as shown below:
./bin/start-alb.sh
Starting ALB...
      ___                     _        Apusic Load Balancer
     /   |  ____  __  _______(_)____   Edition:Agile Edition
    / /| | / __ \/ / / / ___/ / ___/   License start: 2025-02-21
   / ___ |/ /_/ / /_/ (__  ) / /__     License end: 2025-06-31
  /_/  |_/ .___/\__,_/____/_/\___/     IP granted: 255.255.255.255
        /_/                            Licensee: 金蝶天燕研发测试

  version: V2.0.5
2
3
4
5
6
7
8
9
10
11
12
- Phenomenon: After executing the startup script, it does not exit script execution, and does not output
ALB are running now!etc. prompts - Cause analysis: ALB foreground started, not background started
- Solution: In conf/alb.conf configuration file, check if
daemon off;configuration exists, if so, delete it, then restart ALB.
# Access Page Shows 403 Error
After configuring ALB, the access page shows 403 error, as shown below:

- Phenomenon: Accessing any page (static resources) shows 403 error.
- Cause analysis: ALB startup user does not have read permission for corresponding static resources, causing 403 error.
- Solution: In the first line of conf/alb.conf configuration file, change
user nobody;touser root;or modify to a username that has access permission for corresponding static resources, finally restart ALB.
# AAS Login Failure
- Phenomenon: Using ALB to proxy multiple AAS services, after entering username and password and clicking login page, login failure occurs or redirects to login page.
- Cause analysis:
- Session inconsistency: Browser visits send different requests to different AAS nodes, while login session is only on one of the AAS servers.
- Request header or cookie loss: AAS server service depends on request headers or cookies to verify if client is logged in, if request header or cookie is lost, cannot verify if client is logged in.
- websocket connection failure: Some services establish websocket connection after login, if websocket connection fails, cannot verify if client is logged in.
- Solution:
- Session inconsistency: ALB uses ip_hash or sticky load balancing algorithm.
- Request header or cookie loss: Configure forwarding all request headers and cookies
location / {

  proxy_pass http://backend/;

  # The following is newly added configuration
  proxy_cookie_path / /;  # Ensure Cookie path is correct
  proxy_pass_header Set-Cookie;


  proxy_set_header Host $host;
  proxy_set_header X-Real-IP $remote_addr;
  proxy_set_header X-Forwarded-For $proxy_add_x_forwarded_for;
  proxy_set_header X-Forwarded-Proto $scheme;

}
1
2
3
4
5
6
7
8
9
10
11
12
13
14
15 - websocket connection failure: Write separate location configuration proxy for websocket connection address
location /websocket_url {
  proxy_pass http://backend/websocket_url;
       proxy_pass http://backend/efiles/;

    # WebSocket necessary configuration
    proxy_http_version 1.1;
    proxy_set_header Upgrade $http_upgrade;
    proxy_set_header Connection "upgrade";

    # Set websocket connection read timeout to 10 minutes, modify time according to business
    proxy_read_timeout 600s;
    # Set websocket connection write timeout to 10 minutes, modify time according to business
    keepalive_timeout 600s;

    proxy_cookie_path / /;  # Ensure Cookie path is correct
    proxy_pass_header Set-Cookie;

    proxy_set_header Host $host;
    proxy_set_header X-Real-IP $remote_addr;
    proxy_set_header X-Forwarded-For $proxy_add_x_forwarded_for;
    proxy_set_header X-Forwarded-Proto $scheme;
}
1
2
3
4
5
6
7
8
9
10
11
12
13
14
15
16
17
18
19
20
21
22
# After One Node of Backend Reverse Proxy Service Goes Down, Service Becomes Unaccessible, But Other Nodes Are Normal
- Phenomenon: ALB reverse proxies service nodes A, B, C, when A goes down or crashes, but B, C services are normal, accessing ALB at this time shows short-time unavailability.
- Cause analysis: ALB connection to already down A service causes timeout leading to entire service unavailable. In network, A service going down may cause ALB to wait too long connecting to A service, causing service unavailable during this period.
- Solution: Modify ALB connection timeout to upstream service, default is 60 seconds, modify to 10 seconds or less, meanwhile enable active health check to make ALB no longer forward requests to downed service, below is reference example
upstream backend {
  sticky; # Use session affinity load balancing algorithm or ip_hash
  server 192.168.1.1:8080 max_fails=3 fail_timeout=10s;
  server 192.168.1.2:8080 max_fails=3 fail_timeout=10s;
  server 192.168.1.3:8080 max_fails=3 fail_timeout=10s;

  # Configure active health check (refer to active health check chapter for specific configuration)
  check timeout=1000 fall=3 rise=2 type=http interval=3000;
  check_http_expect_alive http_2xx  http_3xx  http_4xx;
}

http {
  server {
    location / {
      proxy_pass http://backend/;
      # Core configuration, shorten service connection timeout (but errors may occur under high concurrency, set reasonably according to concurrency)
      proxy_connect_timeout 3s;
    }
  }
}
2
3
4
5
6
7
8
9
10
11
12
13
14
15
16
17
18
19
20
# Unified Authorization Center Authorization Startup Failure
- Phenomenon: Using unified authorization center authorization method startup fails, failure error message as follows:
alb: [emerg]: center auth: request to center fault, err: send auth auth info to authserver error
- Cause analysis: Authorization center update causes ALB request parsing failure
- Solution: Update to ALB version released in 2025.
# 502 Error: no live upstreams while connecting to upstream
- Phenomenon: Frontend access shows 502 error, and ALB error log shows large amount of
no live upstreams while connecting to upstream - Cause analysis: In ALB reverse proxy, if upstream node response time exceeds
proxy_connect_timeout,proxy_send_timeout,proxy_read_timeout, then the node will be marked as unavailable, and withmax_failsdefault value of 1 in upstream configuration, this causes ALB unable to access the node showing the above error. - Solution: Modify
proxy_connect_timeout,proxy_send_timeout,proxy_read_timeoutto longer time (over 60s), or setmax_failsto 3, indicating not to mark node as unavailable. - Configuration example:
upstream gateway_api {
    # Add max_fails and fail_timeout parameters
    server 127.0.0.1:9099 max_fails=3 fail_timeout=15s;
    server 127.0.0.2:9099 max_fails=3 fail_timeout=15s;
}

server {
  location /api/ {
    proxy_pass http://gateway_api/;

    # Increase timeout parameters
    proxy_connect_timeout 15s;
    proxy_send_timeout 60s;
    proxy_read_timeout 60s;
  }
}
2
3
4
5
6
7
8
9
10
11
12
13
14
15
16
# Console Access Failure: Invalid Host Request
- Phenomenon: Accessing console shows
Invalid Host Requesterror:{"code":7,"data":null,"msg":"非法Host请求"} - Cause analysis: This is caused by console security policy, only allowing access IP entry to be local IP address, if using proxy/docker environment this error will occur
- Solution: Modify console configuration
[ALB installation directory]/console/conf/config.yamland setdockeritem undersystemnode totrueAfter configuration, restart the console servicesystem: # System environment setting env: public # System port setting addr: 8887 # System route global prefix routerprefix: "/api/alb/console" # Use https https: false certfile: "./cert/cert.pem" keyfile: "./cert/key.key" # Whether to force first login password change, default force (force does not affect default account) change-pwd-at-first: true # Whether it is docker running mode docker: true # Modify this item to true1
2
3
4
5
6
7
8
9
10
11
12
13
14
15
← ALB 极简运维手册 用户手册→